
| Search our quarter-million Q&As |
Home of the finishing HOTLINE since 1989
-----Small scale aluminum anodizing
Q. I need help, I'm sorry, for setting up 250 gallon anodizing tank.
Where I worked we ran a 450 gallon tank at 15 to 20 volts and had a chiller to cool the tank.
I'm starting up my own business; I don't have a lot of money to start up so I would like to run a 200 to 250 gallon tank. What size rectifier will I need to be able to run at 18 volts and 400 amps in my anodizing tank? I would like to run an air cooled system because of the added cost of having to purchase a chiller I can't afford right now. In the future as my business grows and I gain more capital I'll be able to invest in bigger better equipment. The business I worked at had a 10000 w rectifier.
Shop employee - Stuart Florida
October 30, 2024
A. Hi Maria. I've visited your lovely town twice this year.
Rectifiers are usually specified by their voltage & amperage, rather than by the Watts they consume. 18 volts sounds good. You will probably anodize at about 12 ASF, so I doubt that you will need 400 Amps; 150 Amps sounds more reasonable. So I think you'll want a 150 Amp 18 Volt rectifier.
When you say "air cooled" I think you mean no cooling except for what little is provided by air agitation
⇦ huh?
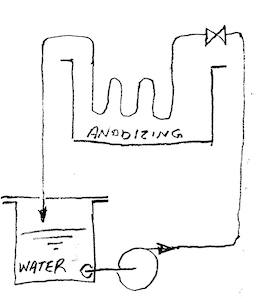
. Unfortunately, your anodizing tank will heat up quickly. I think the best you can do cheaply is to use a cooling coil in your anodizing tank and recirculate water from a chilled water tank through it, chilling the water with ice or dry ice when needed.
Luck & Regards,
Ted Mooney, P.E. RET
Striving to live Aloha
finishing.com - Pine Beach, New Jersey
Need quick confidential answers? $25
Need project assistance? $100/hr.
Multiple threads merged: please forgive chronology errors and repetition 🙂
Q. Anyone out there, I just found the web site today and read all I could of the letters that were sent in. I am afraid I fall into the same category of a lot of the others. I want to do my own aluminum anodizing. I have had a small business for 10 years that I operate from my home and build Underwater drilling systems, Gem stone cutting machines, Survey equipment and GPS equipment mostly for universities worldwide. Everything is aluminum. I run into a lot of problems with all anodizers in my area not wanting to help me.
My business runs in spurts and I do mainly rush jobs. Anodizers do not like to do small jobs and they put me behind in my work invariably by bumping me for a larger job. Then when I do change to another anodizer the colors are not always the same. I have started to look into a home study of anodizing with the related engineering societies listed in the web site. I want to make my life simple. IS IT POSSIBLE TO GET INTO ALUMINUM ANODIZING ON A SMALL SCALE AND DO IT RIGHT? If so where should I start ?
- Georgetown Texas
2000
A. Eddie, You did not say just how big the parts are that you need to plate or if by color you mean the parts are dyed. With that said I will put in my options for you.
One option would be to brush anodize the parts that you need done using hand held electrodes. The brush plating process meets the requirements of MIL-A-8625 / MIL-PRF-8625
[⇦ this spec on DLA], but cannot be dyed to different colors (black, red, green, etc.). The brush plating process uses a lot less solution than tank plating; you work with a liter of solution instead of gallons.
- Valencia, California
A. Greetings Mr. Wheeler and everyone else that's contributed so far.
I've helped guys do this stuff out of their homes for something which they just want to look a decent color other than bare aluminum. It's not hard in that regard, but it is messy, it can be dangerous to work with in regards to your health, and it is difficult to dispose of the wastes. If you have 1 liter of solution, you may have to dispose more frequently than a larger operation.
Have you checked the job shop listings on finishing.com for a shop in your area you maybe didn't know about? What size parts are you talking anyway? I, being a very small shop myself compared to some of the others roaming around here can generally meet your needs on small quantity, small part requirements. But I'm not here to make a sale, I'm here to help you find someone to do it first and foremost, who is local to you.
I suggest checking those resources, then scanning over the Thomas Regional website and seeing if you can locate someone that way. Basically unless you're trying to deal with the biggest of the big in your area (I'm talking size of the company, not the size of your parts) then you "should" be able to find someone.
Good Luck to you.
- Toledo, Ohio
Q. I am looking to do something similar to what was mentioned. I'm looking to anodize parts that are 5/32" by 6 inches. I would like to do a setup on my own but if the price was right I would let someone else do it for me.
Let me know what you all think.
- Plantation, Florida, USA
2007
Multiple threads merged: please forgive chronology errors and repetition 🙂
Small, temporary, Type II anodizing project
Q. I've been working on a small scale anodizing project for about 6 months, mainly for characterization work and fundamental understanding of the anodization process.
I've had a difficult time finding any practical guides for setting up my anodizing tank, i.e., work to cathode ratios, agitation, shielding (if necessary). My problem is inconsistent anodizing thickness on 6061 alloy. My current set up has a work to cathode ratio of 1:2.2. Spacing is about 2 inches between anode to cathode. No agitation. Range of sulfuric concentration from 10 oz/gal to 30 oz/gal (for characterization work)
I have several questions regarding:
Al3+ Conc.
Voltage vs. Current Control
Agitation
Temperature
Etching effect on coating formation
Where should I start looking? Am I doing something fundamentally wrong? I prefer "real life" experience to books, but anything to lead me in the right direction. For research materials I've been mainly reading:
- The Surface Finishing and Treatment of Aluminum and its Alloys
[adv: suggestions on
AbeBooks,
Amazon &
eBay affil links] by Pinner & Sheasby
- The Technology of Anodizing Aluminum
[on
AbeBooks, on
Amazon, on
eBay" (affil links)affil links] by Brace
My background M.S. in Inorganic Chemistry/Materials Science
- Spokane, Washington, USA
2003
A. The most practical book that I owned was "Light Metals" by David Montgomery and Charlie Grubbs. Written in very plain language by two very highly experienced anodizers. As books go, it is cheap. Comes in a notebook. Contact AESF (www.nasf.org) to get one. I shortened the title by several words, but the authors are the same. Newer versions have the authors in reverse order.
Personal feelings, 2 inch spacing is inadequate -- 4" is better. You will have a lot less problems if you use mild oil-free air agitation. Your acid range is too great. Settle on a book value. The stronger the acid the more it can eat the oxide formed. Current control is a nice way to anodize but people have generated good product by plain voltage control. Temperature control is critical and you did not mention it. This can be your entire problem. If you are only doing a small amount, you could get by with a larger volume tank which will hold the temp rise down and would help your spacing out. Buy the suggested book. It is unusually practical. I have met a couple of the British authors of your books and their seminars are as boring as their books 🙂
- Navarre, Florida
A. Patrick, you mentioned you have no agitation. This is a critical step in the anodize bath. Agitation will produce an even anodize finish and maintain a consistent bath temperature. You will need a chiller to cool the bath if you start to run parts with a large surface area; this will also maintain the temp of the bath 65-70 F. Running 17 Volts for 55 min for black & 15 volts for 25 min for clear produces quality parts for us. This process is for a 6061 aluminum other substrates will not give you the same results, especially 2024.
Casey Weizel, PresidentForesight Finishing LLC
- Tempe, Arizona

A. Casey, the parameters that you suggest will produce a very heavy anodize coating that will certainly have no problem meeting the coating weight test for Type 2.
James Watts- Navarre, Florida
Multiple threads merged: please forgive chronology errors and repetition 🙂
Heat and circulation problems in small anodizing bath
Q. What is the best way to keep the anodizing bath moving? I am having some problems with heat and pitting. My anodizing bath is 2 US gal, and have two 8"x8" lead cathodes. The part I have had problems with is approx. 82 cubic inches. I have been using a plastic container (desmut came in it) filled with ice, and placed in the solution. It keeps the solution at 79-81 °F. I suspect if I add a second container of ice it will help, but am worried that the bath is too still to keep the temperature ambient. Any help with this matter would be greatly appreciated!
Thank you very much!
- Ottawa, Ontario, Canada
2003
Aluminum How-To "Chromating - Anodizing - Hardcoating" by Robert Probert You'll love this book. Finishing.com has sold a thousand copies without a return request 🙂 A. If you have access to an air compressor [adv: air compressors on eBay or Amazon [affil link] ... get some PVC piping, drill some 1/32 holes (approx. 1" apart, facing the bottom of the tank) in a section that runs along the bottom of the tank. Plumb the PVC piping to the air compressor, with a regulator. Although its crude, it will keep your bath circulating. You may have to try a few sample parts at different pressures to find what works best for your application. If you find the agitation is uneven (which you probably will), you will need to plug, or tape some of the holes till it evens out. There are much better ways to plumb, and get even agitation, if you decide to make this more than a hobby.  Marc Green anodizer - Boise, Idaho A. First, switch to 6063 aluminum cathodes. Second, go to a larger volume, as in a 5 or 6 gal plastic pail. This will give you a twice as large (or more) heat sink, so the temp will not rise as fast. Pre cool the solution to the lower limit of your desired range. Third, add a air agitation with a medium size fish tank air source. Do not use the air stone. It is a plastic that will not last in the acid. A heavy piece of plastic tubing or pipe. Cap or plug the end and drill about 1/16" holes at a 45 degree angle (down) alternating sides about every half inch. Regulate the airflow to give you the agitation you desire. You may have to go to pumping a ice water solution thru a seamless stainless tubing chiller coil that you put in your tank. Obviously, you will need a tiny pump for this. It will require considerable watching to maintain an even temp. James Watts- Navarre, Florida |
![]() Ahhhh ... fish tank pump ... good idea, James!
Ahhhh ... fish tank pump ... good idea, James!
Marc Green
anodizer - Boise, Idaho
Q. Thank you all for your replies! I have bought a fish tank air pump and a 4-way flow control valve. I will soon upgrade to a 20 gal tank, but don't have the room at the moment. I also found that filling Ziploc bags with ice and placing them in the bath helped control the temperature quite nicely. I was able to sustain 71 °F for almost two hours. Thanks, I am still open for other ideas though! Graham
Graham Skjenna [returning]- Ottawa, Ontario, Canada
2003
A. Personally, I would not use the ziplock bags more than once until you have a great idea of how many times that it might be used. You can do this by reusing only one baggie until it does not look very good. It is a good idea for the small user. I had done it with heavy duty plastic bottles tied to the side of the tank with fair luck, but you will have a much better heat transfer thru the thinner bag. I gravitated to the pump thru the seamless stainless tubing and then went first class with a chiller and a store bought heat exchanger. Warning, 316SS is attacked by the 15% acid as you get above 75 °F, so if you go that route, be prepared to take it out of the acid when the chilling device is not on.
James Watts- Navarre, Florida
Small scale Type III hardcoating
Q. I am trying to get a .002 thickness type III class 2 anodizing finish. The main parts that is important to me is thickness and not burning the part. I made a tank with a bubbler with a 6061 cathode and have some sulfuric acid, and I am researching oxalic acid and glycerine/glycolic acid additives. To get a .002 thickness with a low risk of burning, what current density should it be run at and does it have to be done at around 28-32 °F.
Dave McDoginer- Houston, Texas
November 23, 2013
A. Hi Dave. The short answer is that, no, you don't need to go below 50 °F is you are using a proper additive system for Type 2-1/2 anodizing, and you probably need to anodize in the 24-36 ASF range depending on the alloy. Letter 52350, "Hardcoat Anodizing Voltage" should be helpful.
But I think faster progress will be made if you take a couple of sentences to introduce yourself and describe your situation. The problem I'm having, which is fairly common in this forum, is we don't know your experience level. If you have never done any successful anodizing previously, then starting with Type 2-1/2 without any guidance from a vendor is a tall order. We'd probably like to see you enjoy some success with Type 2 first because, if you come back and tell us the Type 2-1/2 is not working, we're in a situation where we've brought in too many variables to simultaneously tame. One tiger at a time, please 🙂
Good luck.
Regards,
Ted Mooney, P.E. RET
Striving to live Aloha
finishing.com - Pine Beach, New Jersey
Need quick confidential answers? $25
Need project assistance? $100/hr.
Q. Sorry for the late response, I have never anodized anything before and I am trying to class III type 2 hard coat anodize 7075-T6 aluminum at home. I would like a coating thickness of .002". I know that I have to use the rule of 720 to calculate anodizing time. I would like to know the temperature, dissolved aluminum, sulfuric acid, concentration, ramp time, and any other variable I am missing. Like I said, my main concern is burning because the parts are expensive and I have spent a while machining them.
Dave McDoginer [returning]- Houston, Texas, USA
June 28, 2014
A. Hi again Dave. The temperature needs to be 28 to 32 °F unless you are using proprietary additives; then it might be around 50 °F as suggested by the vendor. Please see letter 27828, "Setting up hard anodizing on 7075 aluminum alloys" and letter 40535, "Problems and Issues Hard Anodizing of 7075 Aluminum" for the dissolved aluminum, current density, etc.
But let me say the usual: if the parts are important to you then you should send them to an anodizing shop.
Nothing is impossible, but experience is the best teacher ... and never having anodized anything before, you are trying to:
1. do type III or 2-1/2 hard anodizing (which is significantly more difficult than standard class II anodizing),
2. on a tricky alloy (7075 sometimes develops segregation at the grain boundaries and has other problems),
3. working live with your precious real parts rather than spending a few months learning with scrap parts,
4. while doing it in a home setup without professional cooling & agitation to prevent burning,
5. with no professional instrumentation to gauge how you are progressing.
Again, nothing is impossible, but I think the odds of you not ruining parts on your first try is slim. Best of luck, but we'd like to see you gain some experience on scrap before risking your parts.
Regards,
Ted Mooney, P.E. RET
Striving to live Aloha
finishing.com - Pine Beach, New Jersey
Need quick confidential answers? $25
Need project assistance? $100/hr.
How do I control the voltage when type III anodizing?
Q. I am trying to start Type III Class 2 anodizing for gun parts. I have my solution mix according to the directions, I have the additive to help with temperature. My solution is chilled to 40 °F. My current is set to 0.1 amp per square inch, and on a piece about 50 square inches my rectifier is going over 30 volts and thus turning off. Everything I am reading says it should be around 15 volts. I am not sure what to change to maintain better voltage at higher amps. Please help the new guy. Thank you for your advise.
Nicholas Luedtkefirearms - Sand Springs, Oklahoma
April 5, 2016
A. Hi Nicholas. The first thing you might need to know is that voltage and current cannot be independently controlled. Ohm's Law says Current = Voltage / Resistance. I think you are misreading or mis-setting something because if you were truly holding your current down to 0.1 Amp/in2 when you placed the parts into the solution, the voltage would hold at only enough volts to deliver that current (probably less than 6 volts at the beginning of the cycle).
Near the end of the cycle, depending on the alloy, it might take 30 volts to keep anodizing at 0.1 Amp /in2. This change is because: when you put bare aluminum into the solution, lots of current can flow into it without the need for much voltage, but as the highly insulative anodized coating builds in thickness, it keeps taking more and more voltage to keep the current flowing against that increasing resistance.
If your power supply is capable of "current control" and is set right, what should happen is you just set it for 0.1 Amp/in2, and it will start out at low voltage and the voltage will gradually increase to maintain the current. Alternately, although more work, you can control by voltage: start at about 3 volts and gradually increase the voltage so as to maintain the 0.1 Amp/in2 that you are shooting for.
I would urge you and other newcomers to experiment on scrap before trying to work with valuable parts. Good luck.
Regards,
Ted Mooney, P.E. RET
Striving to live Aloha
finishing.com - Pine Beach, New Jersey
Need quick confidential answers? $25
Need project assistance? $100/hr.
Q. THANK YOU FOR THE RESPONSE IT IS VERY HELPFUL.
MY RECTIFIER DOES HAVE A CONSTANT CURRENT SETTING AND THEN I SET IT AT .1AMP/SQ.IN. THE CURRENT DOES INCREASE SLOWLY AND USUALLY STABILIZES AROUND 20 VOLTS, THEN GOES OVER 30 VOLTS, WHICH TRIPS THE OVER VOLTAGE STOP BEFORE THE REQUIRED THICKNESS IS REACHED. I AM NOT SURE WHERE I AM GOING AMISS, USING CONSTANT CURRENT, I CAN'T SEEM TO KEEP THE VOLTAGE DOWN.
I BOUGHT A ANODIZING KIT AND IT CAME WITH A RECTIFIER THAT IS 50 AMP AND 30 VOLTS. I AM TRYING TO DO HARD ANODIZING TO 2 MILS+ IN THICKNESS ON SURFACE AREAS UP TO 1000 SQUARE INCHES. IS MY RECTIFIER JUST TOO SMALL, IF SO PLEASE OFFER RECOMMENDATIONS ON WHAT SIZE I SHOULD BE USING.
THANKS FOR YOUR HELP, IT IS VERY APPRECIATED
NICK
FIREARMS - SAND SPRINGS Oklahoma USA
A. Hi again; apparently I partially misunderstood your situation. If you've been managing to keep the voltage slowly rising at a fixed current of 0.1 Amps/in2, but it eventually rises to 30V without building the required thickness, and your rectifier can do no more, yes, the rectifier is too low in voltage.
If you wish to process 1000 square inches, even at 0.1 Amp/in2 you would need 100 Amps, whereas you probably should be anodizing at nearly twice that current density. For 1000 sq. in. (6.94 ft2) of parts at 24 ASF, your amperage should be 167 Amps. Voltage depends on alloy, but could easily be 60-75 volts, maybe even more.
Although I would thus think that your rectifier should perhaps be 175 Amps at 75 Volts rather than 50 Amps at 30 Volts, I'd urge you to learn as much as you can from the equipment at hand, rather than trying to do ultimate fine tuning of parameters by the book instead of from practical experience. Good luck.
Regards,
Ted Mooney, P.E. RET
Striving to live Aloha
finishing.com - Pine Beach, New Jersey
Need quick confidential answers? $25
Need project assistance? $100/hr.
Keeping anodizing acid bath cool
Q. As I live in Vietnam where summer temperatures can get to over 40 °C, and as my work space does not have air conditioning, how would I keep solution cool enough?
I guess one way would be to use fish tank cooler pumps?
What about more crude solution by freezing some bottles in freezer and inserting them in the bath and agitating it by air?
hobbyist - Vietnam
May 7, 2016
Sorry! Finishing.com is temporarily Read-Only.
Ted Mooney is retiring but I have several offers to take it over.
We're working hard to make sure we find it the best new home.