
| Search our quarter-million Q&As |
Home of the finishing HOTLINE since 1989
-----How to build a bottle cap table
Q. I'm about to start laying my caps down for an 8' by 3' table, I was wondering how strong the epoxy is, and how well it will resist cracking and splitting like a windshield when the table is moved around. Should I divide my cap basin into 2 or 3 areas? or Go with glass top? Thanks!
Donnie Rmilitary - Pensacola, Florida
September 25, 2010
Q. Hello,
I constructed an 8' by 4' bottle cap table but have not laid down any type of resin yet. After we constructed it, we realized that we made the border height too tall because right now, if we were to fill in the area with resin to the brim of the border (which is how we want it), it would take around 10 gallons of resin, and we do not want t, or need to, spend that much money. The caps and the border are glued down really well, so we thought of a scenario that we could try to fix it, but I wanted to run it by this forum first. Here it is...we pour 6 gallons of resin down (a little bit at a time, going through the process) right now and then, once the resin dries and hardens, we would trim down the border to the point of the border and resin being at the same level with a hand planar or something similar. Any problems that you foresee? Would the resin crack? We originally wanted to pry up the border pieces but with it being glued down by wood glue, we figure it would simply rip the weaker wood, being the plywood.
John Shoar- Dayton, Ohio
October 31, 2010
Q. Hey everyone,
What is the best way to glue down the bottle caps onto your table? Would using hot glue around the perimeter of the caps work, or should I fill the insides of the cap? Or can I put down a thin layer of epoxy and while its still sticky lay my caps?
- Columbus, Ohio, United States
November 2, 2010
Q. I am about to build my table and have a question about gluing down the caps. There has been a lot of talk about this and I was wondering if anyone has used rubber cement for this since it can be applied easily and is cheap. Would anyone recommend using clear elmer's glue instead? Thanks in advance for any answers! On Wisconsin!
Kody Habeck- Madison, Wisconsin
December 12, 2010
A. Kody: I didn't glue my caps down at all. I slowly pored the first layer of epoxy over the caps and kept an eye of them for 30 minutes, then periodically checked them for the next few hours. If I caught any caps floating up, I'd push them down slowly, and blow the bubbles out. I had maybe 20-30 that tried to float up, which is relatively low, considering.
Travis Peterson- San Marcos, Texas, united states
December 13, 2010
Q. I spread out a thin layer of Elmers glue using a sponge brush and set the caps on top. The caps do not move or raise.
I have a question about the Kleer Kote. My bar is going to be in an unheated area off of my detached garage. It is enclosed but it gets below 0 around here in the winter. The bar will not be used in the winter but I was wondering if the Kleer Kote will crack? Anyone have a bar in an area like this?
- N Ridgeville, Ohio USA
January 10, 2011
Q. I am working on a project as a gift for my boyfriend. I want to adhere bottle caps to a piece of wood to make a plaque like display of bottle caps in the shape of a 4 leaf clover. I want to layer the bottle caps to make the clover 3D. I am stumped at how to attach the bottle caps to the wood and to the other bottle caps. Does anyone have any ideas? I would like to seal the entire completed piece as well, and I have no idea how to go about sealing it without a frame around it.
Crystal Graham- Raleigh, North Carolina, USA
January 11, 2011
Q. Going to be doing a Kleer Kote epoxy top to my bar about 3-6 weeks from now, sealing bottle caps in the process. All the advice here has been very helpful, but has anyone tried to drill through it? I need a spot for the beer line to come up into the draft tower and would prefer to drill after finishing the epoxy, if possible. I don't want it to crack, though.
Rick Mahone- Buffalo, New York, United States
April 8, 2011
Q. Wondering if Rick Mahone drilled for his beer tap? Please post the procedure you followed for this. I'm in my biggest cap table to date that will eventually include a beer tap from a keg underneath. Need to know how wide the diameter of the hole - I'm planning on drilling prior to pouring...
Dan Gasteazoro- Apple Valley, Minnesota USA
July 29, 2011
Q. Hey, I was was going to spray paint the wood underneath the bottle caps, but I was wondering if the Kleer Koat would do anything to the paint? anybody know/ would it even look good/ do I need to treat the plywood first?
Thanks guys!
- Greenwich, Connecticut, USA
June 20, 2011
! Planning on doing some similar projects using the Kleer Kote Resin, my first will be encasing and enshrining seashells my 6 year old daughter collected from our vacation onto a board and making sort of a plaque that can be hung or stand like a picture. I will of course thoroughly clean (bleach) ⇦ in bulk on eBay or Amazon [affil link] and rinse and dry them first. For the seal coat I planned to coat the board that will be used for the base and dip the shells prior to lying them onto the board in the desired arrangement. I am hoping this will reduce the issue of bubbles with subsequent flood coats. Thanks to all for the great info. and pics. After this I am beginning to get inspired to do a poker table.
Bill Wilson- Pittsburgh, Pennsylvania
July 17, 2011
! Just wrapping up my first project. My dam around the circular table produced some issues that I'm reasonably confident I didn't come across a solution for in this awesome thread...so here goes - I intended to pull the dam off from the outer circular edge (and inner for for a beer bucket) and found that the tyvek flexible "wood" piece I used for the dam left a white coating on the epoxy (used US Composites Kleer Koat, awesome btw). What is best to use to remove this film? Second question...my dam left sharp edges. I am brainstorming the best way to "grind" these down. A sharp blade, sandpaper? I want to be able to see within epoxy finish without clouding the clarity.
Thanks for the info from years past and (hopefully) for answer to come!
- Apple Valley, Minnesota, USA
July 22, 2011
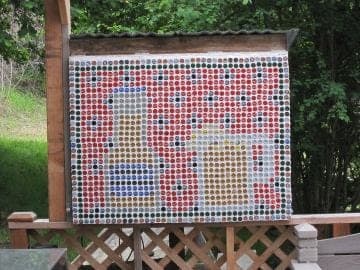
i. First try at beer cap table, I'm gonna do it again
Hobbyist - Walden, Colorado
July 25, 2011
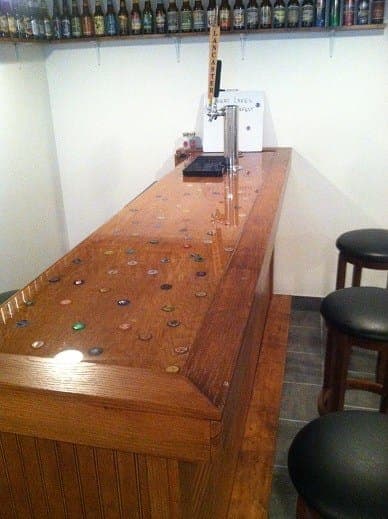
i. Here is a photo of my bar which I created based on the posts in this forum. Thanks to everyone for your help and go Phillies!
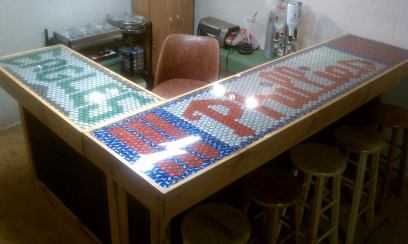
FYI, I used hot glue to secure the caps and U.S. Composites Kleer Kote Table Top Epoxy as the pourable surface. It turned out great!
Here is a little website I created with step by step instructions and pictures of how I created my bar: mirasphillybottlecapbar.webs.com/
Jim Mira- Pennsylvania
August 9, 2011
Q. Hi all, I am a crafter making tables out of beer caps and other things. My problem is when I use the Kleer Kote on a black table I often get a dusty look in the epoxy. Any idea what I am doing wrong. Looks like tons of microscopic bubbles. Does it make a difference what type of container you mix the Kleer Kote in? Very frustrating when sometimes they look great and the next they don't. Can't seem to figure out what is different on the pours.
Linda Oertwichcrafter - Pilger, Nebraska, USA
August 15, 2011
A. I had the same problem in some parts and I think it's a result of stirring too fast. It causes tiny air bubbles that you can't really pop with a torch. On my next project I'm going to stir really slowly and hang a bed sheet or something over it to prevent any dust.
Jim Mira- Scranton, Pennsylvania
August 18, 2011
! I found this site while me and my buddy were deciding to make a bottle cap table. All the posts have helped us a great deal. We just finished it. I will try to get photos of it soon.
Zach Alix- New London, Connecticut
August 28, 2011
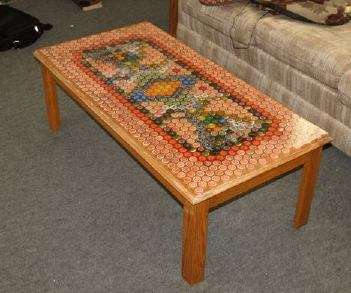
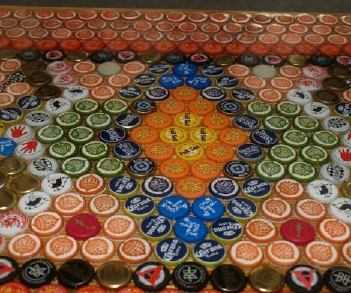
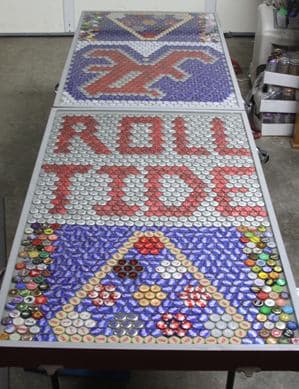
i. Thanks everyone for their suggestions on this site. I used it as my guide in creating this amazing coffee table. I am currently undergoing my undergraduate degree at The University of Cincinnati and have loved Bearcat football, so I made a tribute table. The final design used 544 plastic coke bottle caps. The table measures approx. 22.5" x 40.5"

Thanks again to all for the great suggestions/advice!!
Josh Fuerst- Cincinnati, Ohio, United States
September 16, 2011
Q. My friend and I have started a bar but it is on a hollow door. This was a couple years ago but we used vinyl tile glue to put the bottle caps on but we didn't seal the wood in any way. Do you see there being a problem with this in any way? And should I put a seal-coat over the caps before I do my flood coat?
Andrew DeVries- Kalamazoo, Michigan, USA
November 14, 2011
! This website is exactly what I need to get my project started. I am starting out with a tile top coffee table. I am going to leave the tile on one side of the table top and put bottle caps on the opposite side so depending on the event we can flip the top of the table. I have already started the project and will be posting photos soon.
Thanks for the help on this forum.
- North Carolina
February 5, 2012
April 24, 2012
This is the table I made, just need to add epoxy, going with the Kleer Kote. I was originally going to do a beer pong table or bar top but I found this table outside my our apartments dumpster and just went with it (on of the legs was "broken" just needed a 4 inch piece of 1x4 to fix it, their loss) The caps that are turned upside down between the designs are from rainier and actually contain rebus puzzles on them. I remember growing up with them and helping my dad solve them.
Anyway, I'm going to build a barrier around it somehow so it will be flat out to the lowest edge. Might fill in more caps on the edges when I do that.
Drew McCarson- Winlock, Washington, USA
Q. Has anyone ever used kleer koat on cardboard boxes?
How did it turn out?
I've had the idea of using beer and pizza boxes to make a coffee table and book shelf for a while but never used it before not sure how it would work out.
Thanks
- colorado springs colorado usa
April 29, 2012
Q. I have an outdoor "tiki" type bar with a mahogany bar top. I would like to embed sea glass and sea shells in an epoxy finish on top. Can I stain and urethane the top before applying the epoxy?
Frank Silva- Truro, Massachusetts, USA
May 3, 2012
Q. Very informative thread everyone. I don't believe I have really seen an answer for this question yet. I am wondering if it would be beneficial to fill the bottle caps with something like hot glue or plaster, before applying the epoxy, to help keep any bubbles from leaking out. Would this work and/or even be worth the time to do it?
Josh Barta- Lincoln, Nebraska, USA
June 4, 2012
August 7, 2012
Just wanted to send a big thank you to this thread, as it helped me plan a bottlecap bartop project that turned out really great. All the tips were fabulous.
One huge tip that I'd like to offer: Do not take too much time pouring out your mix, because it will start to smoke, harden up quickly, and you'll end up pouring a big blob into the middle of your project. This happened to me. Luckily I was able to get most of it off, and cut a line with a utility knife
[affil link] before it really screwed things up too bad.
For my edge, I decided to cut wine corks in half long ways, and hot glue them end to end around the edge - this was really nice since I had a rounded part to my top. I then used about 5 coats of polyurethane on the corks and especially inside the area where the caps would be so that it was completely water tight. I know the epoxy instructions say to do a thin coat like this, but I recommend just doing it with polyurethane which is a lot cheaper and also not as messy.
To do the mixing, I used simple red solo cups - filled a cup up twice with hardener and dumped into a trick-or-treat style halloween bucket, then used a separate solo cup and filled with resin (thick!) twice and dumped in. Stirred slowly per the instructions. Made sure it was 75-80° where I was doing it - needed a space heater and had to shut the AC off in my house for a day (boo). Left the epoxy warming in my garage in the days before the pour.
I'm really glad we didn't waste our time trying to glue down the bottle caps before the flood coat - we had like 900 caps, so that would've taken forever. Once we had our patterns all laid out, basically just slowly pour your mix over the caps and have somebody else there helping you if possible. We found that using the end of a clean paint stirrer was very helpful with the "floaters". You'll see when you do yours, about 5-10 seconds after a cap is covered it will begin to float. Just push each one down over & over with the paint stirrer until every one has "sank" - and your rubber gloves stay clean. I was also using a paint stirrer to "drip-fill" the harder to reach areas on my top - but don't take too much time because your bucket will get HOT and you'll end up with a mess - seriously - have it poured within like 10 minutes after stirring's complete or you'll regret it. We didn't need to use any heat gun or anything - the bubbles just rose to the top and we popped them with the end of the paint stirrer.
My bartop is 24" wide by 80" long (with a curve in it) and 2 gallons was the perfect amount of resin. Cost me about $100-110 delivered off eBay .
Already thinking about what we can do next!
- Pittsburgh, Pennsylvania, USA
Ed. note: The cork edge was a nice looking and practical idea!
Q. Can I use a marine grade epoxy resin kit, or will that yield a completely different result?
Jesse Frederickson- Port Townsend, Washington, USA
August 22, 2012
Hi Jesse. If you have spare marine epoxy and a small unimportant project to try it on, please do and then tell us what happened.
But if we need to guess, my guess is that it will be quite unsatisfactory because coating materials are optimized for their purpose and marine epoxy might overheat if that thick, or it might acquire unremovable bubbles, or it might not level without brushing, or it might harden before you can get it all smoothly poured, etc.
Regards,

Ted Mooney, P.E.
Striving to live Aloha
finishing.com - Pine Beach, New Jersey
Need quick confidential answers? $25
Need project assistance? $100/hr.
August , 2012
Q. I really am lost. I'm trying to make a beer pong table for my husband's man cave. He's deployed and I wanted to surprise him. I don't know where to find the caps at. Also, how do you attach them to the table after its made? Thanks.
Jordyn Delossantos- Tacoma, Washington, USA
August 24, 2012
Hi Jordyn.
I think the main source of caps is beer bottles that you have opened. If that is not applicable, it's possible to buy plain bottle caps in a wide variety of colors from Amazon .
3 postings above yours, Tom S. tells you how to do the project without attaching the caps, just pushing them down when they float. So you can either glue them or not. I'm not suggesting that the project is easy, because I haven't done it, but I think there is enough info on this page if you read slowly and carefully. Good luck.
Regards,
Ted Mooney, P.E.
Striving to live Aloha
finishing.com - Pine Beach, New Jersey
Need quick confidential answers? $25
Need project assistance? $100/hr.
Q. Hi all,
I've been looking at various sites and this appears to be the most informative. I have a painted plywood hexagon shape with a wood trim border. The table is just going to be inside a garage/basement.
I plan to glue my caps down with a clear acrylic latex caulk, is that a bit overkill?
I saw a lot of resin products to seal it, is one of the products better to use than others? (My dad suggested an FRP fiberglass resin) Has that been used before?
Any other suggestions would be appreciated, and I'll be sure to post a picture after I'm done!
- Chicago, Illinois
October 2, 2012
Q. For those of you who have done folding beer pong tables... Did you just use 2 fences in the middle to create the barrier? If not how did you separate the 2 sides so the table was still able to fold without having a lip/bump in the center of the table? What material would you suggest to use for a removable fence? And in general about how much does the finished beer pong table weigh? Lastly how did everyone keep dust and bugs and anything else unwanted from sealing into the final surfaces? Thank you everyone for all your shares! This will be my first project and it's a pretty big one but I think my son will appreciate his birthday gift. Thank you all again!
Crystal Garcia- APO, AE (US Army, stationed in Europe)
December 12, 2012
Q. Hey Everyone,
I see this forum is a little old but hopefully someone can help me. I am building a mini bar, and I put my first coat down of resin tonight. After reading the instructions more thoroughly I see that we made our coat about three times as thick as recommended. Does anyone know what I should expect? Will it even set? Help!
- Fond du Lac, Wisconsin, US
May 12, 2013
A. Hi Sara. The forum is well established, durable, and enduring -- not old :-)
If you added the right amount of curing agent (hardener), it will harden. These chemical hardening reactions generate a lot of heat and I think that one concern with a coating that is too thick is it may gas or bubble from overheating. But if it worked it should be fine.
Regards,
Ted Mooney, P.E.
Striving to live Aloha
finishing.com - Pine Beach, New Jersey
Need quick confidential answers? $25
Need project assistance? $100/hr.
May , 2013
June 15
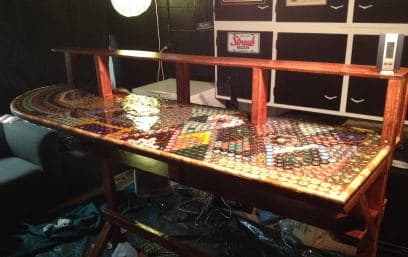
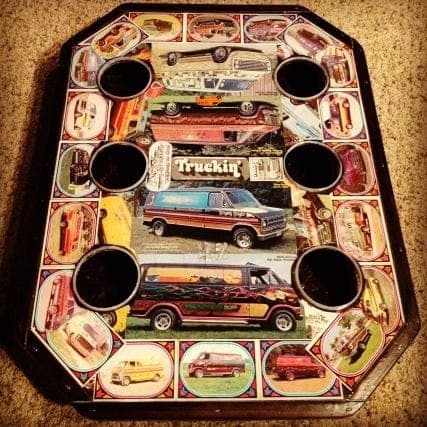
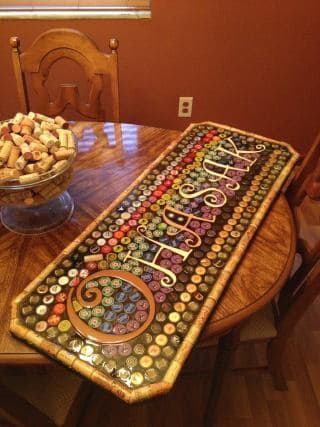
A. Hey - Tom S here again - same guy that did the bar [a few postings above]. I'm back to report we've done 3 more epoxy projects since the bar.
First is a desk I made for my wife (from scratch) who works in the music business - we covered the top in concert ticket stubs. Second is a table I made for my 70's custom van with 1975 Donruss "Truckin" trading cards & vintage van magazine cutouts. Third is a wall-hanging barcap sign with cork edge & lettering for a game room that we made as a gift for friends for their wedding.
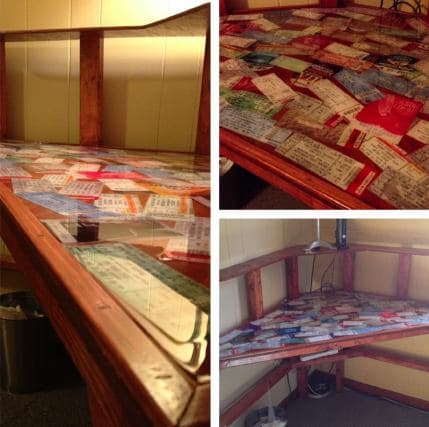
Advice in addition to what I said back when I submitted my bar pics: If using paper/cardboard like two of these projects: FIRST - use clear spray paint on the front & backs of each piece of paper. This is tedious - however it'll prevent wicking during your pour. I found that spray painting thin layers were best so that the actual spray paint didn't wick the paper as well. SECOND: Glue down every nook & cranny of paper including corners - they will float and annoy the heck out of you. THIRD: If you use wooden letters like in the sign we made, cover the letters (or anything wooden) with polyurethane first - otherwise you'll get air bubbles.
We poured all 3 of these at room temperatures around 70-72 degrees and they all turned out pretty good. Keep some shims on hand wherever you're doing your pour so that you can adjust the levelness on the fly. I used Elmer's glue as "caulking" around all the edges & nooks & crannies - it's key to make sure there's nowhere for the epoxy to escape. It's best to have at least 2 people on hand during the pour -- we used clean paint stirrers to push our bottlecaps back down (over & over & over) as well as a hair dryer ⇦ on eBay or Amazon [affil link] . Once you feel it starting to firm up, stop trying to pop every last bubble because you're likely to screw it up more than you're helping it.
As you can see -- I have cup holders inside the van table. The way I did this was I shoved solo cups in the holes extremely tight and glued them in with Elmer's -- they held tight for the pour. Then after the epoxy hardens, you can pull them out and hit the sharp edges with some sandpaper.
Everybody has loved all of our projects, and I'm sure there will be more! Good luck if you're reading this and trying this for your first time.
Tom S- Pittsburgh, Pennsylvania, USA
Ed. note: Incredible work, Tom. Thanks for sharing it with us!
November 5, 2013
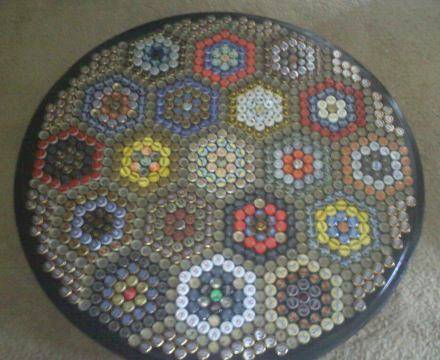
A. I have been lurking at the great site for a couple of years now as my OCD meets Martha tendencies worked out what I really wanted to do with the caps I was saving.
The first project was a cabinet cover to be used outdoors. Having read the posts about using poly resin for outdoor applications, I went with the "tile method" for my beer bottle and mug combo. The finished product looked pretty good but has faded and started to rust in spots. This one is on the re-do list.
My second project was to re-cover two round expanded metal tables that had started to rust.

After bolting squares of plywood to the existing table tops, I cut some inexpensive moulding for the frame that covers the exposed edges of the wood and was tall enough to allow for a 1/8" sheet of plexi on top. I left all the wood natural and just gave it a couple of coats of clear poly spray.
Laying out the game board designs took the longest since some of the caps had to be crimped to keep in line with others (difference between twist-off and non). The caps are free-floating and held in place by the plexi, which is sealed with a bead of 100% silicone to keep moisture out from inside the tables. This also allows fairly easy access to the top if I need to replace faded caps or want to change the designs. Playing pieces are also made from caps, felt and silicone.
- Lebanon, Oregon, USA
Q. I am building an epoxy bottle cap table top. I need to add more epoxy to the first coat, however, I would like to change epoxy brands to something cheaper. My question is: if I change to a different brand of epoxy, will it bond well and work well with the original coats? The first coats are done with Parks Super Glaze. Are these epoxies pretty much made out of the same chemicals? Or are there difference that would cause problems if I changed in the middle of the project?
Tom Gutowski- Milwaukee, Wisconsin
September 4, 2014
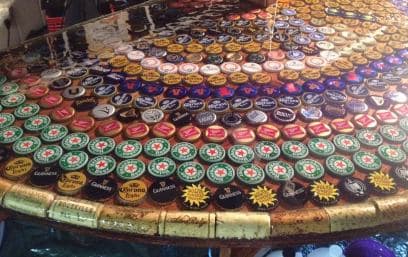
A. I've been away from this thread for a while, but just wanted to post a few things as I start planning another table...
1. To answer an earlier question, I did drill for my draft beer tower. The epoxy is easily drilled through and I used a standard wooden hole saw. It was very easy. I highly recommend drilling AFTER the epoxy hardens, not before. It will be much easier. Your draft tower instructions should tell you what size hole you need (basically you need the inner diameter of the tower, NOT the diameter of the outside/base).
2. A hair dryer (as advertised in the instructions) does NOT work well at popping bubbles. A propane handheld torch worked well. I would assume a heat gun would work, but I did not try that.
3. I brushed on a layer of the epoxy first as per the instructions and stuck the bottle caps to that. None of them floated.
4. I have an open back to my bar (meaning there is no bordering piece of wood separating the bar service rail and the bar top). I built a temporary wall made out of clamps, 2x4s, and plastic sheeting which held the epoxy back at first. Then, as many people said, I let the epoxy drip over the side and smoothed out with a foam brush, but this was VERY difficult, stressful, and annoying. I would never build another table top like this again without having 4 solid walls to the table top (probably silicone sealed as well).
- Buffalo, New York
January 12, 2015
![]() Thanks for the voice of experience, Rick!
Thanks for the voice of experience, Rick!
Regards,
Ted Mooney, P.E.
Striving to live Aloha
finishing.com - Pine Beach, New Jersey
Need quick confidential answers? $25
Need project assistance? $100/hr.
January 2015
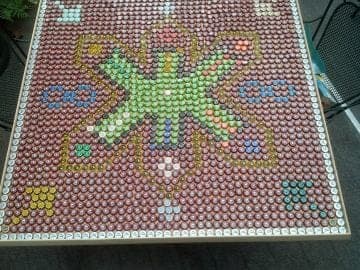
![]() Thanks so much for this site. I completed my table last year and am about to start another one. I am posting pics of my completed project.
Thanks so much for this site. I completed my table last year and am about to start another one. I am posting pics of my completed project.

My first table was a beer pong table that folds in half for easy transport.
My second project is going to be a cornhole game.
Thanks again for all of the wonderful posts and help.
- Tuscaloosa, Alabama
April 4, 2015
Sorry! Finishing.com is temporarily Read-Only.
Ted Mooney is retiring but I have several offers to take it over.
We're working hard to make sure we find it the best new home.