
| Search our quarter-million Q&As |
Home of the finishing HOTLINE since 1989
-----How to build a bottle cap table
Q. I am trying to make a beer-pong table about 8' x 3', how many bottles of Kleer Kote would it take to do it?
Josh NealHobbyist - Tyler, Texas
September 3, 2009
September 3, 2009
A. Hi, Josh. Multiply the length in inches times the width in inches times the depth in inches for the volume of clearcoat needed in cubic inches. A gallon is 231 cubic inches, so divide by 231 for the volume in gallons. Good luck.
Regards,

Ted Mooney, P.E.
Striving to live Aloha
finishing.com - Pine Beach, New Jersey
Need quick confidential answers? $25
Need project assistance? $100/hr.
November 11, 2009
Q. Hi this is what I am trying to do: can those of you that have made these awesome tables please chime in....
I want to make a portable (either by hingeing it or just having it two separate pieces) poker table out of 3/4" plywood w/ bottle caps and then coat it with klear kote epoxy.
I have a few questions
-will 3/4" plywood be thick enough?
-would you recommend have it be pourable - will I have to worry about the clearcoat cracking because of the plywood twisting or being carried on its side?
Also I and looking for wooden chip racks/cup holders if any ones knows a good place to get them let me know
Thank you
Cole
- New Jersey
November 11, 2009
A. Hi, Cole. I haven't made a bottle cap table myself, but I've used 3/4" plywood for a bar top, and I've done a lot of ceramic tiling (equally brittle) on it; in one case as a stand for a 300+ pound wood stove, where the span was too great and some tiles and grout cracked over time. If you use it for playing poker or beer pong, it will be fine.

But don't make it flimsy, or one day you'll be really mad at yourself when there's heavy drinking & fun, and the girls are dancing on the other guys' tables and you have to tell them they can't dance on yours :-)
Regards,
Ted Mooney, P.E.
Striving to live Aloha
finishing.com - Pine Beach, New Jersey
Need quick confidential answers? $25
Need project assistance? $100/hr.
November 12, 2009
![]() haha
haha
Well I guess that will all depend on the strength of the table I put it on :-) since it will just be a table top.
Thanks again
Cole
- New Jersey
Q. I just poured the Epoxy Resin on my beer pong table but I don't think I mixed it very well. It's been three days and it is kinda getting harder but still really sticky but there are a couple of spots where it is still just gooey! What can I do to fix this?
Kristine Nelson- Bradenton, Florida
November 6, 2009
Q. Hello,
I am in charge of our 5th grade class school auction project where we decided to do a bottle cap coffee table. We found a coffee table at a goodwill store that used to have glass in the center which is now missing. We thought this would be a perfect place to put the bottle caps if we attached plywood underneath the table where the glass used to be. In the meantime we wanted to order plain caps on-line, have the kids paint them, glue them to the plywood (which will have been painted by then) and then pour the epoxy-resin over the caps as the directions call for. I want to know if the epoxy will have an adverse effect on the paint the kids put on the caps. We were going to have them use paint pens, or even perhaps Sharpie markers to save money. I am getting worried about too many different elements getting into the mix, as we would be stripping the coffee table and painting it black, painting the plywood black; applying the caps and seal coats of the epoxy as I have been researching in all of your directions, I just wasn't sure about the paint on the caps, and if there was a certain paint I should use?
- Nashville, Tennessee
November 18, 2009
A. Kristine,
This may be a little late to help with your predicament. The gooey/sticky undried epoxy is a result of incomplete mixing. I had this happen with one of my prototypes. I was able to scrape off most of the undried stuff and put on a new well mixed flood coat to solve the problem.
Beth,
I didn't see any reaction between any of the painted caps I used and the epoxy. The best way to be sure is to make a small test case using your desired paints and see what happens.
Good luck!
Ron
 Ron Steele
- Northampton, Pennsylvania
December 9, 2009
i. Ron,
I used a small wooden tray and painted it black since that is the color that our coffee table will be. It turns out that paint pens are the best medium of paint to use on our caps. Since our caps were not previously covered with primer or acrylic paint, the acrylic decorative paint the kids applied just peeled right off. The sharpie markers that the art teacher recommended, blurred and ran together after the epoxy was poured on. The paint pens went on easily, were durable and showed up well after the epoxy was applied. Thanks so much for the reply. We will see how the master project goes.
- Nashville, Tennessee
December 16, 2009
Q. Hello,
All of the responses on this thread have been extremely helpful so far, so thank you! I completed covering a 36" round wood table with bottle caps a little while back, and have since been debating how to cover it. Friends originally suggested a plexiglass table top, but now I am leaning toward using the epoxy because I love the way it looks.
My question is about the edges...since this is a round table with no edges that would stop the epoxy from dripping, I was planning on using removable fences. I'm just worried that the removable fences will get stuck to the epoxy as it dries, or that when I pull them off it won't be even. Does anyone know if this will happen? And if so, how can I prevent this?
Thank you so much, and the tables shown are all fantastic! I only hope mine will look half as good!
- Austin, Texas
December 27, 2009
Q. Hey there,
All of these projects look amazing! I'm trying to build my own beer-cap shuffle board and was wondering how smooth the kleer koat table epoxy was? A lot of shuffleboard tables I've seen use a clear gloss oil based polyurethane. Would I be able to maybe coat this on top of the epoxy covered caps/table? or is that a no go?
student - Chico, California
December 31, 2009
January 4, 2010
A. Hi Jordan,
I can't comment from personal experience regarding using a removable fence. The klear kote instructions offer some guidance on page three under advanced techniques. I have heard of others who used a temporary edge to build up the epoxy thickness followed by a final coat without the edge to allow the epoxy to run over for a better looking edge. The best advice I can offer is make a small prototype to see if the removable edge you plan to use will be successful.
www.shopmaninc.com/pdf/kkote.pdf
Hi Ben,
My bar top is super smooth thanks to the epoxy self leveling while still liquid. There is only a tiny upward curve within 1/8" of the edges where the surface tension of the epoxy crept up the wood edges a little bit. I would guess the extra polyurethane coat will be unnecessary.
Good luck with your projects!
Ron
Ron Steele
- Northampton, Pennsylvania
Q. I am planning on building an 8 x 4 ft beer pong table using a layer of bottle caps on top of plywood. My question is what do you guys recommend I use to glue the caps down and also cover the tops with. Please keep in mind the cover surface has to be hard enough for a good bounce with a ping pong ball. I started planning with plexiglass, but that'll cost me $90 and would prefer a cheaper solution.
Cole juelfs- Kearney, Nebraska
January 21, 2010
A. Hi, Cole. Cost is always an object, but these bottle cap epoxy tables will unfortunately cost you more than $90 in epoxy.
Regards,
Ted Mooney, P.E.
Striving to live Aloha
finishing.com - Pine Beach, New Jersey
Need quick confidential answers? $25
Need project assistance? $100/hr.
January 21, 2010
! Your site is amazing. We're down in Southern Italy and have made a mosaic table for outdoors but have been trawling the internet for ages to work out what to seal it with to ensure protection and a flat surface. Kleer Kote will hopefully be the answer. Now the problem is how to get it to Italy! Thanks for all your input.
Chris
- Ostuni, Bari. Italy
January 28, 2010
Ed. note: Thanks for the compliment, Chris, but the only thing this website did was post what people submitted. Thanks, all, for the wonderful photos and postings!
Q. Ok, so I have a 4' x 8' table covered in caps currently not glued down. Ordering the kleer epoxy shortly. I'm wondering how necessary it is to glue the caps down.
If it is, is there anything you would recommend that wouldn't require me to pick up the caps to glue them back down? Every time we pick one up it tends to mess up many other spots.
Thanks!
- Bethlehem, Pennsylvania, USA
February 1, 2010
! Hello everyone, I am currently in the planning stages of my own folding beer cap table with a epoxy top coat. I hope it turns out as good as the ones I have seen on here. You have all given me plenty of information to work from. My table will be regulation sized as you would see in the World Series of Beer Pong. 8' x 2' x 27.5" I will report back and post my pictures when I'm done, wish me luck!
Erick BaumbergerHobbyist - Springfield, Illinois
February 11, 2010
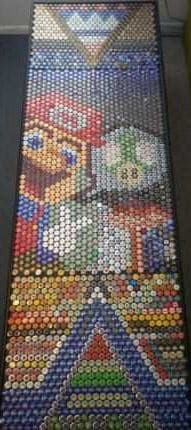
i. My roommates and I have collected about 2,500 beer bottle caps and came up with this design. There's a mario with a 1 up mushroom in a speech bubble, along with 2 triangles for a game of 10 cup beer pong. we still have to pour the epoxy though... just gotta save up some money first.
[The picture is at left].
Zach Repphunhobbyist - Kent, Ohio
February 13, 2010
Q. Just bought a 7.5' x 2' sheet of plywood, official beer pong table size. My roommates and I have saved metal beer bottle caps for over 2 years. Our goal is to make a custom beer pong table by arranging the beer caps around the wood to make a design.
1. We sanded down the plywood until it was free of anything. Next we nailed the trim around the outside, about 1/4 inch raised off the tabletop. Then took a paper towel and cleaned up any sawdust or residue. We have clear polyurethane and just applied the first coat to the wood tonight.
Our plan is to apply 3 coats of the polyurethane. On the 4th coat, we will apply it very thick, almost globbing it on, and sticking in the bottle caps as we go.
Will this plan work?
Does anyone have a way to make it better?
What do you think will be the best way to finish this project off?
- Buffalo, New York, USA
February 17, 2010
Q. When pouring the epoxy is there any chance for bubbles to form due to air pushed out from beneath the bottle caps or is this generally not a concern. How should I go about sealing the bottle caps to the base of the table prior to applying the seal coat and ensuing epoxy layers. Thanks.... This is a great thread.
David Burkeamateur builder - Chattanooga, Tennessee
March 1, 2010
March 8, 2010
![]() This page has provided a lot of great information regarding poured epoxy resin tables. We decided to go with license plates instead of bottle caps and just finished a test pour of a 2' by 2' table. We screwed the plates down and applied the resin slowly and it doesn't appear that any large pockets of air were trapped beneath the plates. We just had small bubbles from mixing.
This page has provided a lot of great information regarding poured epoxy resin tables. We decided to go with license plates instead of bottle caps and just finished a test pour of a 2' by 2' table. We screwed the plates down and applied the resin slowly and it doesn't appear that any large pockets of air were trapped beneath the plates. We just had small bubbles from mixing.
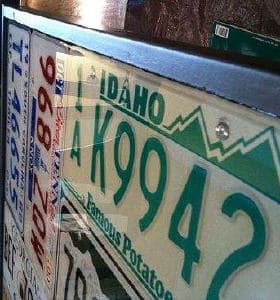
Our next step is to do a 2 ft by 12 ft counter top that is more similar in size to the Pong tables.
Scott Burnett- Boise, Idaho
A. I'm making a table with Kleer Koat and have had problems with bubbles using a hair dryer like the directions say you can. I wouldn't recommend this and went and got a propane torch, it works easy and fast. Has anyone else had success with other means of bubble popping?
Byron StrotherHobbyist - Denver, Colorado
March 15, 2010
A. Hi David,
Sorry for the late reply. I haven't checked this page in a while. Yes, bubbles from under the caps is a concern. In a couple of my prototypes, I had issues with bubbles emerging from under the caps after the epoxy was too hard to pop them. One explanation I read is the air under the caps expands and escapes as the epoxy temperature increases during curing. I solved this problem by using tile grout to seal around the caps. Another solution is to fill the caps with something to eliminate the air pocket.
Hi Scott,
The license plates look great. Well done!
Ron Steele- Northampton, Pennsylvania
March 29, 2010
Q. I am new at the bottle cap tables and have come across a few questions. Once the caps are glued down, how do I put borders or fences around the table's edges where they are removable? Then what is the best color and type of epoxy to put on top of the caps? So that you can clearly read the caps...
Mathew Andersonhobbyist - Auburn, Alabama
April 6, 2010
! I am making a table of my own. These postings have provided further inspiration to my idea of building a pong table. I must say that my techniques will vary slightly as I will be using ordered blank caps to achieve my design and I am going to use an acrylic sheet top (unfortunately I really can't afford the epoxy and I got a good price on the acrylic sheet). I plan to have it done within a month and will post pictures for everyone to compare.
Eric Miller- Allentown, Pennsylvania
April 14, 2010
! I have been collecting bottle caps for two years with the intention to build a bottle cap table. I finally finished it this month after countless hours of labor building, sanding, finishing, arranging, cleaning, sealing, and tweaking. It was such a fun project. I can't cut the habit of collecting so I'm already thinking-up ideas for another one. This one is a beerpong table. The legs fold-up and it has removable shorter legs so it can drop-down to coffee table height when we're not playing.
- Austin, Texas
April 23, 2010
Q. I already put a 3/16" coat of epoxy resin down and I wanted to pour a second coat along the front of my bar. I called the manufacture and they said to sand it with 220 grit and then use acetone ⇦ on eBay or Amazon [affil link] Flammable! to remove loose particles. I am a little stumped by this seems like to much grit. Does anyone have any suggestions on what to do before I pour a second coat. Thank you very much.
Jason Anderegg- Plano,Texas
May 3, 2010
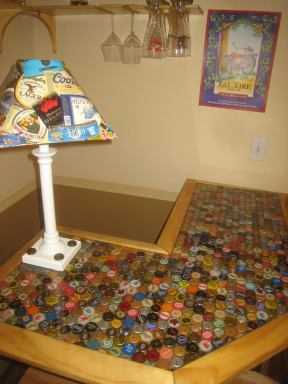
! Hi, I just finished a bottle cap coffee table. I ended up painting the table black with a "fence" around the edge for the resin. I found a cheap way to seal up the bottoms of the bottle caps. I used black silicone at Home Depot and used a caulk gun to spread it generously over the surface and press the caps into it. The silicone sealed up the bottom of the caps and filled in the spaces between caps. This saved on me having to spend extra money on the resin. Unless you look really close, the silicone is barely visible against the rest of the black table. Thanks you to the rest of you who posted great hints and tips.
Chris Mias- New York, New York
May 17, 2010
May 17, 2010
i. Hi all,
Finally finished our table.
We shipped the Kleer Kote all the way from the US.
Instead of a pic, check out this video. If you're only interested in the epoxy bits, you can skip to test pour at 2:37 , and final set-up/pouring starts at 2:54.
We did 3 layers of epoxy, seal coat is tough with the bottle caps packed in tight. Used a heat gun
⇦ on
eBay or
Amazon [affil link] to pop bubbles, works much better than a hair dryer and worth the $15. Pouring the epoxy is a bit of a pain, most challenges have already been mentioned here. A few additions:
1) Don't do it at night. At least if you live somewhere that tiny bugs are attracted to bright lights. Yep, we were left with a few tiny fruit flies in the surface on the final pour.
2) Don't overdo it with the heat gun. I got a little overzealous in one area, and the air under the bottle caps expanded and escaped en masse. I had also set the surface layer by overheating it, so the bubbles couldn't get out. Its not too noticeable, but it bugs me.
3) Using the removable barrier method was interesting. Make sure you pull that plastic sheeting really tight. Any bubbles or creases you leave there will result in weird patterns in the side of epoxy layer, making attaching the final sides more difficult.
4) Even after sealing the base of the table and all the gaps with copious amounts of silicon, we still had about 6 leaks. Wasn't a major problem, just make sure you lay something down underneath where you pour.
Feel free to throw questions at me now, feel I've a bit of experience with this stuff.
Cheers,
Joe
- Townsville, QLD, Australia
! Awesome forum, this really helps people a lot, I was wondering if anyone has tried placing epoxy resin over vinyl, or in my case a vinyl banner. I designed an 8 ft x 3 ft vinyl banner that I want on my table with some sort of epoxy resin placed on top for display/protection. Any ideas?
Ray Calitri- Upstate New York USA
June 9, 2010
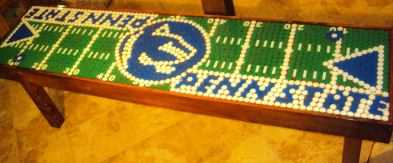
i. Here it is. Took a lot of work. I would really appreciate you publishing this photo.
Thanks,
Eric Miller- Allentown, Pennsylvania
June 16, 2010
Ed. note: Nice "nittany lion", Eric!
A. Hi Eric, just wanted to say that table looks great. Is that with the acrylic sheet on top? Gives a nice result if so.
Ray - Have no experience with using vinyl, but I don't see it being a problem. The epoxy doesn't seem to react with any materials, though water based paints and dyes may run a little? It also warms up a little in the curing process, but probably not enough to damage the vinyl. I'd still suggest doing a test pour to sort out any problems. The epoxy works well, but I guess you could also look into glass or acrylic options to protect the banner. Hope it all works out, post some pics when you're done!
- Townsville, Australia
June 25, 2010
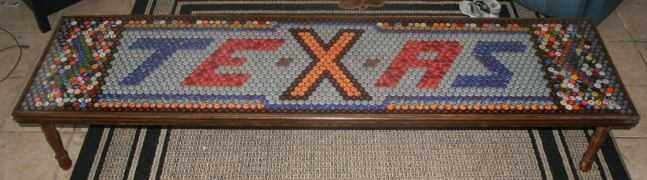
A. I spent two years collecting bottle caps. Ended up collecting far more than needed, so I have a lot extra. I decided on a Texas themed table with red v. blue. I decided on a 2X8 table that would be stationary and not portable. I built the table itself with a 1X2 edge around the top that is about 1/4" high off the table top. The height is the same as a ping pong table. It took a total of about 1900 caps to complete the table. I ordered my epoxy from US Composites. The only problems I really encountered was a fly landing in the epoxy causing me to have to repair the spot which in turn left a higher area on the epoxy because I didn't put a full new layer down. But it doesn't look bad because the rest of the table came out flawless. The costs of the table including lumber, paint, and epoxy came out to about $220. I plan to eventually add red and blue lights under the table too.

- San Marcos, Texas
July 28, 2010
! Thanks to everyone for all the tips and advice. My roommates and I finished our bar a while back and I'm just now getting around to submitting a picture.
Let me know if you have any questions!
Danny Warner- Pensacola, Florida
August 4, 2010
Sorry! Finishing.com is temporarily Read-Only.
Ted Mooney is retiring but I have several offers to take it over.
We're working hard to make sure we find it the best new home.