
| Search our quarter-million Q&As |
Home of the finishing HOTLINE since 1989
-----Tips for bottle cap tables
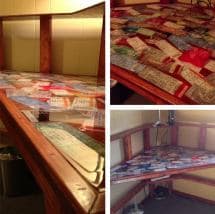
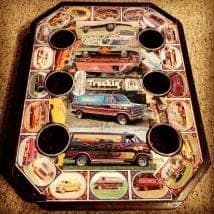
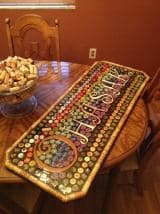
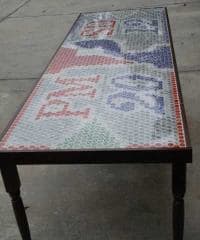
Work by Tom Staszak

Q. Hey Jeremy. Once again thanks for all the great responses and I'm almost done with collecting all my bottle caps needed. Would different types of wood be a problem with the epoxy actually seeping into the wood? What kind of wood did you use as the table and "fences". I was actually just thinking of buying wood those big flat pieces of wood from Lowe's and was wondering if that will be fine as the table top. Thanks again
Robert Miller- Miami, Florida
June 2, 2009
Q. I am unclear how to finish the sides of the built-up resin when it is still wet. Do you remove the fences after pouring each flood coat? And what material/process do you finish it with?
James Ratchford- Blowing Rock, North Carolina
July 5, 2009
Q. Hey guys, the tables look awesome! I have been saving my caps for about 7 years now and have over 25,000 I'm planning to do the complete top of my workbench in my garage, my question is with regards to the final look of the resin/epoxy, is there any buffing or wet sanding required to get the finish you guys managed to achieve? Thanks
Derek Allen- Keswick,Ontario,Canada
July 15, 2009
A. Hi Derek,
No buffing or sanding will be required. If applied as directed, the epoxy dries with a nice shiny finish.
 Ron Steele
- Northampton, Pennsylvania
A. Thanks everyone for the great comments. I'll try to answer a few of the latest questions.
Above, Joe was asking about resin for an exterior application. Make sure you search specifically for exterior products. Most clear resins are basically just poured plastic, and will yellow if exposed to UV rays over time.
Robert--I don't think wood type will be a problem. I use plywood for the table, and just ripped down pine for the "fences". The key to that if you're worried about seepage or adsorption is a thin seal coat prior to the flood coats. Once that's dry, you won't have to worry about any further seeping. The biggest issue is the first couple flood coats...you're going to have tons of bubbles come from underneath the caps as the resin seeps underneath (even if you've glued them down). Again, once you get one or two coats down, it will seal the gaps and you won't have to worry anymore.
James--depends on what look you want. You can see Ron's table has resin that stops short of the top of the border, and looks beautiful. I wanted a smooth edge for the poker table, so my fences were just higher than the caps, and I poured enough layers to go over the top of the fences, and drip down the sides. It's an awesome look too, and you just have to watch in the beginning for excess drips. Every couple of minutes, run a foam brush around the edge and it smooths out easily. Only other things to watch for are drips on the bottom, and overflow in the middle (in our case). Just scoop or flatten those out as much as possible w/ a blockbuster card or similar, and sand or grind the excess off after it's cured.
Derek--no final sanding is needed. Just pour your last coat, pop the bubbles, and keep dust and bugs away from it while drying. You'll end up with a beautiful and smooth surface. With 25,000 caps, you ought to be able to make a really nice looking decorative case for your liver, which must've fallen out by now :)
 Jeremy Melis
- Dallas, Texas
Q. Thank you all for sharing your experiences with making these tables. I just started today building a table that will be 8' x 2' 8". I'm using about 3500 caps to create a design on the table top. The only thing I haven't decided yet is whether to let the Kleer Kote flow over the edge or to have a small lip on the edge of the table. If I let the epoxy overflow, I don't want the epoxy to slope very far into the table. Jeremy, about how much of your table is flat, i.e. how far from the edge does your slope start?
Thanks so much; For everyone else planning to build a table, I'll post pictures when it's finished in a few weeks.
- Charlotte, North Carolina / Philadelphia, Pennsylvania
July 18, 2009
How much epoxy do you need?
Q. Ron, how much of the Kleer Kote Epoxy did you need for that table? I plan on making a 4' x 8' table with an edge just a little higher than the caps, and I would like the epoxy to go all the way to the top of the edging.
Emily Hoffman- Bethlehem, Pennsylvania
July 20, 2009
A. Hi, Emily. A gallon is 231 cubic inches, and a 4' x 8' table is 4608 square inches. So one gallon will cover it to a depth of 231/4608 = 0.05 inches. 10 gallons will cover it to a depth of 0.5" or 1/2"; 5 gallons to a depth of 1/4".
Regards,

Ted Mooney, P.E.
Striving to live Aloha
finishing.com - Pine Beach, New Jersey
Need quick confidential answers? $25
Need project assistance? $100/hr.
July 22, 2009
Q. Love your tables - they look great! Ten years ago, I painted my kitchen counter top with a great geometrical design, and then covered it with resin. The resin has held up fabulously... the only problem is the area near the kitchen window has yellowed over time, and the entire counter top is not quite as shiny as it used to be (ten years of kitchen abuse!). Do you have any suggestions on how I can repair the yellowed sections? Is there a way to resurface the resin, to get rid of the yellowing and make it shiny again? Thanks for any suggestions at all!
Laura DiFiore- Calhan, Colorado
July 27, 2009
Q. I'm in the process of creating a bar with bottle caps in a 2 part epoxy similar to the projects found here. I'm using Parks Super Glaze found at Home Depot. I'm going to be using several flood coats but I'm wondering if I have to let each flood coat fully cure (directions say 72 hours) before applying the next flood coat or if I can apply subsequent flood coats once it is hard enough that the liquid coats won't mix together into one really thick coat. Anyone have any advice for this? Thanks.
Mike Chambers- Burlington, Vermont
July 29, 2009
Q. I am making a beer pong table using bottle caps and the klear kote resin. The table is 2.5 x 7 feet. If I buy 2 gallons I will have enough for a seal coat, one flood coat and about 80 oz. left over. Should I spend the money to buy 4 gallons or will one flood coat be enough? Also should I fill the underside of the caps with some kind of plaster or caulk to prevent air bubbles from rising from under the caps? I am also thinking about using some sort of waterproof tile grout to fill in the gaps between the caps. I am trying to minimize the cost of the whole project. Any help or ideas?
Paul Cross- Florence, Alabama
August 5, 2009
![]() Thanks for the responses guys, my liver should still be in decent shape, its been a team effort to get that many caps! I know of 2 people with over 100,000 caps each so I'm not alone in my vast amount. I'm hoping to tackle my workbench over the winter, ill keep an eye on this thread and post pics when I'm finally done.
Thanks for the responses guys, my liver should still be in decent shape, its been a team effort to get that many caps! I know of 2 people with over 100,000 caps each so I'm not alone in my vast amount. I'm hoping to tackle my workbench over the winter, ill keep an eye on this thread and post pics when I'm finally done.
- Keswick, Ontario, Canada
August 7, 2009
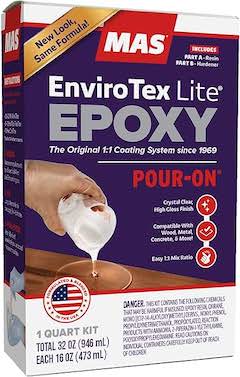
Q. I have been trying to find a product in Canada that will do the trick, and the only thing I can come up with is Enviro-Tech Lite from Michaels Arts and Crafts. I can't find any instructions on how deep a flood coat I can do at a time. Any suggestions?
My table top will have wine corks and bottle caps, and possibly a broken up plate or two, so the finished depth will be about 1". I am also trying to figure out how much product I will actually need! You know girls and math! lol It's a 48" round table top.
thanks!
- Oshawa, Ontario, Canada
August 12, 2009
A. Hi, Suzanne. I'd suggest something a bit less challenging for a first attempt, like either a very small item with the 1" thick coat, or a more conventional thickness on this table.
The area of a circle is π r2, so a 48" round table is 1810 square inches. If you wanted a coating 1" thick, that's 1810 cubic inches, whereas a gallon is 231 cubic inches. Even no-math girly girls can divide 1810 by 231 to figure the gallons :-)
Regards,
Ted Mooney, P.E.
Striving to live Aloha
finishing.com - Pine Beach, New Jersey
Need quick confidential answers? $25
Need project assistance? $100/hr.
August 13, 2009
August 14, 2009
![]() Hi all,
Hi all,
I had posted this to a different forum discussing bottle cap bar tops where many were asking for instructions, but since that site requires an account to view the thread, I thought it might be a good idea to post it here as well.
I'll attempt to write a brief how-to and list the problems I saw. Please forgive me if this post gets lengthy.
Good luck with your projects! I look forward to seeing pictures when they are finished.
------------------------------------------------------
(Ed. note, Jan. 2019: Sorry, Ron seems to no longer maintain those photobucket pages)
Problems identified thanks to the prototypes:1: Stirring the epoxy too long results in oodles of embedded bubbles that are impossible to get out resulting in cloudy looking epoxy
2: The caps will float if the first epoxy coat is too thick and the caps aren't glued down or grouted.
3: If the caps aren't sealed with grout or a thin layer of epoxy, big bubbles can sneak out from under the cap after the epoxy is too hard set to pop them - very bad!
4: Pressing caps into a layer of grout doesn't always seal the cap and prevent bubbles.
5: Seal any cracks or gaps in the bar top frame with clear caulk. The epoxy will slowly seep through any gap or even a nail hole and make a mess.
Now on to how I did it.
Step 1: Prepare the bar top. I installed the edges of the bar top roughly 1/4 inch higher than the top of the caps. The final epoxy coat covers the caps by about 1/8 inch. Don't forget to caulk/seal gaps to prevent unwanted epoxy leaking.
Step 2: Glue down the caps in the desired pattern. I used model cement left over from some plastic model car kits. Each caps was glued with two or three drops of glue around the perimeter, usually where it touched other caps.
Step 3: Apply grout. I used unsanded black grout I bought at Lowe's. It was applied with a gallon ziploc bag with the corner cut so it functioned like a pastry bag. The prototypes helped me figure out how much grout looked good while not putting it on too thick and covering most of the caps.
Step 4: After the grout has dried and the caps have been cleaned thoroughly, it's time for the epoxy seal coat. I used US Composites Kleer Kote table top epoxy and applied it as specified in the directions. Note: the directions also give guidance for encapsulating other thing like pictures and newspaper.
Step 5: Baby sit the epoxy for the first 30-45 minutes. During this time bubbles can be easily popped with toothpicks and a blow torch (also noted in the epoxy directions). A bright light source is great for finding pet hair etc. that floated into the epoxy. Just move around and look for disturbances in the reflection of the light source. Once the epoxy starts getting firm, you can't touch the surface without ruining it.
Step 6: Wait several hours and apply the thick final epoxy coat as directed.
Step 7: Repeat step 5
Step 8: Walk away, cross your fingers and check it the next day. If all went well, it will look great and not be sticky.
Ron Steele- Northampton, Pennsylvania
August 15, 2009
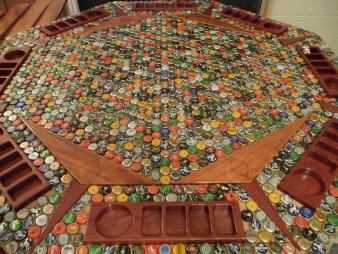
Hey all I just finished my project table . . .
![]()
. . . good luck on all your projects.
T.F.
Ed. note: Sorry, folks, we removed T's name, town, and table on 10/3/11 at his request. He's probably looking for a job and doesn't want "beer pong" to be the first thing the recruiter associates with him :-)
T.: Your table is awesome! good job! Did you fill the epoxy to the level of your table edge, or did you allow the epoxy to flow up and over the wooden edge of your table? Any tips on affixing the caps to the table at the start?
thanks!
- St. Petersburg, Florida
August 28, 2009
U.S. Composites Klear Kote epoxy
! Just finished my table last night using the U.S. Composites Klear Kote epoxy. It looks great! I think Ron did a great job of explaining the steps to using the epoxy. As a side note, I used lighters and a creme brulee torch
⇦ on
eBay
or
Amazon [affil link] to pop the bubbles, and both worked really well.
Peter
- Philadelphia, Pennsylvania
August 28, 2009
![]() Thanks for the tips everyone, you've really been a life-saver. In the spring I'm going to do a man-cave in the basement and wanted to have the top of my bar contain casino chips and playing card hands. But instead of sitting the chips on the bar, I'm going to drill out holes and have them flush with the bar top. So rather than a fairly thick coat of liquor, I would only have a fairly thin coat. I had no idea what to use, and had experimented with varnish, urethane and laquer. The epoxy in this article will be exactly what I need. Thanks.
Thanks for the tips everyone, you've really been a life-saver. In the spring I'm going to do a man-cave in the basement and wanted to have the top of my bar contain casino chips and playing card hands. But instead of sitting the chips on the bar, I'm going to drill out holes and have them flush with the bar top. So rather than a fairly thick coat of liquor, I would only have a fairly thin coat. I had no idea what to use, and had experimented with varnish, urethane and laquer. The epoxy in this article will be exactly what I need. Thanks.
- Detroit, Michigan
October 18, 2013
|
|
! After reading this thread I ordered 4 gallons of Kleer Kote from US Composites. I laid around 1500 caps on a 2 1/2' x 6' folding table. I used a drizzle coating of Kleer Kote to seal the caps down to the table before pouring a partial flood poor. I'll have plenty of Kleer Kote left, probably more than a gallon. Thanks for all the great advice. James Sampson- Mary Esther, Florida September 22, 2009 |
Q. How do you achieve a continuous edge? I would like the side of the table top to have the same lacquer finish as the surface. My fear is that even when using a removable metal fence, the lacquer will adhere to the material and/or loose some of its natural luster.
Does anyone have experience with this treatment?
- Laguna Beach, California
September 14, 2009
A. Re: Wm. Shook's continuous edge question...
All the poker tables we make have this continuous edge. What we do is build an outside "fence" with wood that's about as tall as the bottle caps. Then, when we resin, we pour 1-2 layers higher than the outer fence. The resin drips down the edge, and you have to smooth it out continuously as it dries. Also, watch the bottom...you'll get drips, and these will dry rock-hard. You either gotta wipe them off when they're wet, or come back and grind them off.
Jeremy
Jeremy Melis- Dallas, Texas
November 23, 2009
September 30, 2009
! Great tables everybody!
I've been checking in on this thread every few months since the beginning of the year.
A housemate and I have constructed a similar table over here in Australia, but can't find an appropriate epoxy to finish it with.
We've tried a couple of 2-part polyurethane casting resins, but the exposed surface doesn't finish flat and hard. We've been back to our local composite supplier, they don't think we can do better.
Can't find Kleer Kote or US composite products anywhere over here, and emails to US Composites have gone unanswered.
If anyone has ideas, I'm all ears. :)
Ahh well, just thought I'd stop lurking and let you all know these tables look great, and post a pic of our effort:
- Townsville, QLD, Australia
Ed. note May 17, 2010: Joe has completed his table and posted a great youtube video of the construction.
Sorry! Finishing.com is temporarily Read-Only.
Ted Mooney is retiring but I have several offers to take it over.
We're working hard to make sure we find it the best new home.