
| Search our quarter-million Q&As |
Home of the finishing HOTLINE since 1989
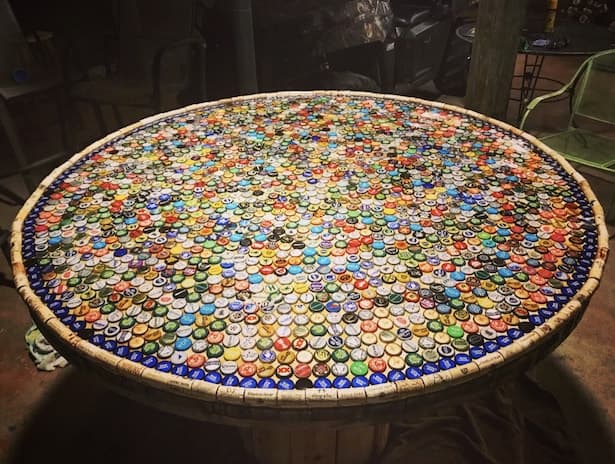
-----How to build a bottle cap table
< Prev. page (You're on the last page)
April 11, 2015
Q. I have been looking through these posts and am virtually crying! I live in the UK. I am a housewife. I painted one drawer and poured self leveling epoxy resin from a small 4-oz. kit for jewellery onto it and then flicked very fine glitter over the top. When the bubbles came I used my embossers heat gun
⇦ on
eBay or
Amazon [affil link] from my craft kit to disperse them.
What was the end result? Well, me jumping up and down and squealing because I could see a future kitchen!
EXCEPT - I'm a housewife who does little craft projects. I'm not going to buy silly little pots of self leveling resin stuff at an over blown price from a craft shop!
So, searching led me to your lovely pages. But you guys are mainly all in the US! How, what, where do I begin?
I just want a UK outlet or some advice on UK manufacturers names and what I'm supposed to buy! Something where I'm not redirected to a site selling boat varnish!
I wish I knew how to upload my 12 second video of my glitter draw and a pic of my first attempt! Then hopefully you would see what I meant and could advise!
Please help me get my pink glitter kitchen.
NannyPink, with hope, and pink glitter running thru me! Lol!
- Baldock, hertfordshire, England
Ed. note: Hi Lynn. Just e-mail the video to or put it on youtube and tell us the address. Clear pourable epoxy is not cheap no matter where you buy it, but try amazon.co.uk
Q. I have a question that perhaps some of you could help me with. I have noticed many of you have done bottle tops, etc. However, my situation is unique. We are actually inserting guns into the thick bar top. The issue is that the depth is almost 3 inches. Does anyone know of a product that won't require 48 pours at that depth? I would like to do it in several pours but most require 1/16th of an inch or 1/8th of an inch layers. That would take forever!! Need help and any response or input is appreciated.
John RunkleDirty Shame Saloon - Troy, Montana USA
April 30, 2015
Q. Hello Everyone,
Thanks for all the useful advice on this site. I am about to do my bar in bottle caps and have a few questions being nervous that this is my first time doing this and I don't want to screw it up .
Would spreading a decent layer of Elmers glue and pushing the caps into it help with the bubbles from under the Caps issue? Would this affect the resin in any way?
I have seen mentions of different brands of resin to use and I'm wondering if either Parks super glaze from Home Depot or Famowood glaze coat from Lowes would work as well.
How many coats of resin are people putting down to achieve the results that are shown here? Is there a reduction in clarity the more coats that are put down?
Thanks again!
- Canton, Michigan, USA
May 8, 2015
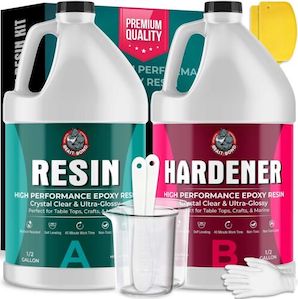
Hi Thomas. I haven't done a table, but I don't think that Elmer's water-soluble glue would be as good as an epoxy glue ⇦ on eBay or Amazon [affil link] . You might try a sample with 8 or 10 bottlecaps to get a feel for what works before you commit your hard work to the vagaries of a routine you're not familiar with, and which is so time limited as a rapidly-hardening epoxy.
Look for "thick pourable epoxy", and see whether the instructions indicate that it's for this purpose; if not, it probably won't work nearly as well. Sorry, we don't recommend specific brands or stores as it has led so many times to phony "testimonials" from salespeople posing as satisfied customers. If you give people both anonymity plus an opportunity for commercial profit from a posting, faking it can be irresistible :-)
Regards,

Ted Mooney, P.E. RET
Striving to live Aloha
finishing.com - Pine Beach, New Jersey
Need quick confidential answers? $25
Need project assistance? $100/hr.
May 2015
Q. Thanks Ted. How many coats are usually used? Is it based on height wanted?
Thomas Dettloff [returning]- Canton, Michigan
May 8, 2015
A. Hi Thomas. I'm only the operator of this website, and this is just one of 50,000 threads on the site: I've never worked with that pourable epoxy stuff, so I can't answer -- but I think it implies on this page and perhaps in the directions on the bottle that there is a limit to the thickness of a pour. Maybe about 1/4" probably because epoxy get so hot as it cures that it needs to get some cooling from the air. Good luck, and hopefully people who have done it will ring in. Good luck.
Regards,
Ted Mooney, P.E. RET
Striving to live Aloha
finishing.com - Pine Beach, New Jersey
Need quick confidential answers? $25
Need project assistance? $100/hr.
May 2015
Q. This tread is awesome and exactly what I was looking for! I've been saving bottle caps for a while now and finally have enough for my bottle cap beer pong table. I've read this entire tread and was hoping you fine people would comment/give suggestions to my plan.
I'm planning on buying plywood, fairly thick, and wood gluing a "fence" around the perimeter of the table using clamps. I will mostly buy and install legs onto my table once completed just to save time. I was planning on either painting or staining the table. Then place the bottle caps in my desired design (spelling my particular college). It will be a rectangle table (probably 8' by 3' or something like that) and I will stagger the bottle caps to make a snug fit. I do not think I am going to glue each bottle cap down in order to save time and money. I am worried about bottle caps 'floating' but I have lots of roommates that will be able to help keep them down as I pour the first coat. This part worries my most. After this however I just need about two or three more thin coats of epoxy. Oh, and am I am definitely planning on using the Kleer Kote as nearly everyone recommended it even though it is expensive. I also have a torch and plan on using it too heat up the epoxy to remove bubbles.
So what do you think? I am worried about not gluing down the caps but I think it will work. What about putting books or weights on the bottle caps to keep them down while I pour the first coat? And when I pour the first layer should I worry about getting epoxy on the top? Eventually they will all be completely covered so can I just pour wherever and it will drip itself down and harden the caps in place? Thanks for everyone's contributions and help, this has been such a great help in planning my bottle cap beer pong table!!
- Springfield, Massachusetts USA
June 14, 2015
September 10, 2015
A. Thomas...& Derek...
Glue will definitely help with the bubbles and will have no effect on the finish. I used Elmers washable school glue and I used the clear glue instead of the white glue.
I used two coats to get the desired thickness over my tops.
GLUE THEM DOWN.... THEY WILL FLOAT.
Books or people or anything else is just going to be a disaster waiting to happen. Time and a few more bucks is nothing for such an awesome table.
After I had my design laid out I removed the tops about 10-15 rows at a time. I then spread the glue pretty thick and used an old credit card to spread the glue out evenly and then placed the caps back down. About an hour is all it takes to do it this way and to avoid many problems.
Good Luck
- Tuscaloosa Alabama USA
Q. Hello!
Great thread.
A quick question for those who have made a beer pong table. I just completed making a beer pong table and covered it with the Famowood brand of epoxy resin. I did one layer, as it was a hand painted table instead of a beer cap table. It came out perfect! However, I am wondering if the table will have adequate bounce? Does anyone have experience with how a pong ball bounces off epoxy as compared to wood?
I do realize that most people play the game by tossing the ball into the cup and not bouncing...but just in case :-) thanks!
- Fayetteville, North Carolina USA
September 21, 2015
Q. Hi. I have learned a ton from all the posts and am ready to start except for 1 thing. I have a table that does not have a lip (fence?). If I build a frame with caulk to hold the epoxy in, can I remove the frame/lip/fence afterwards? So there are no splinters should I wrap the wood in Saran type wrap? I am sending pictures and appreciate your help!

(I can remove the legs so all sides are exposed)
- Dallas, Texas
May 8, 2016
Q. What is everyone using for the "fence" ? My table, an old electrical spool, does not have an edge and I'd prefer it not to have a permanent one. Thanks for any suggestions!
Tina LeNormand- Gulfport, Mississippi United States
June 21, 2016
A. Hi Peter; hi Tina. I haven't done this so I don't know, and the question has been asked at least a half-dozen times on this thread. So what I'm going to say is try covering your wood fence with wax paper. It seems to be used to keep 101 things from sticking. I doubt that Saran wrap would work as well.
But even Renoir and Michaelangelo did charcoal sketches before committing a scene to oils. Don't be expecting detailed instruction on how you can build a masterpiece the first time you touch pourable epoxy :-)
Play with the wax paper and some pourable epoxy on small scrap pieces first :-)
Regards,
Ted Mooney, P.E. RET
Striving to live Aloha
finishing.com - Pine Beach, New Jersey
Need quick confidential answers? $25
Need project assistance? $100/hr.
June 2016
Bar Top Refinishing Help
Q. I am a college student. To pay for school I have been doing higher end home renovations and custom furniture pieces.
I have done multiple finished surfaces with Varnish and two part Epoxies. Recently a customer asked me to resurface a custom bar top he had built for him. It has minor scratches and engraving in the middle of it.
I am trying to figure out the best possible finish to use for this surface, It has only had a oil rub finish on it which has allowed it to be scuffed and scratched from use over the years. The surface is a white Oak with a Walnut stain. The bar surface has been engraved with their family name as well so I want to be sure to not tarnish this area.
My plan is to start rough and work my way up in Grit till I have the surface blemish free. My concern with over sanding is having to find and rematch the stain. Epoxy resin would be an easy work around but would require a larger time frame (customer is asking 4 days) as well as a concern for contaminants since the bar top is not removable.
This has caused me to want to revert to a regular Varnish with multiple coats that is fast drying. This would let me do a light sanding and then immediately begin work on the surface. The varnish will not hold up as well as the Epoxy, but would be a fast solution.
My final questions is with epoxy bubbling, I have never been able to get my surface bubble free which really bothers me. I have concealed and re-sanded to conceal bubbles to the point customers will not notice, but it still bothers me greatly. I use a torch and heat gun and watch like a mother goose, but still manage to have bubbles rise up. Does any one have tips for finishing these types of surfaces and suggestions for this type of work in general?
Student - Mechanicsburg, Pennsylvania
December 5, 2016
A. Hi Drew. There are many suggestions for dealing with bubbles on this page which we appended your inquiry to. I see that there is also a spray you can mist onto the surface for the purpose ... but how well it works is something I don't know :-(
Regards,
Ted Mooney, P.E. RET
Striving to live Aloha
finishing.com - Pine Beach, New Jersey
Need quick confidential answers? $25
Need project assistance? $100/hr.
December 2016
Embroidered military patches
Q. I want to make a bar top or table top putting military embroidered patches under the resin. I have observed other resin bar tops where the patches had nothing to protect the integrity of the colors of the threads and the patches became very dark and hard to see, possibly due to "absorbing" the liquid resin.
Does anyone have any suggestions what to possibly soak the embroidered patches with, which would allow them to become impervious to the resin/Kleer coat?
Hobbyist - Oro Valley, Arizona, USA
October 21, 2017
October 25, 2017
A. Hello, Jane!
What are the dimensions of the patches?
Apologies in advance BTW because my explanations tend to end up being more complex and involved than is doing the actual procedures...
Anyway - This *might* be applicable:
I've used very light multiple coats of Triple Thick Crystal Clear Glaze on *paper*, and very light multiple coats of Crystal Clear Enamel on tropical hardwoods which "bleed" color if any sort of solvent-based coating is brushed on.
Both are spray products; name brands deleted but the first one is common to Hobby shops and the latter is found in home'n'hardware stores/departments ;) The trick is finding a place with no ((or minimal)) air current, and using very light, brief "spritzes" so that just a few tiny droplets get misted onto the paper, and waiting for it to dry well between "spritzes".
- The idea is to minimize the amount of solvent that can get absorbed while leaving just enough for the acrylic to remain sticky.
- That might work for fabric but I've never done it myself, plus, fabrics and dyes are so different, and embroidery is different again, so it'd be best if you had a small sample you could test.
That being said, however, if I was doing your project, I'd personally do it as a glass-covered inlay, carving out a small compartment in the wood for each patch, with a lip for the glass to sit in ((the depth adjusted for the projected depth of your resin)), then sealing the wood with a few layers of super-blonde shellac ((because it's non-reactive and neutral when dry)), setting the patch on a bit of something non-reactive ((to keep it just a wee bit above any possible condensation)), apply some flexible adhesive, and set-in the glass.
What I'd also consider doing, FWIW, would be to make small openings in each compartment for tiny LED string lights, or optical fiber running from a light source ((depending upon the thickness of your wood and the distance between patches)) that could just barely peek through the wood, or maybe even some super-thin electroluminescent "EL" wire in each compartment, to subtly light each patch underneath the glass - I think that could be nifty ;)
- HOWEVER!, avoid window glass - it has a greenish tint, and it's not very strong at all, so not good for a table or bar. I'd go with something made specifically for use in stained-glass projects, or something very clear ((maybe optical glass)) designed for industrial applications.
I hope that Helps!
- Richmond, Texas USA
A. I have to wonder if simple Elmer's glue or ModgePodge (clear) would solve the problem of darkening.
I used to use two part epoxy pour mixes by the five gallon containers. I found pouring it over a news clipping, or sealing that clipping with polyurethane or brush on lacquer would cause the other side to bleed through so bad the project would be destroyed. However, if I sealed the clipping in the same glue I used to attach the clipping to the plaque, the next coat over it did not affect the glue or the clipping.
- Desert Aire, Washington, USA
December 4, 2017
June 1, 2018
Q. Hello there. Loving all the bottle cap tables. That might have be my next project!! Shhhh … don't tell my husband cuz I've gotta finish this project first ;)
I'm wondering if I can use the same 2-part epoxy technique to protect the top of a cabinet that we want to use as a bar outside. Myself and my daughter have put a bit of time into refinishing this old cabinet with our favorite things, fun sayings, family vacations and inside jokes but unfortunately the top is made of a cheap chipboard so it won't hold up in wet conditions. Do you think this technique will save our little project? It's not completely finished but the pic should give you a good idea of what we're up against.

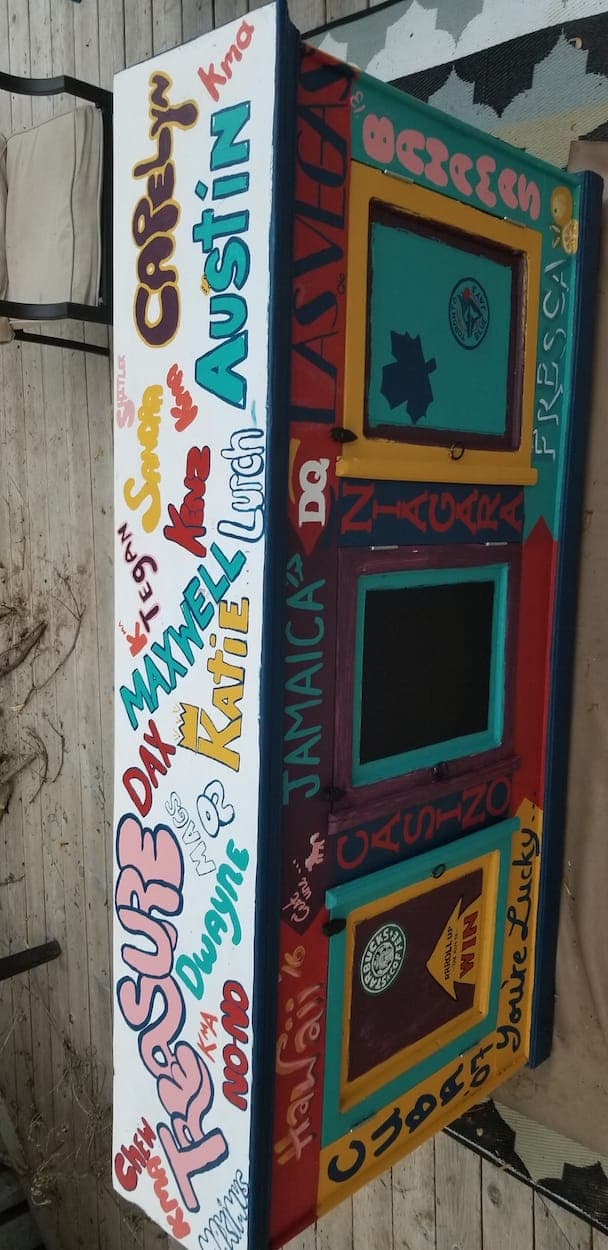
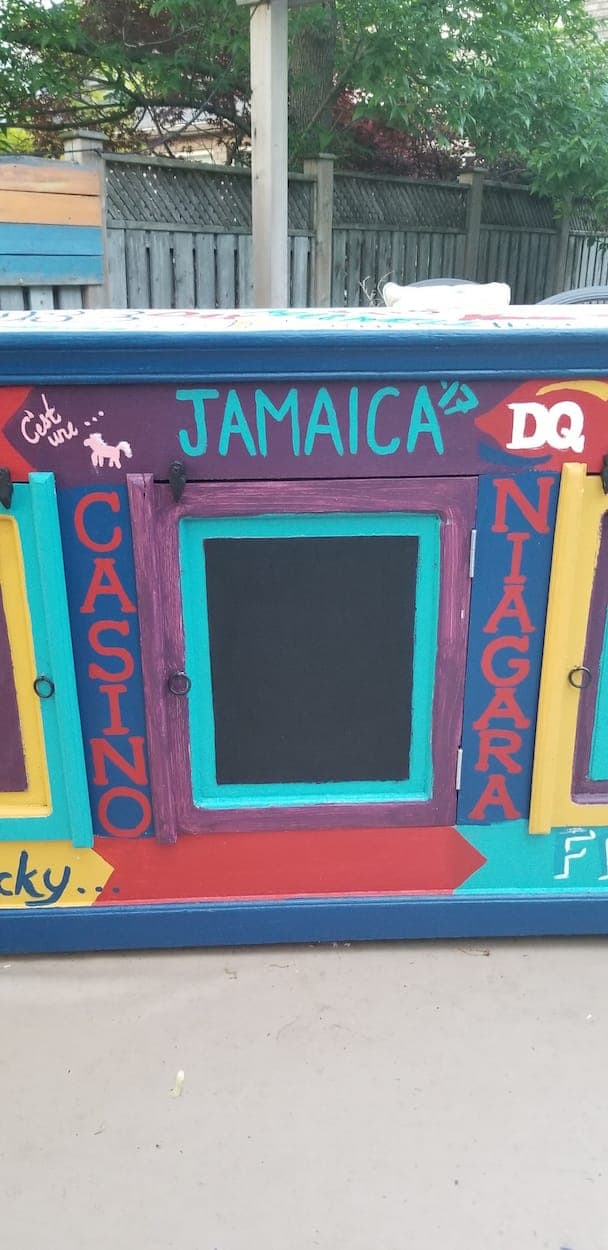
How would I set up fences so I achieve the same thickness that flows over the top edges?
Thanks in advance
- Hamilton Ontario Canada
A. Hi Barb. That is really a piece of work! Congratulations.
But I think trying to use thick pourable epoxy will make for poorer results after much more work and far higher cost. I'd suggest carefully applying two, maybe even three, layers of polyurethane with a brush and it will be very clear, UV resistant for outdoor use, and completely waterproof.
Personally, I wouldn't expect the wood sides and ends to endure outdoor exposure without polyurethane either. Good luck.
Regards,
Ted Mooney, P.E. RET
Striving to live Aloha
finishing.com - Pine Beach, New Jersey
Need quick confidential answers? $25
Need project assistance? $100/hr.
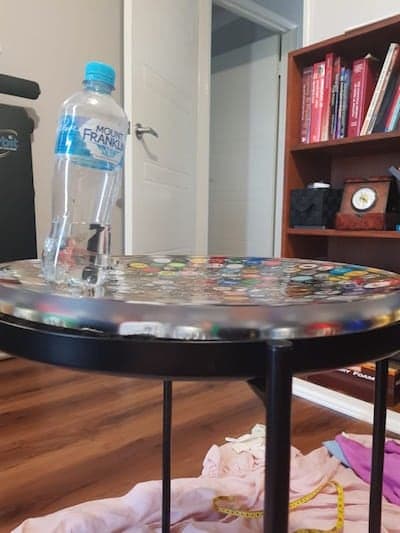
![]() This thread was super informative and beneficial to me while working on my spool table! I'm happy to share my final result!
This thread was super informative and beneficial to me while working on my spool table! I'm happy to share my final result!

- Sumter County, Georgia
October 25, 2018
A. Thanks Jes. My son works at (and I frequently visit) a craft brewery which uses a bunch of such spools as tables. I'll have to show him this :-)
Regards,
Ted Mooney, P.E. RET
Striving to live Aloha
finishing.com - Pine Beach, New Jersey
Need quick confidential answers? $25
Need project assistance? $100/hr.
Q. Hey guys, I'm devastated and need some help.
We followed a tutorial to create a bottle cap table using a metal Ikea table as the mould. We glued the caps on and then poured Protite clear casting resin onto it. Everything was looking great until we checked it this morning to find that the entire resin disc is now noticeably concave.
I have no idea why it has bent like this. And because it is bent, it now no longer fits in the table. We spent 18 months collecting these bottle caps for a birthday present and it seems there is no way of fixing it. Does anybody have any suggestions? Is it even salvageable?
Tam Citadel- Perth, Australia
January 26, 2019
< Prev. page (You're on the last page)
Sorry! Finishing.com is temporarily Read-Only.
Ted Mooney is retiring but I have several offers to take it over.
We're working hard to make sure we find it the best new home.