
-----
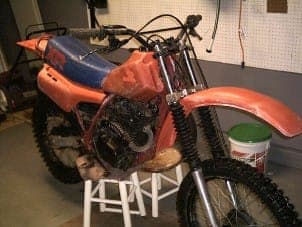
Painting a plastic (polyethylene) motorcycle gas tank?
Q. I know that many people would love to be able to paint their old faded beat up MX fuel tank. I have never tried this, but have been told that this is not possible due to the out gassing of fumes thru the plastic "pores". This being said, does anyone know of some process that would allow for the successful application of a good Automotive paint finish that will not "bubble up" once applied to the HDPE tank. I would like to seal the inside of the tank with a good plastic epoxy gas tank sealer. My thinking is that this may solve the out gassing issue in order that the paint may stay adhered. First off do these epoxy gas tank sealers work? or will this peel or negatively effect the performance of the plastic tank? If this were successful in sealing the inside of the tank, what other special provisions are needed to successfully paint the exterior of the fuel tank. Does an adhesion promoter and flex agent need to be used with the paint for most durable long lasting finish. Would a special paint such as ("Imron") Aircraft quality paint improve the chances of obtaining the best finish? Has anyone ever tried this with Powder coating the exterior of the tank? Hope this will get a lot of response in order that there maybe a reasonable way to successfully paint your MX plastics without the negative consequences that we all have heard about or experienced. Thanks in advance for your knowledge and input on this matter. Sincerely, Kevin
Kevin FormanVMX Enthusiast /restorer - Doylestown, Pennsylvania
October 11, 2018
⇩ Related postings, oldest first ⇩
Q. I have a plastic (polyethylene, I believe) gas tank from a motorcycle I would like to paint or at least find a way to have it colored "red" instead of the faded orange type color it is now.
Is there any good places that can do so or is there a way for me to prepare and paint myself? Please let me know what materials should be used to get adhesion to this material and also a resistance to the gas fumes which breathe thru the gas tank itself. I have it painted now but two weeks and it bubbles from the fumes I believe.
Thank you in advance.
Clint G [last name deleted for privacy by Editor]- Saginaw, Michigan
2002
2002
A. Hi Clint !
Please see the archives --
# 10814, "How can I paint polyethylene?",
#10626, "Bondite or flexible primer for polyethylene" and
#6528, "Coating for Polyethylene Material".
In short, you cannot successfully 'paint' Polyethylene.
I would be much more concerned about the gas fumes that, you say, permeate through the tank's walls. Are you SURE? Was this always like this? (which I doubt). PE is pretty good in permeability but PE will eventually break down due to U.V. attack ... which is why it, like many plastics, is coloured (normally black); but red colours, ask any motorist, DO fade.
Sorry. Can't help you. Go & ask the dealer. But please get back and let me know what make of motor bike this is, a cross country special, perhaps? Thanks.

Freeman Newton [deceased]
(It is our sad duty to advise that Freeman passed away
April 21, 2012. R.I.P. old friend).
A. Hello,
I can confirm this having a problem of painting a gas tank myself. I contacted Acerbis a major manufacturer of motorcycle gas tank and they told me that their tanks for off road (dirt) bikes are Reticulated Polyethylene (PE-X). According to them they are not repairable nor paintable. Painting could be performed if the tank is fluorinated (not very practical for me). The ones for street bikes are Polyamide (nylon).
Best regards,
Roberto C [last name deleted for privacy by Editor]- Torino, Italy
2002

A. This is a common thing now; with the new Honda CBR only the outer shell is plastic the inner tank part is still metal.
You can paint the plastic, it is made out of the same plastic as the fairings and such. It is like painting plastic ground effect kits for cars, same thing. You should have no trouble painting it. Good luck. post a pic when it's done.
Jose l [last name deleted for privacy by Editor]- Chicago Illinois
2003
A. I had the same problem. 1986 Yamaha TT350 with white PE (plastic) fairings, fenders, and yes, gas tank. All remain white over the years, but the gas tank is yellowed. I tried painting with an epoxy primer and paint. Same thing - just weeks later, I got bubbling, and eventually scraped it all off. POSSIBLE SOLUTION: I'm taking it to a local spray-on truck bed liner company. All colors available. They say it should be great adhesion. The finish will be textured, but still shiny - and TOUGH. If it works well, I may paint the other pieces to match. Check with me in a couple weeks and I'll tell you how it turned out.
Brett W [last name deleted for privacy by Editor]- Spokane, Washington
2003
Q. I'm trying to find out if Brett W had any luck with the bed liner spray sticking to the plastic gas tank. I too have tried painting the Plastic gas tank on my MZ several times with no success. Thanks
Ian G [last name deleted for privacy by Editor]technology - Port of Spain, Trinidad
2004
Q. As with many of the questions posted, I am trying to restore a faded dirt bike gas tank to white. I was wondering if it could be lightly sanded or if the stain goes much deeper than that. Also, if the guy that used bed liner to cover would report his results I would appreciate it as that sounds like a reasonable idea.
Scott M [last name deleted for privacy by Editor]Hobbyist - Sheldon, Missouri
2003
A. There are two issues involved in painting polyethylene. One is to "activate" or "modify" the surface chemically to allow wet out and adhesion. In industry there are numerous methods used to treat the surface of polyethylene before bonding or painting. The best are too hazardous for a small shop or garage since the chemicals involved are actually dangerous. Reasonable bond strength - enough for paint - can be achieved with very light surface roughening using detergent water and fine wet-or-dry sandpaper. This must be followed by careful flame treatment. An oxygen rich flame is best and the flame must not be allowed to melt or glaze the surface. Instead, the farthest tip of the flame only should contact the surface and then only for a brief fraction of a microsecond. The flame must be kept quickly moving at all times. Every square inch of the surface must be touched ever so briefly by the farthest tip of the flame in this way. After some cooling, the surface can be retreated if in doubt - but I would suggest running the flame in a cross direction to the initial hit.
The surface can be tested with super clean distilled water. Apply a single drop with a very clean eye dropper. On an untreated tank, the drop will bead up like on a well waxed car. No adhesion. If properly surface modified, the drop will actual cling to the surface and spread out to be at least twice as wide as it is high. This gives adequate adhesion for most applications.
The second issue is to use a paint compatible with the flexibility of polyethylene. I suggest using a flexibilized paint or adding a flexibilizer as is customary for flexible bumpers. All the major paint suppliers offer this. Of course, a flexibilized clear coat can be put on top.
As to priming - I feel it just interferes with flexible performance and adds extra work. If the tank needs scratches or dings filled in this may be possible if you can find a sufficiently flexible filler. In any case if you were to sand the primer or the filler down and even lightly hit or scuff into the polyethylene, that area has to be re-flame treated. If you hit it hard enough to bubble the primer or filler, you are way overdoing it! Several light quick sweeps with the flame will do the job - a near-scorching will ruin it!
If you need optimum adhesion or structural bonding for repairs or modification that can be done too but the chemistry has to be kicked up a lot.
Jack W [last name deleted for privacy by Editor]- Austin, Texas
2003
Q. I have the same problem. I have a 1983 XR200. The used XR200 plastics are the same faded color as mine. The previous owner tried the spray paint with the same bubble results. It's an old bike but a very good runner, riding it you would think it's right from the Honda showroom floor. Too bad the plastics make it look like it ready for the junk yard. If you all find a good way to restore then please let me know.
- Slidell, Louisiana
2004
Dear David W
I have a 1995 XR250R that I have rebuilt and also restoring to reliable operating condition and clean it up. I want to paint the white gas tank, because over the years they tend to yellow. New tanks are pricey so I was trying to find out how to paint it. I cleaned it well, scuffed the surface lightly with sandpaper, for adhesion, and applied a satin white plastic bonding paint, but it just peeled days later. I was on this site looking for tips when I saw your memo. You can buy new stock plastic for your 1983 XR200.
Ben T [last name deleted for privacy by Editor]- Arley, Alabama
2005
Q. I have a dirt bike and I am trying to paint all the fenders and all the side panels a high gloss paint and I would like to now how or what kind of paint to use and how to paint it? I need a good paint that will hold up on a dirt bike.
Joshua T [last name deleted for privacy by Editor]Painter - Georgetown, Ohio
Q. I am searching for a cost effective paint or texturing process that will adhere to low density rotomolded polyethylene. I would like to create a surface texture and color similar to stucco, rock, concrete, etc.
Les C [last name deleted for privacy by Editor]Plastic rotomolding company - Meridian , Idaho
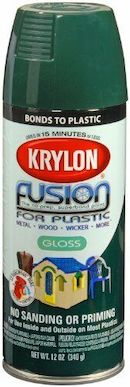
A. I have had great luck with a paint product called Krylon Fusion ⇦ on eBay or Amazon [affil link] . It's a plastic coat in various colors and it has worked very well on side panels fenders, etc. I have not tried it on gas tanks.
Vance S [last name deleted for privacy by Editor]- Michigan
2004
Q. Hi all,
Can anyone please help me on the subject of painting my kayaks name on it. It is an A K A brand new, my new toy for light tackle fishing and is made from Polyethylene. Can anyone advise me please?
Darren O [last name deleted for privacy by Editor]kayak fishing - Perth, West Australia, Australia
A. I have never used this product but may be you could try Ixell-adhera which Aids adherence of 2 component paint on internal or external plastic material Polypropylene (PP), Polypropylene / Polyethylene (P/E) and all modified Polypropylene (PP/EPDM) materials.
Jody [last name deleted for privacy by Editor]- Jakarta, Indonesia
2004
Q. Hey my name is Paul,
I have a CBR 250 rr tri colour and hate the colours so I want to paint the fairings and gas tank. The fairings are pretty much perfect condition and have peeled the stickers off. Can I just paint straight over the old paint on the fairings. and on the gas tanks there are stickers but covered in a clear coat so I can't peel them, should I sand the whole tank back or just where stickers are and then bog or prime where the stickers existed. Also I have a dent in the fuel tank but pretty minor should I bog it or get it sucked out.
hobby - Perth, WA, Australia
A. Found this article very good.Haven't tried myself yet
www.4strokes.com/tech/plastic_restore/
- Lethbridge, Alberta, Canada
2005
Q. I'm going to try using the
Krylon Fusion
⇦ on
eBay
or
Amazon [affil link]
on a toy ride for my daughter. It is made of polyethylene. Manufacturer says it can't be painted, but they've got an interest in obsolescence. I'm going to work on the tires first and if it holds, I'll try the top, and then the body in that order.
If Krylon Fusion works as advertised, I plan to find salvageable similar toys to refurbish and donate to children's outreach and advocacy groups.
I'll keep you posted if the Fusion works.
- Decatur, Alabama
2005
A. I think I might have a good answer to all of you guys. I have quite a lot of experience in D-I-Y painting and I have tried a variety of products, so here we go:
Por-15 Rust Preventative Coating
⇦ on
eBay or
Amazon [affil link]
These are the best D-I-Y paints I could find, a bit more expensive than others though. They are unbelievably tough and they stick on anything.
- Manchester, UK
2005
Q. Okay, I am also looking for an answer to this question - BUT - I own an old Armstrong/CCM with a plastic tank - that the previous owner had successfully painted pure white, 3 years ago, and still looks like new - so... it IS definitely possible.
John C [last name deleted for privacy by Editor]- Bridgwater, Somerset, UK
2005
A. Hello! I would suggest if you don't have to paint plastic, don't paint them! They will look nice at first then after awhile you will be wondering how do you take it off (soak them in brake fluid ⇦ on eBay or Amazon [affil link] over night, works like a charm) Especially plastic tanks. You will find your tank will start to sweat and eventually crack! From previous experience! If it has heavy oxidation on it, take the time to razor blade it, scrape it off. It is time consuming but you will be more that happy with the results in the end! Then sand them down with medium-fine sandpaper and work keep using finer sandpaper. Then use a hard plastic conditioner on them. They will shine like the day they were on the showroom floor! Take care guys.
Korey L [last name deleted for privacy by Editor]- Canada
2006
![]() My husband and his friend is going to try painting my bike will let you know how it went. I have an old '82 Honda Goldwing.
My husband and his friend is going to try painting my bike will let you know how it went. I have an old '82 Honda Goldwing.
- Chariton, Iowa
2006
A. Last week I followed advice of using the Krylon paint, my husband painted my motorcycle, which was sun faded black, with black Krylon paint and misted over that with a car paint that has metal specs. I have a '82 GL1100 Goldwing the outer tank and fenders are plastic, so far so good, it's just been about a week and we haven't buffed it yet though. Will reply again if problems arise.
Lori W [last name deleted for privacy by Editor]- Chariton, Iowa
2006
A. Painting my gas tank on my cr500 motocrosser was a pain, like most of you here it peeled of about a week after application, simply due to the vapours permeating through the walls and causing it to bubble. Only way I could find was to use fibreglass resin (mixed with pigment colour of your choice, black in my case) with a couple of coats and a good sanding/polish it looks lovely (and solid so it won't bubble).
Simon T [last name deleted for privacy by Editor]- Cambridge, England
2006
Q. I have tried using the Krylon Fusion on a dirt bike fuel tank but it peeled off. I'm guessing there needs to be some surface prep to get the proper adhesion. I'd also like to spray all the plastics (fenders and side panels) and am curious about flex cracks. One email said to use a flexible primer like used on automotive bumpers. I would like someone to clear up the confusion and misinformation and provide a known workable solution! Thanks!
John W [last name deleted for privacy by Editor]hobbyist - Dillsburg, Pennsylvania
2006
|
|
Ed. note: Hi, John. We see no 'misinformation'. Several people told us what they tried and that it didn't work. Others said you might get paint to stick if you are willing to do the difficult mechanical prep, followed by flame prep, followed by dyne testing that they detailed. Others proposed the compromise of switching to bed lining material or resin instead of paint. There are thousands of different plastics, and Krylon Fusion works fine on some in some applications, and not on others in other applications. Similarly, some forums recommend Bulldog adhesion promoter ⇦ on eBay or Amazon [affil link] for plastic bumpers. But plastic gas tanks are a different material than plastic bumpers, and a completely different application. A simple method to guarantee adhesion of paint to all plastics under all conditions without flame prep, dyne testing, and other complications simply doesn't exist, sorry. Good luck :-) |
A. I have a 1988 Yamaha YZ 125 dirt bike with a factory finish on the plastic fenders that peeled off. I bought two new plastic fenders at the dealer and used 'plasti-coat' brand spray paint. This paint is just designed for touch up work, but it has worked wonders on the new fenders. I began by applying a VERY light mist of color to the surface, let it dry for up to 10 minutes and repeated up to seven coats. No problems yet and a great glossy finish.
Jamie C [last name deleted for privacy by Editor]- North Hampton, New Hampshire
2006
Q. Just like everyone else I want to paint my Plastic fender, side panels, etc, they are white, I would like them navy blue or black, I think I'm going to try that Krylon paint, If it works it will look sharp, my gas tank isn't plastic though, hmm.. I can probably find something to work on that, what about the seat? haha, It's a ugly light blue color, probably best to just leave it, but I would like it black, maybe I can find one for not too much money or I can find a cover for it... I'll post a pic in a month or 2 when It's looking good.
btw it's a DR125SE
if for some reason I shouldn't do what I just stated, I'm bookmarking this site so POST quick so I don't make a fool of myself...
- Maine
2007
A. I ran into the same issues that most of you have described in regards to painting plastic. I have tried every technique. Bulldog does not work well on PE. however, I have finally found a method that works really well but its a bit expensive. I used PPG products; started by cleaning and degreasing all plastic then lightly sanding with 240 grit then 400. The plastic was then cleaned with soap and water. I then applied 2 light coats of PPG plastic adhesion promoter ($45). Waited about and hour then applied 4-5 coats of PPG flat black automotive paint ($50). It only takes about 10 minutes to dry so applying 5 coats takes about an hour. Let is dry for 24 hours then sand lightly with 400 grit and apply final PPG clear coat ($50) which gives a little shine and a strong hard finish. It looks really good and hasn't peeled off. The only problem is that your going to spend about a $150. The paints come in quarts and you only need about 1/5 of it to do all the plastic.
Good luck
- Columbus, Ohio
2007
A. I've got an old Honda 200xr. I think that heating the plastic with a gas flame or heat gun ⇦ on eBay or Amazon [affil link] does restore the color. I just tried a little test piece on my tank. One must be very careful not to get the temperature too high and the tank has to be empty as well.
Richard Redecker- windhoek, Namibia
2007
A. The Only Answer To A Faded Plastic Tank Is NOT To Spray It, But To Give It It's Original Colour Back!
I Also Considered Spray, But The Bubbles "O" No!
Buy Yourself Or If You Have At Home A Bottle Of
Brasso
⇦ on
eBay
or
Amazon [affil link] , You Know the Thing You Clean Copper With! Yes! With A Sponge And Give That Tank Some Elbow Grease!
Believe Me It Works!
- South Africa
2007
A. PAINTING POLYETHYLENE OR PROPYLENE GAS TANKS AND MOTORCYCLE PARTS "DOES NOT WORK" WHAT I DID WAS:
1. Sanding PE or PP really just moves the surface area (fibres) of the plastic around, this is what we want, cause we're not trying to really remove material, but surface condition it! What we want is kinda like a "fur" texture after sanding, and to achieve this start with a 60 or 80 grit cloth backed quality sandpaper. I like wet dry stuff myself. Ya have to do it by hand, electric sanders don't work cause they are too fast and melt it. So go ahead and sand the hell out of it, then move to next grit, maybe 100, then 120, stop at 220. Should have that white "fur" texture.
2. Run down to local tool store and grab a torch or a heat gun (safest) cheap ass heat gun cost $24.95 (ask the clerk to plug it in first, pretty cheap china one)
3. Keeping a distance,start at bottom of tank (course empty if first and allow fuel to flash) where you can't see it. This is the "practice area", now heat that fur! ever so gently,and wow, a new tank.
4. Buff with "Brasso copper polish". Acrylic bathtub polish works good too!
enjoy.........
- Kelowna, BC, Canada
January 8, 2008
Q. How to prep paint and gloss plastic 2006 yzf r6. I'm getting a custom air brush job on my Yamaha r6 and I was wondering if anyone could give me some directions.
Justin Evans- Raymore, Missouri
March 10, 2008
April 28, 2008
A. The trick for painting PE Gas tanks seems to be:
- Removing all the gas, cleaning the inside, and leaving the tank out well ventilated in the sun for about 2 weeks, so most of the fumes trapped in the plastic can leave the material.
- The putting slow hardening "440" Epoxy on the *Inside*, moving the tank around for about an hour to get a nice thick layer, and then letting the rest drip out.
- Letting the epoxy harden out for about 2 days, also well ventilated.
- Then painting it with car-bumper paint, which is rather flexible and sticks to plastic.
Kind Regards
*Anna.
- Netherlands
![]() I have an 87 cr80r and I have had the plastics painted for about 2 months with Krylon Fusion
⇦ on
eBay
or
Amazon [affil link]
. I have painted the gas tank, fenders, and number plates. they haven't bubbled yet.
I have an 87 cr80r and I have had the plastics painted for about 2 months with Krylon Fusion
⇦ on
eBay
or
Amazon [affil link]
. I have painted the gas tank, fenders, and number plates. they haven't bubbled yet.
- Peebles, Ohio
November 17, 2008
A. It doesn't work to paint dirtbike plastics. I have tried it, and the paint is fragile and scrapes off easily, cracks and paint on the gas tank bubbles and peels off. The best solution is to buy Plastic Renew [affil link]. You can get it from your local shop or a site like denniskirk.com. You basically sand the plastics with different grades of wet sandpaper until you sand off the yellowing and discoloration, then apply the plastic renew. I wasn't sure if it would work, but I have used it on three bikes and a four-wheeler now with very impressive results. It really made things look nice. White plastic works the best, and black is the hardest, but all colors work.
Adam Timmins- Logan, Utah
March 30, 2009
A. Found this product out of S. Africa and Australia:
Seems it is a breakthrough, but why not in USA? : flowkochem.com/FF_Polyethylene_PrSheet_fin.pdf
- Bakersfield, California USA
September 28, 2010
Hi, Mike.
Thanks. But these vendors try to keep their proprietary systems secret, offering no reference to even what general technology is involved. So how can anybody say whether it's a breakthrough or just the same-old same-old as Krylon Fusion, or Bulldog Tiecoat, or Plastic Renew? But the other three seem aimed at the end consumer whereas the flowkochem products seem to be aimed at auto manufacturers. Thanks again.
Regards,

Ted Mooney, P.E.
Striving to live Aloha
finishing.com - Pine Beach, New Jersey
Ted is available for instant help
or longer-term assistance.
September 28, 2010
November 25, 2010
A. # Wash tank with a good cleaner, like Castrol Super Clean
[affil link], both inside and out. I use a scouring pad (like Scotch-Brite brand
⇦ on
eBay
or
Amazon [affil link]
) to really rough up the pores, using the cleaner and rinse out well with water. It is advisable to use rubber gloves, as this cleaner sure can dry out your hands. If there is varnished old fuel in the tank, an automotive grade acrylic lacquer thinner
⇦ on
eBay
or
Amazon
[affil link] Flammable!
or Acetone should be pored inside the tank to loosen up the deposits. I shake the tank vigorously then empty the solvent into a plastic container.
# Now wash the outside of the tank with acrylic lacquer thinner
⇦ on
eBay
or
Amazon
[affil link] Flammable!
or acetone
⇦ on
eBay
or
Amazon
[affil link] Flammable!
. I use a parts brush in a large plastic container. What was left over from the above procedure should work fine. This is to remove most of the old decals and adhesives, as well as any remaining grease or grime in the plastic pores.
# The tank should now be flushed with soapy water, both inside and out, and repeatedly rinsed with clean water.
# It is now time to sand the tank. I use an orbital auto body sander (dual action or DA sander) and start with 80 grit on the deep scratches and gouges, if there are any, as well as to remove old decals. I then take 180 or 220 grit on the sander and do the rest of the tank, as well as the areas that were sanded with the 80 grit, in an effort to minimize the scratches. Try to keep the sander flat at all times.
# A scouring pad is then used on all the edges, the undersides, and any areas missed by the sander, to promote adhesion for the top coating process.
# The tank should now be blown off with compressed air. Then washed again, both inside and out, with soap and water and thoroughly rinsed. Allow to air dry completely.
# Wipe the tank down with automotive grade wax and grease remover and use a tack cloth ⇦[this on
eBay or
Amazon affil links]
(automotive grade) to remove dust particles. The tank should now be ready for top coating.
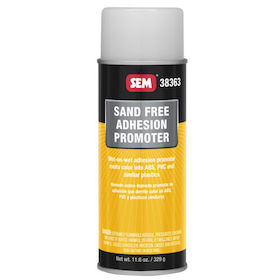
# A product that I highly recommend for promoting good adhesion to plastic parts and personally know works very well is Sherwin Williams # UPO7227 Adhesion Promoter. This is available in aerosol spray cans as well as quart cans. The adhesion promoter should now be applied. I apply 1-2 wet coats, and let dry for about 30 minutes. I was able to do 4 tanks with one 16 oz. aerosol can.
# You are now ready for the priming process. I used a flexible primer manufactured by SEM. It is available in quarts and possibly aerosol. The SEM part number is 39134 and it is called Flexible Primer/Surfacer. This is a great product and builds nicely. It can be sanded after 45 minutes. I apply at least 2 heavy coats, let dry, then wet-sand using 220 grit wet/dry sandpaper.
# The tank should now be thoroughly rinsed and dried. Apply another 1-2 good coats of SEM # 39134 Flex-Primer. Let it setup (dry) then wet sand using 400 grit sandpaper. Thoroughly rinse again, and assess your work. It is possible that the tank may need another application. If so, repeat as necessary, final sanding with 400 wet. When finished, rinse the tank again thoroughly, both inside and out, and let dry. On my original Can-Am MX-3 red fenders I had to perform the priming/filling process 3 times to remove all the scratches, as one of the fenders was really bad to begin with.
# You are now ready for top coating. Remove any oils from handling using wax and grease remover. Use sparingly as to not saturate the current layers you have finished thus far. Make sure the tank is completely dry. Now wipe using a tack cloth ⇦[this on
eBay or
Amazon affil links]
to remove dust.
# Any places on the tank where bare plastic is showing, where the SEM primer has been sanded through, should be covered lightly with the UPO7227 Adhesion Promoter. There is no need to cover the entire tank again with the adhesion promoter but it won't hurt if you do.
# Allow to dry. Tack dust again using tack cloth ⇦[this on
eBay or
Amazon affil links]
. Now the color is to be applied.
# I have always had good success using Sherwin Williams automotive finishes. I use Sherwin Williams acrylic enamel with hardener for most plastic. Now select the paint color of your choice.
# The Sherwin Williams acrylic enamel should be mixed as stated on the can, using 8 parts color, 4 parts reducer, and 1 part hardener or catalyst. The following additive should also be added: Sherwin Williams Multi-Flex, Flex Additive, # V6-V299. Two parts should be added to the mixed paint. Ensure you are using an OSHA approved paint mask, as the mixed paint contains volatile chemicals, including Poly-Isocyanides.
# I generally apply 3-4 good coats to ensure full coverage, obviously allowing the paint to flash between coats to minimize sags or runs.
# The paint should be allowed to dry completely. I generally wait 2-4 weeks, then apply the decals. The finished tank can be washed and waxed, and cared for like any automotive finish, but waxing should be done only after about 4 weeks time, so any remaining paint vapors are allowed to escape.
# The finish holds up incredibly well, as it is an automotive paint re-finishing system. There are sealers to seal the insides of these tanks, and they will work well for preventing the gas fumes from trying to escape through the plastic pores of the tank. When the fumes try to escape, from leaving the gas in the tank for prolonged periods of time, there is a bubbling problem that is created near the bottom of the tank. I have done many tanks in this manner, and the ones that have a good tank vent, and are drained and flushed with water after riding seem to last the longest. Those that leave gas in the tank without sealing the inside seem to bubble near the bottom. Those that seal the inside of the tank seem to last the best, and the finish on the tank is as durable as any finish on any automobile, as automotive refinish products were used to restore the plastic above.
- Brush Prairie, Washington, USA
A. I was told by a bike shop to have a tank cover made by an upholstery shop; they can make a cover any color and some with custom designs. These work good for plastic tanks as they won't hold paint.
Jeff Smith- Salt Lake City, Utah, USA
April 20, 2011
A. Painting a cleaned and lightly sanded polythene gas tank with three coats of 'latex 2000' (water based latex solution), builds up a rubber undercoat that is flexible and allows a top coat of red oxide primer, followed by a gloss oil paint finish to be applied. It worked for me.
Chris Prus- New York, New York USA
June 25, 2011
Q. Will fibreglass resin work to seal the inside of the tank?
remus vorster- g/dal South Africa
March 22, 2012
April 29, 2012
A. Hello all,
I am pleased to report that have very successfully painted a plastic fuel tank on the dirt bike, used it for racing and many weeks later all is good.
Special materials:
acetone
⇦ on
eBay
or
Amazon
[affil link] Flammable!
fuel tank liner from Blue Lightning Products
adhesion promoter spray can from SEM.
flexible primer from SEM.
(zinc plating kit)
Procedure:
Thoroughly wash the tank inside and outside with acetone several times over several days, weekends to remove any trace of old fuel, grease etc
Removed rust and zinc plated the metal piece of the tank opening. Obviously this has a lot of sub-steps but not the point of this article.
Poured a pound of wood screws inside the tank, wrapped it in a blanket, and ran it for 30 min in a wash-drier. The intent is to roughen up the inside for the liner to grip well.
One more shot of acetone inside and leaving everything to dry thoroughly
Lined the inside of the tank as per method indicated on the can. This is a little strange as the liner takes a long time to dry. When left overnight, most of it sets at the lowest point and I wasn't sure there was any liner left on the other parts of the tank. So I did it twice over two week ends. The liner is a super thin and hard green layer.
Sanded the exterior of the tank
Cleaned again with acetone and thinner
Applied the adhesion promoter
Applied two layers of flexible primer
Flatted the primer obviously: that primer is super hard, incredible
Applied two layers of base coat
Applied two layers of clear coat
Got really very pleased with the result
All details and photos here:
http://www.xr500only.com/restauration-tips/how-to-paint-a-plastic-tank-and-use-it-normally
- Sunnyvale, California, USA
A. Using a micro-porous paint should work -- they do them for wood, maybe that'd hold up on a plastic tank. My yz465 looks terrible, need a tank job.
brendan mahoney- united kingdom
November 22, 2014
A. Rit dye worked great; did my dr350 about a year ago and it's still great, except for the little bit of tree damage.
Ken Greenwood- Auckland New Zealand
June 1, 2015
A. To make paint bond to polyethylene you must flame treat it first.
gerard conti- leominster Massachusetts
October 31, 2015
Q, A, or Comment on THIS thread -or- Start a NEW Thread