
| Search our quarter-million Q&As |
Home of the finishing HOTLINE since 1989
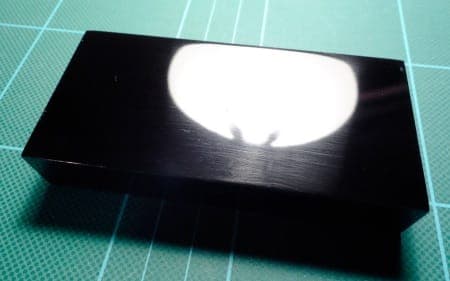
-----Anodize pre-etch of polished part created totally flat finish
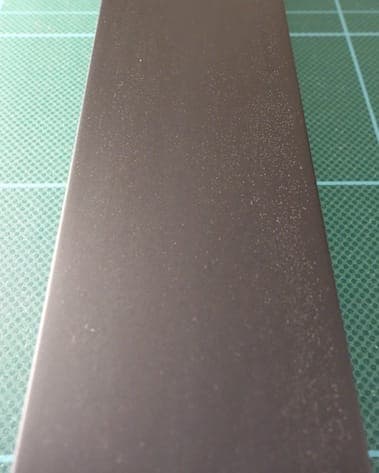
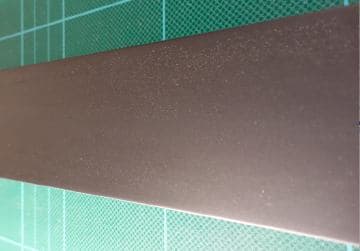
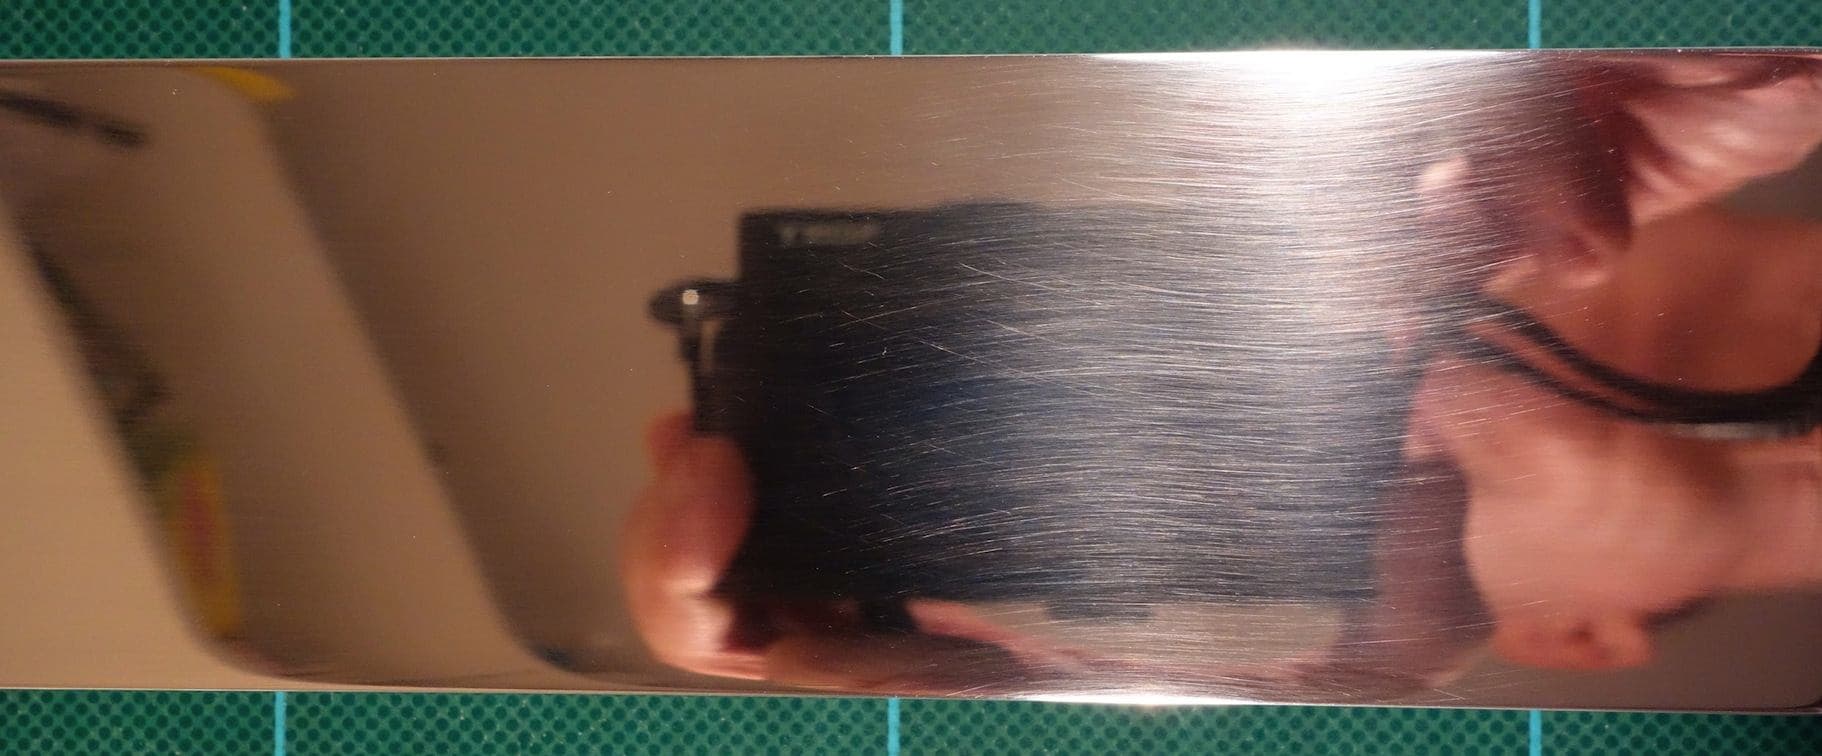
Q. 6063 aluminum extrusion was polished to a mirror-like finish then anodized using two-step electrolytic anodizing process whereby the colorant is an inorganic metal salt, not an organic dye. This is a sulfuric acid process that includes sealing using nickel acetate. I was told that a 10-second etch was done beforehand. As can be seen in the photo, the result is completely flat, which does not seem normal to me after etching for only 10 seconds. Why is the finish so flat, with no sheen at all? Because the etch was probably for more than 10 seconds, or the acid used for etching was too concentrated?
Thank you.
Sincerely,
Robert
Customer of local anodizing shop - Victor, New York, USA
March 11, 2015
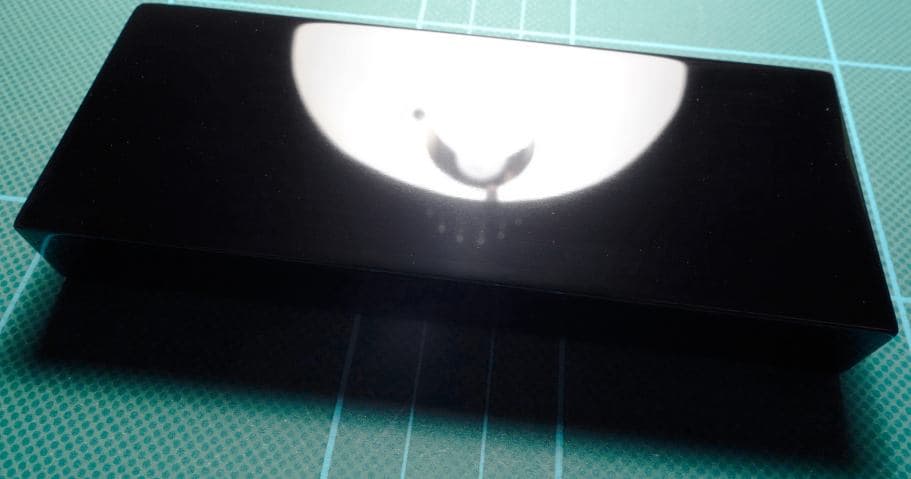
Anodizing creates irregularly shaped white pits on one surface only
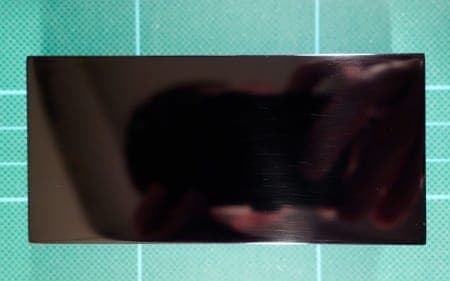
Q. 6063 aluminum extrusion was polished to a mirror-like finish, then anodized using a two-step electrolytic anodizing process whereby the colorant is an inorganic metal salt, not an organic dye. This is a sulfuric acid process that includes sealing using nickel acetate. No etching was done beforehand, although the part was cleaned beforehand, as is always done before anodizing. As can be seen in the photo, there are hundreds of white pits on the wide surface. (These are not just white spots on the surface, but pits that are white.) What went wrong?
Some additional background: the wide surface and only the wide surface of the extrusion was originally brushed, but the brush marks were polished out; however, thousands of very small pits could be seen in the brushed surface before polishing, as is evident in the second photo.
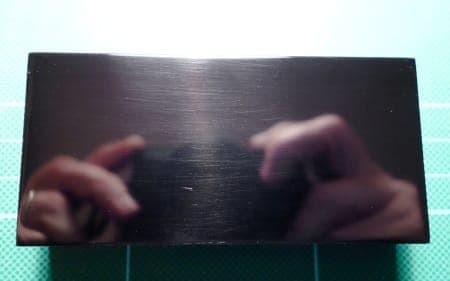
A second piece from the same extrusion was processed as described in the first paragraph, including polishing, except that a 10-second etch was done before anodizing, and so the anodize looks flat (matte). The result was the same: thousands of tiny white pits, although the shape of the pits is more evident: there are irregularly shaped. Please see third photograph.
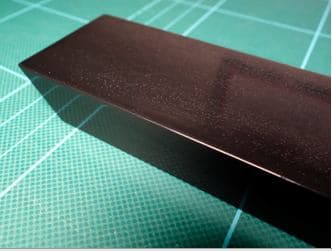
Any possible explanations for the pits would be appreciated.
Thank you.
Sincerely,
Robert
Customer of local anodizing shop - Victor, New York, USA
by Brace & Sheasby
on Amazon or eBay
or AbeBooks
(affil link)
A. Robert,
Your polished part likely should not have been etched. Not all etches are the same and you can expect differing results. The spots on it look very much like a picture in the Technology of Anodizing Aluminum, 2nd edition, page 54. In that case the flaw is attributed to atmospheric contamination. The spots also look the same as when I tried to anodize a set of aluminum motorcycle rims after the first try. Your part also looks as if it could have been run twice.
Your grained part likely has spots because it was NOT etched. Graining processes I am familiar with will remove as well as re-deposit aluminum on the surface. This will entrap solution as well as aluminum particles that may or may not anodize. A longer / heavier etch helps alleviate this condition.
- Colorado Springs, Colorado
Q. Hi Willie,
Thank you for your reply. I've made some comments below:
"Your polished part likely should not have been etched. Not all etches are the same and you can expect differing results."
Okay. But this is by far the most flat or matte finish that I have ever seen. Furthermore, the finish seems to rub off, because if I clean my thumb then moisten it, then rub the matte anodize with my thumb, then strands of gummy black gunk get rolled up under my thumb, just like when moist, dirty fingers are rubbed together. What does this mean? That the anodize was not sealed?
"The spots on it look very much like a picture in the Technology of Anodizing Aluminum ... In that case the flaw is attributed to atmospheric contamination."
That is interesting. I don't have that book though. My spots are definitely pits though, as I can see that they have depth, even if that's not evident in the photos. I note that identical white pits, i.e. pits that are irregular in shape with well defined edges, are found on page 74 of Ted Short's "The Identification and Prevention of Defects on Anodized Aluminium Parts". Those pits are said to be due to "spalling", which can be caused by too high a voltage during the coloring process, so Ted explains, although he offers alternative causes as well.
"The spots also look the same as when I tried to anodize a set of aluminum motorcycle rims after the first try."
So, what did you do? Strip the anodize and try again? Did you do anything differently the second time?
"Your part also looks as if it could have been run twice."
Well, in a sense, it was run twice in that two electrolytic processes were carried out: one to create the aluminum oxide layer, then again to deposit a tin-based salt in the "pores" in order to make the part black.
"Your grained part likely has spots because it was NOT etched. Graining processes I am familiar with will remove as well as re-deposit aluminum on the surface. This will entrap solution as well as aluminum particles that may or may not anodize. A longer / heavier etch helps alleviate this condition."
That makes sense to me, although I have aluminum picture frame extrusion by Nielsen that has a brush finish and is glossy. Perhaps it was etched to get rid of the aluminum particles, then bright-dipped or electropolished afterwards?
Thanks.
- Victor, New York, USA
A. If I understand your substrate finishing process correctly, you mentioned that your parts were "brushed". Very strong possibility that you were embedding particles (Fe) from your brush bristles into the substrate, which would definitely cause pitting during the anodizing process. Only Al2O3 based sandpaper should be used for finishing parts that need a grained look after anodizing.
I'm not sure if they make brushes with Al bristles, but I would look into something like that if this has to be your finishing process.

Marc Green
anodizer - Boise, Idaho
Q. Thanks for your reply, Marc.
I use the term "brushed" (and "brush") to refer to the look of the piece, not the technique that was used to create that look. I assume that a brush finish is typically created by sanding.
The brushed piece that was anodized -- Ref. www.finishing.com/598/20.shtml -- looks pitted upon close inspection, although the pits looked the same as they did before the anodizing. Someone suggested that the act of sanding to create a brushed look can sometimes tear up narrow strands of metal that break off, and that a pit, a nib or both results at the exact location where a strand breaks off.
As for the anodized pieces in the photos of the post here, i.e. those without a brush finish, those began as brushed pieces, but the brush lines (the deep scratches from the sandpaper) were sanded out. Then the surface was polished, and then the piece was anodized (with etching beforehand in one case, without etching beforehand in the other case). If an iron-based or steel-based tool was used to create the brushed look, would sanding out the deep scratches (using aluminum oxide sandpaper), followed by polishing, remove embedded iron or steel particles, or just embed such particles further into the aluminum?
Thanks.
- Victor, New York, USA
A. Yes, it's entirely possible that sanding after "brushing" would still leave microscopic particles embedded in the substrate. Here's how I would troubleshoot an issue like this.
Basically you have 3 potential causes of your problem.
1. A substrate issue
2. A surface finishing issue
3. A coating issue.
Send 2 pieces from the same lot of material that you're having issues with, if possible, to your coater. 1 finished using your brushing methodology, and one completely unfinished. Additionally, send 2 more pieces from a different lot of material, again..1 with a brushed finish, and one without. Of course, make sure all 4 pieces are uniquely engraved so you can identify them after coating.
Ask your anodizer to run all 4 pieces in the same load, pretreating all 4 pieces (I firmly believe that an etch and desmut is critical to a quality anodic coating).
Comparing the end results should point you directly to the cause of your issue.
1. All 4 pieces come out beautiful, most likely something went awry in your initial run (perhaps an operator mistakenly used CSi sandpaper by mistake)
2. All 4 pieces come out pitted, then your coater may have an issue going on.
3. 2 from the original lot look pitted, but the other 2 from a different lot look fine, then something is going on with that particular lot (original) of material.
4. The 2 pieces that were brush finished come out pitted, but the other 2 look fine. Then you have to take a hard look at your surface finishing process.
Marc Green
anodizer - Boise, Idaho
|
(In response to Robert's March 13 post) - Colorado Springs, Colorado Q. Hi Marc,
Thanks. - Victor, New York, USA A. Robert, yes, CSi sandpaper is a definitely no-no for finishing parts that are to be anodized. Always use Al2O3 sandpaper. I took a look at your picture, and saw what appeared to be some pits, however they very well could be little spots of dust, impossible to tell by a picture. Doubtful that a polishing compound could remove any Si particles embedded into the substrate. For that matter, it's possible his compound could be part of the problem, especially if no pre-treatment was done. Marc Green anodizer - Boise, Idaho |
Q. Hi Willie and Marc,
Thanks for your replies.
Willie, your experience with motorcycle rims is encouraging, since you were able to rectify the situation; and you are right about the picture frame extrusion, as it is extruded, brushed, and painted or anodized at Nielsen's factory in Germany.
Marc, I verified with the polisher that the sandpaper used to remove the brush marks is indeed aluminum oxide: it's Deerfos PSA Blue Film aluminum oxide paper.
As for bright-dipping or electropolishing, one anodizer said that he can get a mirror finish through bright-dipping only on 3XXX-series aluminum, and that bright-dipping other series aluminum gives something less than a mirror finish. Another anodizer said that electropolishing aluminum is a bit of an art, considering that certain things can go wrong, e.g., sharp edges and corners can get rounded, since the current density is higher in those locations. Mechanically polishing is indeed labor-intensive and thus very expensive, but I don't see a viable, reliable alternative for a mirror finish. I'm afraid though that the fine scratches that remain after mechanically polishing are still going to be there if there is no acid etch done during the anodizing process. Perhaps the cleaning and de-smut processes will do a little etching though?
On a related note, the polisher is having trouble removing all traces of the polishing compound. He rinses the parts in lacquer thinner
⇦ on
eBay
or
Amazon
[affil link] Flammable!
after polishing them, but there is still a thin line of compound remaining at the junction of two surfaces that meet at right-angles, concerning certain surfaces... And it's hard to reach such a junction with a rag, a brush or other appropriate implement in order to wipe the junction clean. Can you suggest a way to remove polishing compound residue? Is it necessary? Would a standard pre-anodize soap-wash be sufficient? What about the de-smut process? One anodizer told me today that for his de-smut process, he uses a mixture of three acids, if I remember correctly, one of which is sulfuric; and sulfuric acid reacts with organic matter in particular. Perhaps sulfuric acid would dissolve, in essence, paraffin-based polishing compound?
Thanks.
Robert
- Victor, New York, USA
A. Hi. Some people advise against solvent cleaning of polishing compounds because they claim that stripping out the volatiles and leaving the grit behind just makes the problem worse. Ultrasonic agitation in your cleaning tank should remove the polishing compound, even if the solvent cleaning is skipped. But I'd be a little reluctant to implement this change until other problems are sorted out one at a time :-)
Regards,

Ted Mooney, P.E. RET
Striving to live Aloha
finishing.com - Pine Beach, New Jersey
Need quick confidential answers? $25
Need project assistance? $100/hr.
Q. Hi Ted,
That's very interesting about solvent cleaning possibly leaving behind grit. Thanks for telling me that.
But when you mention ultrasonic cleaning as an alternative, are you referring to something I would do, something the polisher would do, or something the anodizer would do? The anodizers with whom I've spoken haven't mentioned that ultrasonic cleaning is something they can do. Do anodizers normally offer ultrasonic cleaning?
Thanks.
Robert
- Victor, New York, USA
A. Hi. Most automatic anodizing lines, which include automatic transfer of parts from the cleaner to the etch to the desmut to the anodize tank, etc., probably do not include ultrasonic units in the cleaning tank. But many finishing shops do have ultrasonic cleaning stations containing mild cleaners suitable for aluminum like Simple Green -- perhaps not big enough for your parts though. If the anodizing line does not have ultrasonic cleaning in it, that cleaning would have to be done after polishing and before the automatic anodizing line. Maybe your polisher would like to save some labor by installing such a provision.
Regards,
Ted Mooney, P.E. RET
Striving to live Aloha
finishing.com - Pine Beach, New Jersey
Need quick confidential answers? $25
Need project assistance? $100/hr.
![]() Hi Ted,
Hi Ted,
Thanks for your reply.
The anodizer whom I'm currently considering, which is a different one than before, indeed has an ultrasonic cleaner that alas, is too small for my parts, just as you surmised, although the owner, with whom I just spoke by phone, agreed that ultrasonic cleaning would be a good way to remove the polishing compound residue from the hard-to-reach nooks and crannies. The polisher whom I'm using doesn't have an ultrasonic cleaner at all; I doubt he'll get one just because my job may require it. Perhaps there are places that specialize in ultrasonic cleaning, to which I could take my parts after polishing? I've never heard of such places though. (I ~have~ heard of Simple Green though, by the way.)
Regards,
Robert
- Victor, New York, USA
A. Hi Robert. Yes, there are many companies that specialize in precision cleaning and offer services such as ultrasonic. There are at least two such companies in my locale.

Blake Kneedler
Feather Hollow Eng. - Stockton, California
March 18, 2015
Q. Hi Blake, Marc, Ted and Willie,
Thanks again to all of you for your answers.
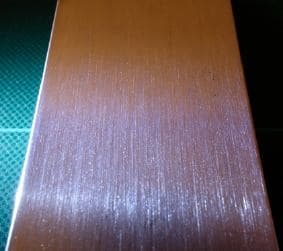
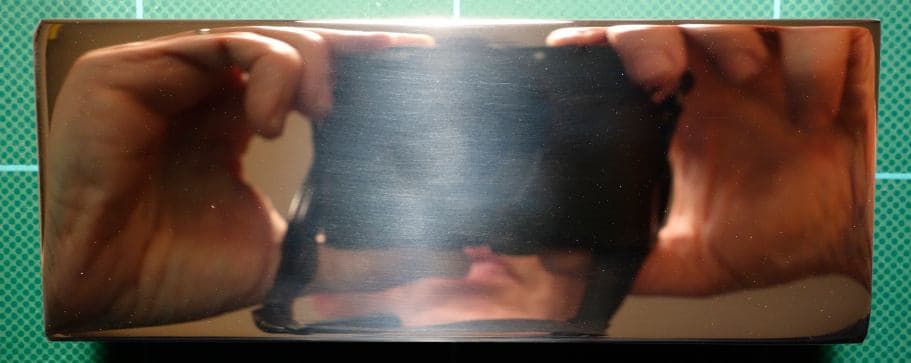
Today, I had a look at another piece (from the same extrusion batch) that was just anodized by a different anodizer than the first one, and there is no pitting -- nothing at all that would seem to be due to a deficiency of the polishing or anodizing process. This is good news, of course. I'd post a photo right now, but I left the sample at the anodizer. By the way, that piece was polished to a mirror-like finish before anodizing, just like you see in my most recent photo. I have three questions though:
(1) The anodizing produced a slight orange peel effect, although not as much as with the first anodizer. (You can't really see it in the photos.) Is this normal?
(2) The scratches that you see in my most recent photo (i.e. the photo of the un-anodized piece that was polished to a mirror-like finish, albeit with very fine scratches remaining after the final polishing process) are even more visible in the piece that was just anodized. (Just to be clear, that piece was anodized using a Type II sulfuric acid anodize.) Might those scratches be less apparent after a Type III "hard anodize", given that there would likely be a build-up of aluminum oxide about 0.001" thick?
(3) The mirror-like polished finish gets scratched by newsprint, and by so called "tissue paper" that is used for wrapping purposes, as well as tissue paper that is used for interleaving artwork. However, Kleenex does not scratch such a polished surface -- not even in rubbing hard with Kleenex. Does anyone know where Kleenex or tissue paper as soft as Kleenex can be obtained in large sheets or on a roll for purposes of wrapping the polished pieces and transporting them to the anodizer? Another thought I had was wrapping in microfiber cloth (artificial chamois ⇦[this on
eBay or
Amazon affil links]
). Any ideas?
Thanks.
Robert
- Victor, New York, USA
A. Robert, unfortunately, anodizing tend to highlight flaws and scratches, not cover them. I'm not so sure you'd like your end result with hard coat, it's a darker color in it's natural state, and that will result in a different color on your finished product.
I think some type of microfiber cloth would suit your needs for packaging your product, but boy, as an anodizer this sounds like it would be a scary job to deal with, and the potential for light scuffs would always be there..even somebody with callouses on their finger would be somewhat of a liability handling these parts, so be prepared to discuss this with your anodizer and come to some type of agreement as to what's acceptable, and talk to them about wearing some type of cloth gloves while handling your parts during racking.
Marc Green
anodizer - Boise, Idaho
![]() Hi Marc,
Hi Marc,
Thanks for your reply.
I think you're absolutely right about having to wear cloth gloves while racking the parts, e.g., the soft cotton gloves worn when handling old manuscripts. Ideally, the anodizer would allow me to rack the parts myself, but I don't know if he would agree. I'll ask though.
I'll post pictures again, once I have some anodized parts in hand.
Regards,
Robert
- Victor, New York, USA
Q. Hi Everyone,
Included with this post are three photos of a piece of extrusion that was anodized black using a type II sulfuric acid process. Most of the apparent imperfections are in fact specks of dust. I think the anodizing came out quite well. It is deep black, despite looking otherwise in some of the photos.
Also included with this post is one photo of another piece of the same extrusion that was anodized black using a hard anodize process. Note not only the duller appearance and increased orange peel, but also the blemishes, such as the one indicated by the arrow.

If you click on the photo to download a high resolution version, you'll see that each blemish seems to have resulted from a chemical that leached out of a pore or a pit. At least, that's my interpretation, and the anodizer's too, although I'm not sure how a pit could have arisen, given that the surface was at first highly polished. The anodizer said that this kind of blemish is common when hard anodizing, but that it's not very apparent when the aluminum is etched, or perhaps tumbled beforehand and then etched. Indeed, I used to have tumbled parts hard anodized and I never noticed blemishes such as this.
Any further insights about either the type II anodize result or the hard anodize result would be appreciated.
Thanks.
- Victor, New York, USA
Ed. note: Whether by Robert's choice or by Dropbox policy, the hi-rez versions of the photos are no longer available. Sorry!
A. Hello again, Robert. The "orange peel" you're talking about is called crazing. You'll definitely increase your chances of crazing using the hard anodize process. It's a thicker coating, usually done at a lower temperature. The cause of crazing is the difference in the thermal expansion of the aluminum substrate, to the much harder aluminum oxide coating.
Unless these parts are going to see a lot of friction, I think you're fine going with the type II process.
I'm not so sure that the coating flaw you're seeing is acid leaching out from a pore. Anodizing pores are measured in angstroms, and simply can't be seen with the naked eye. It still appears to me that some type of substrate contamination is going on. Were these parts pretreated at all?
Marc Green
anodizer - Boise, Idaho
April 5, 2015
Q. Hi Marc,
Thanks for your comments.
I don't understand why you mention that "Anodizing pores are measured in angstroms, and simply can't be seen with the naked eye." If you click on the last photo, which is the photo of the hard anodized part, you'll get an enlarged version in your browser; if you click on the enlarged version, you'll get an even larger version, i.e. you'll get the image at 100% resolution. If you then look at the blemish indicated by the red arrow, you'll see that it looks like the kind of blemish that you see on castings sometimes, where acid or some chemical or another has come out of a pit or pore and puddled up around the pit or pore. However, if you say that this kind of blemish can be caused by some other means, I'd certainly like to explore that possibility too. One thing that may be helpful in diagnosing this is to consider that this kind of blemish appears only on the hard-anodized part, not the type II-anodized part, and yet the two parts came from the same piece of extruded aluminum.
I don't know if the extruded aluminum was pretreated. I imagine though that the extrusion process is somewhat dirty. What I do know is this: after extruding, the aluminum was brushed, then painted. Then I received the extrusion, cut it up into short sections, had the paint stripped, then had the brush marks removed with aluminum-oxide sandpaper. Then I had the short sections mechanically polished.
One other thing; the aluminum was extruded in Germany and the alloy is AlMgSi 0.5, which is said to be almost the same as 6061 or 6063. The manufacturer paints extrusions made from this alloy, or has them painted. The manufacturer also extrudes aluminum that gets bright-dipped then anodized, but for such extrusions it uses 6463. Perhaps the company has found that bright-dipping and anodizing its extrusions made from AlMgSi 0.5 doesn't work out so well.
- Victor, New York, USA
A. Hi Robert,
The reason that 6463 alloy is used is that it gives better brightness in Phosphoric/Nitric acid based mixes and loses less brightness on anodizing. The aluminium is refined to a higher purity level than 6063 which results less loss when anodized. It also contains a small (0.03 - 0.08 %) amount of copper which enhances brightening. It was originally developed, along with 5657 sheet, for car trim.
As Marc says, you are not looking at an anodizing pore. What I think we have is a corrosion pit. They occur during the sealing stage and are often due to electrolytic corrosion. The electrolytic cell can be produced by:-
a) between a stainless tank and the aluminium: this is easy to cure by electrically isolating the the rack.
b) between a titanium rack and aluminium: changing to an aluminium rack will cure it but is often extremely inconvenient.
c) between intermetallic compounds in the aluminium and the surrounding aluminium: the only advice I can offer here is to keep the seal clean, keep the sealing time to a minimum, change the batch of aluminium.
The corrosion can also occur in a dye bath. The same possible remedies apply.

Harry Parkes
- Birmingham, UK
Q. Hi Harry,
Thank you very much for your detailed suggestions. Does it make sense though that the corrosion pits occurred only on the hard anodized piece and not on the piece that was anodized using a type II sulfuric acid process?
By the way, I was speaking to one of your compatriots at Badger in Birmingham earlier today... What do you think of the fine scratches remaining after mechanical polishing, as you can see in some of the photos? If I have the pieces bright-dipped in order to smooth out the surface and in essence get rid of the fine scratches, then I'll loose the mirror finish, right?
Thanks.
P.S. If anyone else would like to chime in, that's fine too!
- Victor, New York, USA
A. Robert,
I'm far from being an expert on anodizing, but I did want to respond to your earlier question about the flat finish. In my experience of making small parts and panels over two or three years, it simply hasn't been possible to achieve a bright finish using 6061 or 6063. In the early days, I tried anodizing mirror-polished pieces over and over with variations in how I prepped the pieces, but always with the same result. All my work is clear, no dye, and the brightest finish I am able to achieve occurs when I brush finish the piece before anodizing. I apply the brushed effect either with sandpaper (large, flat pieces) or plastic scrubbing pads (usually while turning the part slowly on a lathe). I normally use a mild etchant for a few minutes before anodizing, and that seems to have no impact on brightness. I do remember seeing other alloys recommended for bright clear finishing, but I don't have access to those at any reasonable price.
- Austin, Texas USA
Hi Robert,
I'm not surprised that the pits occurred only after hard anodizing. Nor would I have been surprised if the reverse were true. Conditions to cause corrosion are the important thing. For example, the rack may have made electrical contact with the dye or seal tank. It is difficult to find just a which stage the corrosion occurs. It's usually only when the work has been dried and removed from the rack that the defects can be seen, so we blame the last stage - the seal!
It is so difficult to explain the surface appearance after chemical brightening. It is even more difficult for me, or anyone else, to judge whether you would find it acceptable. I would urge you to try it.
There is also the question of the quality/suitability of the mechanical polishing. Is it impossible to buff out the linishing (or whatever) lines rather than leave them embedded in and under the surface? Oh dear, do you detect ancient hostilities brewing between polisher and anodizer?
Yes, I know Badger. I knew the founder, Harry, well and was good friends with his son, "REV" who took over the business.
Harry
Harry Parkes
- Birmingham, UK
|
Q. Hi jack and Harry, - Victor, New York, USA A. Robert - Colorado Springs, Colorado |
A. Hi Robert,
You say 6463 is approximately 6063. Well, yes if you want to repair the garden fence -- but not if you are doing bright anodizing. All alloys designed for extruding contain Mg and Si (Mg2Si) to improve extruding quality. I repeat that 6463 was designed for use as car trim in the days when cars had a lot of bright metal. It brightens better and loses less brightness on anodizing than 6063.
I looked as the web site that you mentioned. I did not find the statement that 3000 series alloys are best for brightening and anodizing. Whether it does or not, I absolutely disagree. 3000 alloys include manganese for high strength. They brighten only moderately well and lose a lot of brightness on anodizing. Mg/Si alloys (including 6063) are better.
I think that I have misread the scratches on your photos. They looked to me like linishing lines from the initial mechanical treatment which had not been removed by subsequent polishing stages. Now reading your postings again, I accept that they are fine lines from the final polishing. This is where chemical polishing (brightening if you wish) comes into its own. One of its strengths is removal of fine lines.
Harry Parkes
- Birmingham, UK
Q. Thanks for your comments, Willie and Harry.
Harry, I meant that AlMgSi-0.5 is approximately 6061 or 6063. I realize that 6463 is different. Also, I too cannot find the comment about 3000-series aluminium on Badger's Website. It was in a table that included a comment concerning each of several different alloys regarding how bright the alloy would look after bright-dipping. Maybe it was a table that I had found on a different Website. Also, I believe that the scratches visible in the photos are indeed the result of final polishing. While bright-dipping should remove them, won't bright-dipping also in general dull the surface such that it is no longer mirror-like? Thanks.
- Victor, New York, USA
April 16, 2015
A. Robert,
I was able to obtain a mirror finish with no visible scratches. It's been about two years since I last did that work, but what I remember is working up to 2000 grit paper, then using white and red rouge, then mag wheel polish (it was either Simichrome
⇦ on
eBay or
Amazon [affil link]
or Mothers). The final step to removing all the very tiny scratches requires buffing the piece with a new lambs wool pad and corn starch. That's right - corn starch. Don't remember where I read about that, but it works. Be prepared for a mess, it's best done outside!
My polished pieces looked just like yours after anodizing - dull gray. I believe it's the silicon content that does this. I build electronics chassis for my vacuum tube hobby, and I've settled on the brushed finish for best results. I don't understand why, but this turns out brighter than when I anodize a mirror polished piece. I also sometimes use a random orbital sander with 220 grit to create a pattern that anodizes well. I generally use this for under-chassis pieces because it's faster than brushing and hides small blemishes.
I believe the only way to achieve a really bright anodized finish is to use a different alloy AND to bright dip. I've read that 5252 anodizes bright (but not 5052), and as someone else posted, the 3000 series are claimed to do pretty well. There's a PDF on the Web about bright dipping that includes a short discussion about alloys. You'll find it if you Google "bright dipping aluminum potash corp".
Good luck in your search!
Jack
- Austin, Texas
![]() Hi Everyone,
Hi Everyone,
After much experimentation with the fine folks at J&L Burnishing and Lacquering in Atlanta, New York, we ended up with a workflow that finishes with hand polishing using a paste consisting of Menzerna M5 solid polishing compound dissolved in mineral spirits
⇦ on
eBay
or
Amazon [affil link]
. Below is a photo of the result, which can be compared with the photo included with my post of March 16th.
Note that the scratches are quite a bit finer after polishing using M5. After using M5, the part was anodized. Below is a photo of the result, which can be compared with the photo included with my post of April 3rd.
Note that the scratches are very faint or even invisible in the part that was polished using M5. The anodizing was done at Tompkins Metal Finishing in Batavia, New York.
Robert Eidschun [returning]- Victor, New York, USA
June 3, 2015
! Looks nice! I'm glad everything finally came together.
Marc Green
anodizer - Boise, Idaho
Sorry! Finishing.com is temporarily Read-Only.
Ted Mooney is retiring but I have several offers to take it over.
We're working hard to make sure we find it the best new home.