
| Search our quarter-million Q&As |
Home of the finishing HOTLINE since 1989
-----Coating tables and bar tops with thick clear pourable plastic
Q. I also am wondering how to apply this to a live edge table I am making.
Tim stickneyhobbyist - Umatilla Florida
October 7, 2021
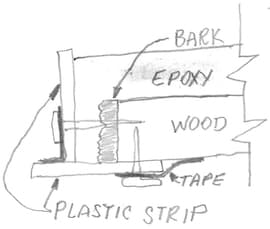
A. Hi Tim. It seems to me that you would need to get some flexible plastic strip 1-2" tall, and tack, tape, or glue it to the edge so it sticks up a half inch or so to make a dam. Maybe spray it with a graphite or teflon release agent so it doesn't stick to the dried epoxy too much, then remove it when dry.
If you want to cover the live edge, you would need to seal the bottom as well, something like this sketch.
Of course, things rarely work out like we blue-sky them, so some experimentation is strongly suggested before jumping right in on your table :-)
Luck & Regards,

Ted Mooney, P.E. RET
Striving to live Aloha
finishing.com - Pine Beach, New Jersey
Need quick confidential answers? $25
Need project assistance? $100/hr.
![]() Thanks for advice I think it will come in handy.
Thanks for advice I think it will come in handy.
Q. What about all the curves in the live edge, how would I get the plastic to contour to them?
Timothy Stickney [returning]- Umatilla Florida
October 9, 2021
A. Hi again. That's why I said "flexible" plastic strip ... and why I didn't say "easy-peasy" :-)
Alternately, you could test to make sure your epoxy or polyester doesn't react with styrofoam, then get a sheet of it bigger than your table, and at least 1/2" thicker than your table, trace the pattern of the table on it, then cut 3/8" or 1/2" bigger all the way around and all the way through that one as a mold, then put it and the table on top of a thin sheet of something before pouring the epoxy.
I haven't done any of this and can't guarantee the epoxy won't stick to the styrofoam even if you spray it with teflon though..
Luck & Regards,
Ted Mooney, P.E. RET
Striving to live Aloha
finishing.com - Pine Beach, New Jersey
Need quick confidential answers? $25
Need project assistance? $100/hr.
October 2021
⇩ Similar, related, Q&As -- oldest first ⇩
Q. I have been to eating and drinking spots with unique tables. On the surface of the table, underneath what seems to be one-half or three-quarters of an inch thick clear coating, are maps and coins and beads and other trinkets. I asked the bartender how they made the table tops, and she told me that there is a product sold by the gallon which is poured onto the table surface to whatever thickness. And when it dries you have what looks like a hundred coats of decoupage. I can not find the product anywhere. Do you know of these products, and where might I find them?
Bill Henry- Somerville, Massachusetts
2002
A. I've seen the stuff you are looking for in a local hobby shop - I think it is called Clear Cast - it is I think an acrylic resin - a two part epoxy like thing. I think it cost about $10-20 per quart. I've seen more than one brand name.

Keith Kropf
steel pans - Gulf Breeze, Florida
2002
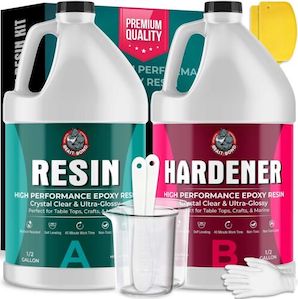
A. What you are looking for is a two part pourable polyurethane.
David Parker- Baltimore, Maryland
2002
A. The stuff you are looking for is a two-part epoxy.
One popular brand is called "Kleer Koat". It is a tricky process for a novice, as any little contaminate or unmixed resin will mess up the top.
- Kansas City, Missouri
2003
A. This is in response to the original question regarding what the material used was that you would see in old diners and such that have objects in it. I didn't see it in any of the responses but I didn't look close. So if I am repeating then I apologize.
The answer is Shellac.
Co*re Services, LLC - Colorado
September 9, 2018
Q. I am also trying to do a project using the epoxy. Every where I read about it, they all say it is not a product for a beginner. But I have no other choice, I have to use this particular product to complete my project (a bar table top with pictures and solid objects). Is there any hope for a beginner and this product? Also, my table top area is about 20" x 30" and I want the epoxy to be at least 1/4 of an inch when I am finished. How much epoxy do I need to buy?
Leah [last name deleted for privacy by Editor]- Nacogdoches, Texas
2003
A. A gallon is 231 cubic inches, so it sounds like about 2 gallons. Good luck, and send a picture when you're done.
By the way, see a bunch of beautiful bottle cap tables on letter 17560, and discussions with the guys who made them.

Ted Mooney, P.E.
Striving to live Aloha
finishing.com - Pine Beach, New Jersey
Need quick confidential answers? $25
Need project assistance? $100/hr.
2003
i. Heads up guys,
Regular epoxy will not do what you're trying; it will yellow and probably crack as will any form of polyurethane at that thickness or any acrylic coating from a retail store. I do Commercial installations for bars and nightclubs I've used several different products over the last few years the best I have used is a two part plastic. Epoxy coatings are difficult to use at best and are specially formulated for this application typically around $100 - $150 for a gallon kit and Most of the suppliers I've dealt with only offer wholesale services. Keep in mind this is not an easy thing the epoxies must be mixed exactly by volume 50/50 stirred well left to "sweat in" for 1/2 hour applied then two or three hours minimum going over the surface with a blow torch to release the air bubbles out of the surface. Note this takes a light touch and determines the quality of the results. If the last part is done well you get a crystal clear thick coating that will last in a high wear commercial environment for years. My first job with this type of product was over 5 years ago and still looks great in a club open 7 days a week
Hope this helps there is a lot of confusion about how this is done I talk to a lot of people who do it wrong and ruin a project they spent a lot of time on. Even saw a bar owner try pouring poly over his bar to achieve the same effect ruined his bar and it had to be tiled over to hide it.
Adam Jonesgeneral contractor - Clemson, South Carolina
2004
2004
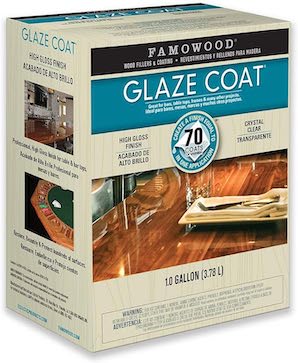
A. There are several brands out there, I have been using Famowood by Eclectic Products
[affil link]. I have also been doing a search online to find a more reasonable cost. Be well and much success to you!
Pam

Pamela Godsoe
- Plymouth, Maine
Q. I would like to encapsulate pea gravel in the top of a small patio table. The maximum thickness would be about 1/2". Will a two part epoxy or plastic hold up in direct sunlight?
Also, logic tells me that I should be able to minimize the presence of bubbles by covering the pebbles only partially. If this is the case can the total encapsulation be done in two steps and how many hours between pours are allowable?
For example would you expect good results using a hair dryer per the following: Partially covered pea gravel on Day #1(pour 1/4" thick) and complete the encapsulation on Day #2 (pour the last 1/4")?

Don Abbott
retired engineer, hobbyist - Ventura, California
2004
A. I respect the warnings above from professionals, but I tried a 1 gallon Envirotex Lite [affil link], a deep (1/2 inch) pour on top of a large maple trunk section to produce a coffee table, and it came out great. The propane torch comment is true, with much patience and time required to pop the surface bubbles after they gradually emerge from any unsealed cracks in your substrate, while the polymer sets over several hours. Plenty of drips, too, through any openings.. the stuff flows well for a couple hours. But I'll do it again!
Kent Murphey- Gainesville, Georgia
2005
Q. What was the size of your coffee table? What did you spread the resin with and use to seal it first? I want to try this to a 7' x 2' bar top. Thanks.
Dan Romero- Palm Beach Gardens, Florida
2005
A. I use EX-74 made by environmental technology inc. I make slab tables from large trees I cut in P.A. The EX-74 degases very easily with a propane torch.You have to stay with it for an hour or so. It must be mixed exactly.Then stirred for a few minutes vigorously. Then poured on right away.Spread evenly with a credit card.Then wait for the bubbles to appear usually about fifteen minutes. A dust free environment is a must. If anyone has questions feel free to ask.
George Leonard- Bayville, New Jersey
2005
Q. How exactly do you use the propane torch to degas?
Has anyone seen a description of the whole process? I am a newbie, but I am determined to made my own patio table with maps and coins.
- Pompano Beach, Florida
2005
A. Just a note to let you know how to get bubbles out after you pour Pourable Clear Epoxy on a surface. The product I use, you can breathe over the surface not blow and the bubbles will disappear from the carbon dioxide we breathe out.
Todd Lawson- Winston Salem, North Carolina
2006
Ed. note: But avoid breathing in over the surface; these solvents aren't good for you.
Q. I used Famowood by Eclectic Products [affil link] high build epoxy coating on a table project of mine. The first table went well...beautiful finish. On the second table there's a spot about 3x3 inch that will not harden. Still after nearly two months it still tacky to touch. Is there any thing I can do to make this harden? Can I remix and re-pour it on top of the original? OR what can I do?
Phyllis Brownhobbyist - Kerens, Texas
2006
Q. With regard to achieving a completely flat surface when pouring a thick layer of epoxy on a tabletop, is it self-leveling if poured quickly? how do you create a completely flat, blemish -free surface? furthermore, what materials would you use to create moulds for table edges, where you want to pour a half inch layer of epoxy on a table top and its sides? and finally, can anyone recommend any dyes for tinting the epoxy?
William Gant- Glasgow, U.K.
2006
A. I use this as an artist.
Envirotex Lite [affil link] is the product of my choice. This stuff just needs to be mixed well 50/50, in a dust free environment. You can add anything to the mix like dried flowers, beads you name it.
I pour it on from center out. I only mix what I need. You can use popsicle sticks or a credit card to gently move product to edges.This method is only for small surfaces. If you want a 1/4 inch thick or more, you have to build a cradle frame flush to fit around your table or surface. I put Vaseline on edges for easy free up. Then the edges are ground or sanded down. Wear a MASK!
You can use a small crafters blow torch or cooking creme brule blow torch
⇦ on
eBay
or
Amazon [affil link] . Heat will not remove the bubbles. Only carbon dioxide will, hence exhaling on a small surface can be done. Don't stay too close to surface. WEAR A MASK!
WARNING I was intoxicated from exhaling on my wood panels. I would not recommend it unless you have an area no bigger than 12 x 12. The bubbles pop and believe me they release small quantities of epoxy in the air as they pop. I had an accumulation in back of my throat which lasted a week. I came close to going to EMERGENCY. Water, dry bread, nothing worked. I was slowly feeling the product harden in back of my throat! What a nightmare!
I now USE A MASK when I work with this product as I do not want lung cancer or other health problems.
It takes about 8 hours to harden.
second coats are possible. You wipe your surface with alcohol. add on more decoupage if you want, then follow instructions above again.
If you want to remove the gloss finish, you can give it a light sanding and you will get a frosted glass look. Test this method first before attempting it on big surface.
REMEMBER, wear goggles
⇦ on
eBay or
Amazon [affil link] and a mask. Don't be fooled by no odor. This stuff is toxic, and I could have sued for bad instructions given by company to exhale onto surfaces. It's just not worth it.
- Canada
Q. Polished white pebbles in a clear resin tile? I would like to know how to make a tile or a sheet of pebbles that are suspended in resin. How do I make the resin? they are to be set into a coffee table I am making.
Julie Charbonneau- Montreal Quebec, CANADA
2006
Q. I would like to make a countertop for a beachside condo (approximately 18 inches wide by 5 feet long and about 1 inch thick. Just a bar type counter to sit at to look over ocean while I drink my AM tea). Do I pour resin into a self built frame or could I use a mold w/ bull nose edge and then mount it to wall with supports? Has anybody tried this project or something similar? Suggestions, comments, ideas?
Thanks, Tammy -- who would love to be in Siesta Keys, Florida but lives in Northeast Ohio. Sunny days to you all.
Tammy Kubekhobbyist and wanting unique coastal condo - Hudson, Ohio
2007
Q. I have used Envirotex-lite on many projects. I do worry about this product and it's link to causing cancer. I do not have much information on this subject and was wondering if anyone is informed of the "risk" associated with its use. I also use a blow torch to rid of surface bubbles. Does this produce any toxic gas? Is it dangerous when I leave it to dry in my house? it does have a strong scent...I would appreciate any knowledgeable info on this subject...or any answers to my questions.
Mandy Ornstein- Cherry Hill, New Jersey
2007
A. Hi, Mandy. You need to ask the supplier for an MSDS (material safety data sheet) because no one else knows what is in it, and they can change the formulation at any time. A Thunderbird is a 2-seat sports car, 4-seat luxury car, or a 6-seat family car whenever Ford changes their mind; and Envirotex-lite contains whatever chemicals the supplier decides. They'll know what an MSDS is. Good luck.
Ted Mooney, P.E.
Striving to live Aloha
finishing.com - Pine Beach, New Jersey
Need quick confidential answers? $25
Need project assistance? $100/hr.
2007
2007
A. Advice for the beginner:
When using pourable epoxy, make sure you use a non-yellowing epoxy, such as bio clear 810, by progressive epoxy polymers, inc.
Be sure to measure (as accurately as possible) the volume you need for your project, and mix that amount plus 2-5% for what gets lost in your mixing container and on your stirring tool. Make sure you are not exceeding the recommended thickness for the particular kind of epoxy you purchase. Some mixtures (especially 50/50) generate a LOT of heat when setting, and can discolor, bubble, melt plastic, even darken your poly undercoat or wood finish. If you need a thicker layer than 1/4 inch, be sure the epoxy you buy specifies that it's safe to do so.
Before pouring, spray the surface and objects to be encased in polyurethane and allow to fully cure. This helps minimize gassing and bubbles trapped at the bottom of the epoxy layer.
When mixing your epoxy, don't be in too much of a hurry. The pouring itself takes so little time, and it levels itself, so relax, and make sure you mix thoroughly. Don't whip the epoxy, as introduced air bubbles are more difficult to eradicate than the gas created during dry time. Smooth, slow strokes are best, allowing the epoxy to settle behind the stirrer. I recommend using as sturdy a piece of wood or metal as you can manage. A friend of mine uses a strip of nylon cutting board wrapped in plastic wrap.
As a previous post indicated, heat is not what helps epoxy gas, it's the chemical composition of the air. Get a block of dry ice(available at most grocery stores), put it in a bowl of water, and hold the bowl over the table. The CO2 will sink to the tabletop, and provide you with as bubble-free a surface as possible. If you are using a frame, this is a bit easier, because the heavy gas will settle into the frame and sit there as long as the air remains still.
If you need a smooth, polished finish around the edge, but are worried about the dust, build a flush frame, and very carefully wrap it in plastic wrap, stretching it and securing it with super glue on the back side. Make sure there are no wrinkles, for those will be impressed upon the edge. I've found it useful to wrap the wood first, then assemble the frame. Epoxy does not adhere to plastic wrap because it is a truly non-porous surface, and will leave a perfectly transparent edge. Beveling is also possible, if you add a second small triangular strip of wood to the top of your targeted level. Also wrap this piece in plastic, of course. Be sure to use latex caulk around the join of the table to the frame, because pourable epoxy is wickedly flowable, and will find any tiny little gap to end up all over your floor, which brings me to:
CARDBOARD UNDER YOUR WORK AREA! Always use scrap wood or cardboard, newspaper will end up permanently adhered to your floor.
I hope this helps people! You don't need to be a professional to use epoxy surfacing, just make sure you are safe. Always work in a well-ventilated area, and wear a mask and goggles at all times.
- United States
Q. I use Polytex 2-part epoxy resins for embedding decorative stones into carved wood handles or burls/knots in wood tables. It mixes (1:1) easily and bubbles pop ok on flat surfaces with my exhale or the torch. My problem is how to remove bubbles in the recesses. My sonicator did not help. A slight vacuum helped somewhat. What do you recommend?
Sarah
Speciality Furniture manufacturer - Tucson, Arizona
May 3, 2009
Q. Can I use a blow torch to also tease out those small bubbles in my satin Minwax polyurethane?
Cori Barryconsumer - Virginia
May 30, 2009
Q. I do not have a bubble problem after we poured the mixture on our bar top. What I have is one end is thicker than the other due to the floor being slightly off level. The thicker part is still tacky. It has been 6 days and it is still tacky. Just one end. Will this ever harden up or is there something I can do like use a heat lamp?
Beth Johnsonnovice, homeowner building a bar - Toledo, Ohio
September 12, 2009
Q. We made a bar used polyurethane to make top a lot of bubbles appeared after it dried. How can we get them out after it has cured? They are many large ones Can you use a blow torch after it has cured?
Peri youngstudent - Escanaba, Michigan
December 4, 2009
A. One tip I would like to add to the post about the pour on epoxy. I used it for the tops of 3 credenzas. I had a very hard time spreading the epoxy on the large surfaces until I used a large stainless steel trowel. It worked like a dream.
Mary Anne Merfeld- Alpharetta, Georgia
March 28, 2010
Q. I've so enjoyed reading about and seeing pics of all the projects made with this liquid plastic. I am wanting to use it to create lacy-looking lamp globes to encase twinkle lights to hang from trees for my daughter's wedding. Has anyone ever tried to pour this epoxy resin once it's gotten pretty hard. The idea is to wait until it's quite thick and pour it over an up-turned bowl covered with plastic wrap in swirlies and circles. I've thought I would try to meld two halves together to create the "globe". Does anyone have any experience with this type of use, or know anything I need to know before I get started? I would like to make a dozen or so of these light globes and in various diameters. Any thoughts or advice?
Leslie Booth- McKinney, Texas
May 3, 2010
Q. I'm doing your standard bottle cap beer pong table with Kleer Koat. Should I apply a seal coat on the wood before placing bottle caps? Or can I apply my seal coat after I've already glued my caps? Or do I need to do both?
Chuck Bee- Portland, Maine
May 14, 2010
Ed. note: Letter 17560 has pictures of more than a dozen bottle-cap tables, and great discussions about how they were built. Although at least one reader did not glue his caps down, almost all readers did.
A. When pouring a 2 part epoxy finish, air bubbles will form after the pour is completed. Use a blow torch to lightly heat the surface of the pour. The bubbles will immediately disappear.
Dennis Drechsler- Victoria, BC, Canada
July 30, 2010
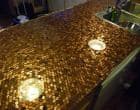
i. If you check over on Make:Projects site by Make Magazine, I posted step-by-step instructions on doing a countertop covered in $77 worth of pennies.
Michael Reilly- Dallas, Texas, USA
August 24, 2010
August 24, 2010
![]() Hi, Michael
Hi, Michael
Nice job on that countertop. I've always been good at "guess the number of jellybeans" contests. Looking at the above picture, and utilizing my carefully honed estimating skill, my guess is there are approximately 7,699 pennies in your countertop -- how close am I?
Regards,
Ted Mooney, P.E.
Striving to live Aloha
finishing.com - Pine Beach, New Jersey
Need quick confidential answers? $25
Need project assistance? $100/hr.
(You're on the 1st page of this topic) Next page >
Sorry! Finishing.com is temporarily Read-Only.
Please maintain your bookmarks! Although Ted Mooney is retiring, finishing.com is not!
It will have a new owner/curator very shortly!