-----
Anodized Aluminium edges not taking dye very well
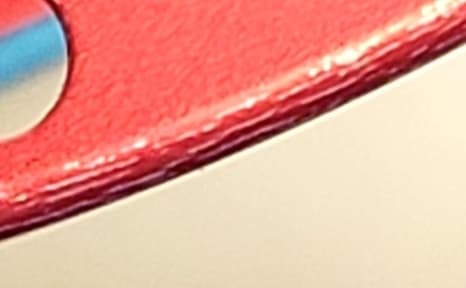
Q. Good day. I have been having an inconsistent problem where some parts are not taking the colour dye very well on the edges. Any idea what the cause could be?

- South Africa
March 18, 2023
A. Hi Denvor. I'm not really understanding the picture -- I have no sense of scale (is this picture "actual size" or way smaller or way bigger? And I don't understand what the item is and why such ridges are considered acceptable, or maybe they're even desired.
But I think you're not going to get saturated dye on a thin ridge like this because you don't have good anodizing on small protuberances like those ridges because they're full of sharp inside corners where growing surfaces crash.
Luck & Regards,

Ted Mooney, P.E. RET
Striving to live Aloha
finishing.com - Pine Beach, New Jersey
Ted is available for instant help
or longer-term assistance.
A. I suspect
1. work hardening from a dull stamping/cutting tool,
2) and/or slivers of thin aluminum left behind by the same dull cutting tool, the slivers anodized, clear thru from side to side, then as 100% aluminum oxide, fell off and left bare metal.

Robert H Probert
Robert H Probert Technical Services
Garner, North Carolina

A. Hi Denvor,
Please have your customer do better deburring prior to sending for anodize. The sharp edges get attacked badly in the anodize tank and are not able to grow the same nice even crystalline structures as the rest of the part due to what we'd call 'burn' or 'scorch', and don't have the pore structure to take and hold dye correctly. This is a common defect. Removing the burr by buffing or some other means, or adding a 'break edge' instruction to the engineering sheet, will remedy it.

Rachel Mackintosh
Lab Rat / WWTF - Greenfield MA
June 9, 2023
![]() Good day Robert.
Good day Robert.
Thanks a lot for the reply.
The machining is of a very high standard so that will not be a problem.
The problem seems to be isolated to only parts dyed in red.
I have reduced the voltage and increased the anodizing time, which seems to have corrected the problem so far.
- South Africa
June 12, 2023
? Good evening Denvor, would you mind sharing what your dye process is? And what dye you are using?

Rachel Mackintosh
Lab Rat / WWTF - Greenfield MA
Q. Good day Rachel
The components are washed in a degreaser for 2 min; 40 sec in the brightener tank; 1 min in the desmut tank; anodized for an hour at 14 volts and a temp of 23 °C; and then the red dye tank at 50 °C for 20 min. The dye is a product supplied by MacDermid.
I was having this problem when I anodized for 45 min.
I hope that this info makes sense. Take care.
- South Africa
June 19, 2023
Q. I seem to be having the same problem popping up again. And again only on parts dyed red.
degrease 60 sec.
brightener 40 sec.
anodize 1 hr @ 14v
dye 22 min @ 60 °C
Seal 18 min
anodizing measured at 20 µm.
This problem popped up after I changed my cathode from a piece of sheet aluminium to 6063t6 droppers.
I previously got these poor results with the following Process:
degrease 60 sec.
brightener 40 sec.
anodize 45 min @ 15v
dye 20 min @ 50 °C
seal 18 min
Anodizing measured at 17 µm
Business owner - East London
August 12, 2024
A. Hi Denvor,
Sorry, but I remain confused :-)
I asked you what this thing is, or for another pic that could offer me a sense of scale, but in dealing with responses from other responders, that request got skipped over. It still looks to me like you have a terrible finish on these edges; Robert Probert has said the same thing, and Rachel Macintosh has said the same thing ... and your response was "The machining is of a very high standard so that will not be a problem" despite the fact that Robert pointed out the areas where burrs anodized all the way through then broke off.
You did not actually tell us what fixed the problem but seem to be implying that minor tweaks in anodizing time & voltage and dye time & temperature temporarily fixed it until you changed anodes, causing it to happen again. I seriously doubt that this timeline correctly explains cause & effect though.
As for red dye specifically being the actual cause, that sounds a bit doubtful for now. Can you send us a current photo of an edge that is not properly accepting red dye, while hopefully including some familiar object (perhaps a scale) in it so we can get a real sense of what this very-high-standard finish looks like?
Thanks & Regards,

Ted Mooney, P.E. RET
Striving to live Aloha
finishing.com - Pine Beach, New Jersey
Ted is available for instant help
or longer-term assistance.
Q, A, or Comment on THIS thread -or- Start a NEW Thread
