
| Search our quarter-million Q&As |
Home of the finishing HOTLINE since 1989
-----Racking Inside Small Holes + Lengthy Rinsing = Poor Rinsing / Streaks?
Q. I wanted to start off by thanking everybody here for your help. We have been browsing the forums for a few years now and what we have learned has been a great help in getting our line built from scratch, completely in house. It's a modest sized anodizing line but we have learned a great deal from everybody here and I wanted to thank everybody for helping us out.
We are in the process of finalizing our type 2 decorative anodizing line and have a rather unusual situation that has cropped up. We only anodize flat parts, cut from 1/8" and 1/4" sheets of aluminum, generally 5XXX or 6XXX series.
Our issue is that every single part we create is different. Some might be long and flat. Others might be short and wide. Still others might be S shaped. We might do one of a single part or a few dozen of the same geometry. The shape of parts is extremely varied but everything is "flat" and not bent.
As you can imagine, this makes racking a bit of a challenge. However, there is a common set of criteria. Every part has at least one 3/16" or 1/4" diameter hole upon which we can put a stepped titanium spring clip through. Our racks consist of vertical titanium racks. We clip parts onto them, so that the parts are always sitting just off the vertical racks. Our titanium racks are sort of like slices of bread, with the parts in between them, if that helps to visualize our setup. We clip our clips to the racks and then our parts to the clips.
Here's our problem though. The parts we have been producing look beautiful. Except for the holes with titanium clips in them, holding the parts onto the racks. We are consistently getting streaks out of those holes, sometimes extending down several inches. Sometimes extending up an inch or so as well but always oriented to gravity. We believe these streaks are dye leaking out of the holes during the dye step. We have a thickness measuring device and it suggests that the anodize layer remains about 0.9 to 1.0 mils thick. Our normal setup consists of soap rinse, 70F caustic at 1.99% for 10 minutes, DI rinse, anodize @ 12 ASF with eductors for agitation, 3 stage counterflow rinse, then 30 minutes in a room temperature dye, followed by 3 stage counterflow rinse then DI water steam seal. We can put pH strips into the holes after anodize and rinse but prior to dye and we can usually see acid still in the hole with the titanium clip. Even after an air sparge sitting under the rack for 10+ minutes.
Notably, small parts with the hole near the edge of the parts will generally rinse out very well, enough such that the streaks on those parts are generally nonexistent. However, if we have holes more in the middle of a part, with an inch or more before we have an edge of the part, those parts tend to streak out the most. If we have an 8" vs 6" vs 4" long part, prior to the hole, the streaking becomes worse when there is more physical part before the hole. Our hypothesis is that the acid is becoming trapped inside the holes and our air sparge is not actually producing enough turbulence to "dig out" the acid, despite the tank appearing to be vigorously agitated. Maybe we are not getting enough flow through the holes?
If we agitate our *dye* tanks while we are dying, we generally get good quality parts, probably because any acid is being rinsed off as soon as it seeps out. That's the only thing that has worked. Every other time we have tried anything else, what we think is acid being kept inside the parts is leaking out during the dye step and ruining our parts with streaks. We know that raw ~ 17% acid will strip the dye off within a matter of seconds, even if the part has been dying for 30 minutes.
We have tried small bubble air sparges, large air bubble air sparges (for as long as 10 minutes), bicarbonate dips (which were the worse, strangely enough), spray rinses, heating our rinse tank to 140F and combining it with air sparging, etc. Nothing we have tried has actually worked.
Assuming the acid leeching out is our issue, nothing we have tried is actually is removing the acid from the holes (or if it is a different problem than trapped acid it is not resolving it) with the clips in them. Similar sized holes without the titanium clips and larger holes are rinsing beautifully. The flats of the parts are rinsing beautifully. But the hole with the titanium clip in it is something that we cannot seem to rinse out. After two weeks and dozens and dozens of parts, I am turning to you experts for something, anything that might be worth pursuing.
We still have a short list of possible things to try but some of them may be a waste of time or may not work at all. Mostly, we are eager to figure out this issue and move onto making solid parts - we have been building this line for about three years now and don't have any more major hurdles aside from this to resolve.
Possible Ideas
Mechanical rinse tank swirling action - motor/propeller based?
Turn racks 90 degrees with "hinged" racks (or just 90 degrees)
A mechanical swish, moving racks back and forth while rinsing
Eductors directed at the parts (modified 90 degree rack idea but with racks still vertical)
Round clips
Smaller clips
Nitric acid rinse
Ultrasonics
Rack vibrator
Consider racking edges with a V shaped clip instead of holes
Rinse aid (wetting agent) could help lower the surface tension in the holes
Manual directed water spray then air blast on a per hole basis
If anybody has any insights or ideas to try or reasons why what we are doing is a stupid idea, please let us know. We know there has to be a solution to this problem but thus far it has completely baffled us. How does one go about rinsing parts that have a titanium spring clip inside the hole, without removing the clip manually and reracking everything by hand for each part? There *HAS* to be a way to rinse these parts out well enough to get consistent results. Except for the holes, these parts look beautiful!
Thank you for reading this and if any has any advice for racking thin parts of various geometry with small holes, we are all ears!
- Tulsa, Ohio USA
August 9, 2014
|
August 12, 2014 A. Hi Bob, Aerospace - Yeovil, Somerset, UK A. You can try going back and forth between hot water and cold prior to the dye. This helps with flushing out the holes. Gently tap the bottom of the rack on bottom of tank until you see the air pocket escape the hole. Start with 5 cycles and see if it works, extend if needed. If you use compressed air out of solution, you run the risk of blowing the acid over the rest of the part ending up with spots with no coverage. Casey Weizel, PresidentForesight Finishing LLC - Tempe, Arizona  August 12, 2014 A. Hi Bob,  Harry Parkes - Birmingham, UK August 12, 2014 |
August 12, 2014
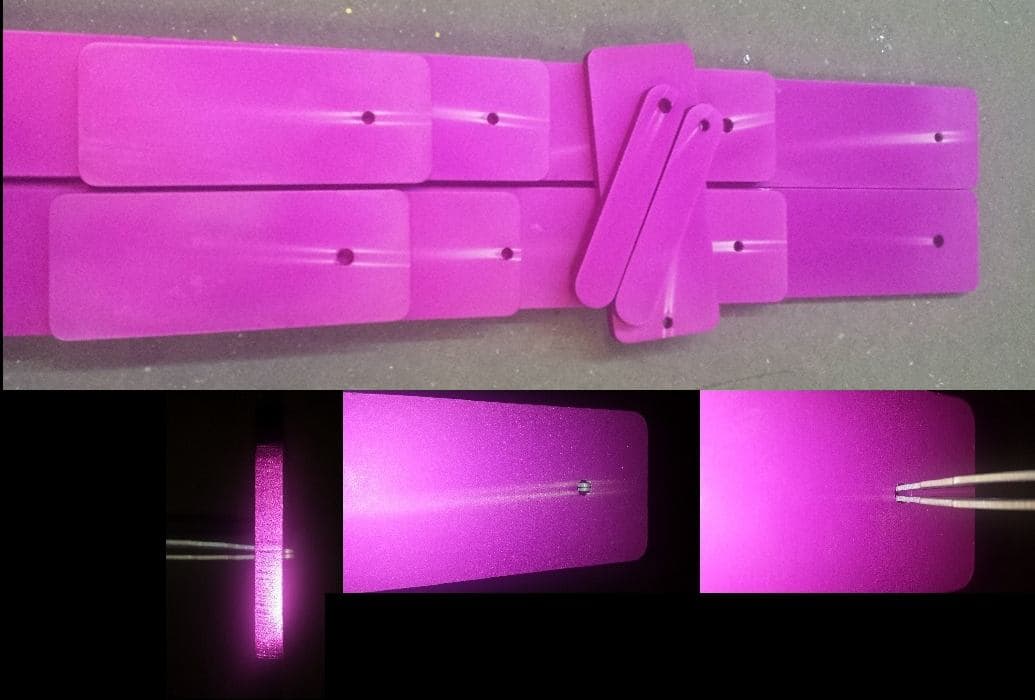
Q. I just wanted to post a followup to my original post with some attached photos to better illustrate what we are seeing. We have performed further testing and noticed that these streaks only appear after 5+ minutes in the room temperature dye bath. Because our dye baths are room temperature baths, they generally run for about 30 minutes. We specifically observed the parts at a set interval of time and found that at 5 minutes a few streaks were starting to show, at 15 minutes they were worse and by 30 minutes, they were fairly pronounced. This also explains why air agitation ⇦ huh? is effective at preventing the streaks from forming. What it does not explain is why they are present in the first place. We can put pH strips into the holes and measure very little to absolutely no acid remaining in the holes after rinsing and yet the streaks still manage to appear.
We also stripped the parts by briefly dipping them in acid to strip the color and then rinsed the parts off of the rack and redyed them without reracking them and the entire part took the dye beautifully. This fits with our measurements and working theory of the anodizing layer being formed properly.
Any further insight or thoughts would be very much appreciated. It feels like we are spinning our wheels and trying everything and getting almost nowhere.
- Tulsa, Ohio USA
A. Hi Bob. A picture is worth a thousand words, and these change everything. I bet all three previous responders will now change their replies :-)
The dual track of these stains is very distinctive; it's not random drip marks. In fact the spacing of the tracks looks to be the same as the width of the open end of the titanium racking pins. This is almost surely an electrical consequence, but it's difficult to tell whether it's thinness in the anodizing along these tracks or a stray current in the dye tank. Excellent pictures, but do you have a picture of racked parts on the rack? Do you have any way of measuring anodizing thickness in the small tracks?
Regards,

Ted Mooney, P.E.
Striving to live Aloha
finishing.com - Pine Beach, New Jersey
Need quick confidential answers? $25
Need project assistance? $100/hr.
August 2014
August 13, 2014
Q. A few additional notes that might be helpful in understanding what is going on.
Coating thickness measurement gives the same results on, near, and away from streaks (0.85 - 0.95 thousandths). The anodize coating looks and measures pristine when it comes out of the anodizing tank.
Stripping the dye from a streaky part with an acid dip, hand washing and hand dyeing (in a small container and not on a clip) produces no streaks. This confirms that the anodize layer is being properly produced and that there is no issue with the underlying aluminum not being able to accept dye. The parts look extremely consistent when they come out of the anodize bath with no evidence of streaking at all.
Rotating the part on the clip between anodizing and dyeing produces streaks that are oriented vertically compared to the dye tank orientation clip, not the acid tank orientation clip. In other words, if we change the orientation of the part on the clip (by rotating it) after coming out of the acid and rinsing, the parts have streaks consistent with the new orientation, not the orientation they had in the acid tank.
The ends of the clips are staggered and thus have two different clip sizes depending on where you put the part on the clip. Both produce the same streaks (one with lots of clip metal near the part and the part close to the rack, one with less clip metal near the part and the part farther from the rack).
Streaks are consistently worse on the back side of the part (the side facing the rack) than the front (the side away from the rack). However, both sides generally show these streaks but the streaks shown in the photo are backside streaks. The front side streaks tend to be smaller in size and less pronounced (sometimes not present) in smaller parts. They also tend to be of the downward orientation and not both up and down.
We continue to be baffled as to what is causing this but our best guess is acid (or bicarbonate when we perform a bicarbonate rinse post acid before water rinsing and then dying the parts?) is still somehow being retained in the holes (but only the holes with titanium clips) and failing to rinse out completely despite what we thought was rather thorough rinsing and it slowly leaches out during the dye processes as evidenced by the fact that if we only leave the parts in the dye for 5 minutes, the dye has not fully taken but the streaks are nonexistent.
Any help or insight or additional tests anybody could suggest we try would be most appreciated. We don't know how to rinse these parts out any more than we are and we are not entirely sure we even understand what is happening, despite our best efforts.
- Tulsa, Ohio USA
A. Hi again Bob. Could you get some plastic clips the same size as the titanium clips, or anything that will pass for them for an experiment, and remove the titanium pins after anodizing and replace them with plastic pins for dyeing?
Regards,
Ted Mooney, P.E.
Striving to live Aloha
finishing.com - Pine Beach, New Jersey
Need quick confidential answers? $25
Need project assistance? $100/hr.
August 2014
|
August 14, 2014 Q. Sure, I will give that a try tomorrow. Removing the clips in practice would be challenging to do for every part but it isn't impossible. If we are going to do that though, we might as well hand rinse every part as well, or at least swish the parts around a clean water tank. Our testing indicates that does resolve the issue of these streaks forming where the clips are. However, doing so in practice for every single part is going to dramatically increase the cost and time to produce every part and is something we are trying very hard to avoid. - Tulsa, Ohio USA A. Thanks for the additional information, Bob. As Ted correctly predicted, I have changed my mind on the cause of your problem. Harry Parkes - Birmingham, UK August 14, 2014 August 14, 2014 A. Hi Bob, - Belgaum, Karnataka, India
|
August 14, 2014
A. Bob
It does not look like acid bleedout; acid being heavier than water runs down.
Taking Harry's thought a step further, is your dye tank Stainless Steel? If so, remedies I would try would include the use of a sacrificial magnesium anode, as well as trying an aluminum spline to which you attach the titanium stepfingers. Or aluminum fingers on the titanium spline
While not addressing root cause, if solution movement prevents it from occurring, consider a filter pump / mixer.
- Colorado Springs, Colorado
|
August 15, 2014 Been awhile since I've done dyed work. However, I have to agree with the poster's conclusion this is acid bleed out. A simple confirmation test I would perform to verify this is to rack a part, using titanium racking (as your current racks are) on the outside edges. Run through your standard process. No steaks coming out of the holes? Voila, you are trapping acid between your Ti rack, and your part. Granted, rack marks on the edges may not be acceptable to your customer, but at least you've found the cause.  Marc Green anodizer - Boise, Idaho August 15, 2014 Our dye tanks are all 1/2" polypropylene. The racks sit on nonconductive fiberglass while inside the dye tanks. - Tulsa, Ohio USA Ed. note: Yes, DM was an acronym for demineralized |
|
August 17, 2014 Very Interesting indeed ,Ted ! Must confess, although I had come across both the spellings at different times, I never wondered about the difference between them ! |
A. To return to the question, Bob, - as Ted has already mentioned in his footnote - I did mean De-Mineralized water (DM). I specifically mentioned that because 'Tap Water' would be a strict NO-NO in this case ( any where in the sequence in fact ), the higher chlorides will create more questions than answers, especially in this 'dyeing after anodizing' case.
The nitric acid rinse I suggested is somehow useful.Theories are that, it washes out the sulfuric better and then in turn, gets cleaned out easier in the rinses.Worth a try, definitely.
- Belgaum,Karnataka, India
August 18, 2014
A. Another perspective:
I noticed all the holes the parts are racked in are through holes, not threaded. Are these functional holes or just for racking? If they are for racking, thread them, use aluminum or titanium bolts and fasten cane/rack.
Foresight Finishing LLC
- Tempe, Arizona
Sorry! Finishing.com is temporarily Read-Only.
Ted Mooney is retiring but I have several offers to take it over.
We're working hard to make sure we find it the best new home.