
| Search our quarter-million Q&As |
Home of the finishing HOTLINE since 1989
-----Inconsistent colour change in anodising
this text gets replaced with bannerText

Q. Hi everyone!
I recently started a small aluminum anodizing system. My very first colored parts result with a patchy color. Any thoughts on what could be causing this?
Here is a brief description of my process:
- Degreasing solution @40 °C for 30 min (I try cleaning with scotch brite and polishing the aluminum part prior to the degreasing without success).
- Degreasing rinse
- Sodium hydroxide 5% for 5 min.
- Sodium hydroxide rinse.
- Sodium bicarbonate solution.
- Sodium bicarbonate rinse.
- Sulfuric acid bath 25% power supply set @ 9.8 V and 3.47 A for 60 min.
- Sodium bicarbonate solution.
- Sodium bicarbonate rinse.
- Simple rinse
- Color dye @40 °C for 15 min.
- Seal with hot water.
Water used is deionized.
- Tijuana Baja California Mexico
September 19, 2022
A. Hi Ilze,
Your process does not match what would be the normal type of tanks used in an anodising line.
What is your first aqueous degreaser composition?
After that it needs to go in a de-oxidising etch, then rinses, at least depending on the alloy being anodised.
what is the alloy your are trying to anodise?
The parts need to remain wet between each stage on the way to the acid tank.
Also the anodising is controlled by current density relative to the surface area of the parts and jigging, as well as a ramping profile to the final amperage/voltage.
The specifics of the voltage and amperages depend on the type of anodising, hard or soft in general terms, this determines the temperature and composition of sulfuric acid solution.
Any extra information you can provide will better assist in helping you.
Best regards
Mark
- A forsaken rock in the Irish Sea
Q. Hello Mark,
I'm using [brand name deleted at vendor request] SP Cleaner/Degreaser.
Parts anodized are aluminum 6061.
By the way, does chlorhydric acid work for de-oxidising etch step?
Yes, parts remain wet along the preparation.
Power supply set up was calculated according to area and 1 mil coating thickness following 720 Rule.
![]() Thanks for the support.
Thanks for the support.
- Tijuana Baja California Mexico
September 20, 2022
A. You are etching before you are clean and that leaves a permanent pattern. Your acid is too high, your voltage is too low.

Robert H Probert
Robert H Probert Technical Services
Garner, North Carolina

A. This is very close to setting up your line correctly:
1 clean (non etch cleaner
2- rinse
3- etch (as little as necessary)
4- rinse
5- Deox/desmut (tri acid)
6 rinse x2
7 anodize 16-18 volts-30 min
8- rinse x2
9- block dye
10-rinse x2
11 seal (nickle)

Drew Nosti, CEF
Anodize USA - Ladson, South Carolina
⇩ Similar, related, Q&As -- oldest first ⇩
Q. We are a machine shop that has made some parts for a local company -- made from 6082 & Almac tool plate. We have used Almac for years without any anodising problems. Our customer came in today with a batch of parts that they had anodised. All the parts that we made from 6082 looked fine as where the Almac tool plate parts looked very "grainy" with an uneven colour - as though the acid had eaten away into the aluminium. I think this is what has happened as there are several fixing holes on the back of the component that are quite over size since anodising (accepts no go thread gauge) The colour is a "mid grey" but I am not sure this has much to do with the problem.
I apologise for my terminology and have only just come across this site, and I am amazed with the wealth of knowledge on here! If any one can point me in the right direction why this has happened I would be truly grateful.
Regards,
Paul Hill- London, UK
2001
A. If you've been doing this before on the same alloy and customer, there is a possibility that error occurred on the part of the aluminum alloy supplier. The aluminum batch that was prepared might not be homogeneously mixed, or simply the wrong alloy had been supplied. I based this opinion on your observation that it produced a grayish finish which may be indicative of richness in silicon (or magnesium?)
Dado Macapagal- Toronto, Ontario
A. What about the acid in the color bath ? It might be a good idea to check the concentration of acid in the color bath.
Thanks
- SYDNEY, Australia
2006
Q. Hi I have had a similar problem with some bike levers. I can anodise new alloy fine but when it came to doing my levers on my bike they went a very dark gray and I was unable to colour them. If anyone could help it would be lovely :)
Kieren Rogers- Bristol, U.K.
December 15, 2011
A. Hi, Kieren.
There are many different aluminum alloys -- Which contain different amounts of copper, silicon, magnesium, zinc, etc. And of those metals, only the aluminum portion can be anodized. That means that when an alloy is high copper for example, which might be the case on bike levers, it tends to anodize very dark. Is it possible that your successes were with a different alloy?
Sometimes some improvement is possible by de-smutting (dissolving the copper and silicon on the surface) between cleaning and anodizing, but this may or may not be enough (some castings alloys are not attractively anodizable).The problem is not solely age, but yes, age can cause segregation along grain boundaries and exacerbate the problem of poor looks and poor corrosion resistance. Good luck.
Regards,

Ted Mooney, P.E.
Striving to live Aloha
tedmundmooney@gmail.com - Pine Beach, New Jersey
Need quick confidential answers? $25
Need project assistance? $100/hr.
Multiple threads merged: please forgive chronology errors and repetition 🙂
Q. How to avoid colour change in anodising (some areas dark shade, some areas light shade)? What is the reason for this colour change?
Franklin DominicIndustrialist - Bangalore, India
October 19, 2011
A. Hi, Franklin.
Aluminum alloys contain other materials besides aluminum (such as silicon, copper, etc.), and none of these "anodize" -- they just turn into black discolorations and even smuts. Besides changing the alloy or getting better quality aluminum, the single best thing you can do is probably to minimize or eliminate the etching step. (My knowledge of this is mainly book knowledge, and hopefully some real anodizers will chime in).
Regards,
Ted Mooney, P.E.
Striving to live Aloha
tedmundmooney@gmail.com - Pine Beach, New Jersey
Need quick confidential answers? $25
Need project assistance? $100/hr.
A. Pretty vague question, so I'll assume you're talking about an inconsistent color on one part, not different loads, or different alloys.
Possible reasons for varying shades of color on one part:
Inconsistent coating thickness.
Larger anodic coating pore size on one area, as opposed to another due to localized overheating during the anodizing process (insufficient agitation, too much surface area for the anodizing rack to adequately handle, etc, etc)
Poor rinsing.
Hot/cold areas in dye tank due to lack of solution agitation.
If you're asking about a color change from load to load..part to part...all of the above would apply, as would many other factors.
The first place I'd start would be checking the coating thickness from the light area, to dark area.

Marc Green
anodizer - Boise, Idaho
Q. Hello, I am new to anodizing aluminum. I am trying to anodize two of the same parts in an anodizing process but they have different result. Can you guys help me what is going on in my anodizing process?
*I am using same parameter/treatment to both of them
- Salatiga, Indonesia
July 21, 2020
Aluminum How-To
"Chromating - Anodizing - Hardcoating"
by Robert Probert
You'll love this book. Finishing.com has sold a thousand copies without a return request 🙂
A. Hi Faisal. If we are to believe in the law of cause and effect, you don't do the exact same thing to two identical parts and get different results :-)
So what you're actually asking readers to do is to guess what is different despite your claim that nothing is different. Hopefully, you understand that this is difficult and will require a lot of data from you :-)
What alloy are you anodizing? What are these two parts which you claim are identical? What is the actual thickness of the anodizing in both cases. This is non-dyed, natural color aluminum? Are you sure that both parts were thoroughly clean to waterbreak-free standards? Are you etching? Are you desmutting? What is the composition of your anodizing bath and your anodizing conditions? Send good pictures of both parts to finishingdotcompublic@gmail.com for posting here please.
Luck & Regards,

Ted Mooney, P.E. RET
Striving to live Aloha
tedmundmooney@gmail.com - Pine Beach, New Jersey
Need quick confidential answers? $25
Need project assistance? $100/hr.
Q. Sorry not telling my detail process. Here is my processing method :
-. clean with degreasing, then rinse
-. etch in caustic soda ⇦liquid caustic soda in bulk on
Amazon [affil link]
for 1 minute, then rinse
-. anodize in sulfuric acid bath for 52 minutes with 12 V 3 A power supply, then rinse
-. put the part to dye bath for 20 minutes in room temperature, then rinse
-. sealing with cool sealing for 10 minutes
I am doing that method for both of my parts but one of them is perfectly dyed but the other one is like bare aluminum, is there any problem with my method.
Both of them are same aluminum alloy 6063. Thanks
Faisal Aprialdi [returning]- Salatiga, Indonesia
July 21, 2020
A. Hi Faisal. It seems to me that there are two likely explanations:
1. For some reason the aluminum-colored part did not anodize, and therefore could not accept the dye.
2. For some reason the aluminum-colored part was previously anodized and sealed, and having been sealed it could not accept the dye.
I remember once, many years ago, on a new aluminum wheel plating line startup I was called in to troubleshoot a plating rectifier that would not put out any current. They had put one wheel on the rack to check the rectifier, and the chemical people, equipment people, rectifier serviceman, and I were scratching our heads for an hour. Turned out the wheel had somehow somewhere, even if only accidentally over the months, become anodized. So #2 does happen :-)
Luck & Regards,
Ted Mooney, P.E. RET
Striving to live Aloha
tedmundmooney@gmail.com - Pine Beach, New Jersey
Need quick confidential answers? $25
Need project assistance? $100/hr.
A. Everything Ted Mooney said above. In more detail, one minute in the etch, at any reasonable concentration, would not strip old anodizing and would not strip weathered oxide; then you did not deoxidize. Not related to this problem, but if you do any serious anodizing, you need higher voltage, up to 15 for most alloys and up to 21 for the 2000's alloys. Also, electrical contact reliability could have been your problem.
Robert H Probert
Robert H Probert Technical Services
Garner, North Carolina
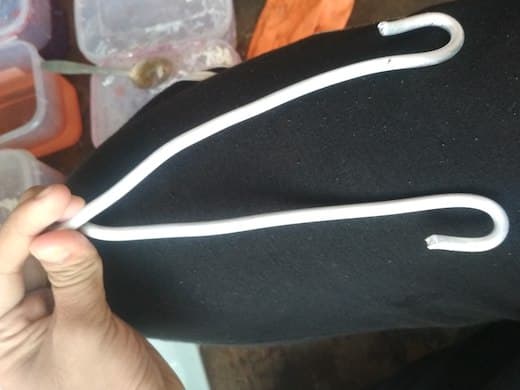
Q. I am using 1.5 A/square dm current density and use aluminum wire for my hanger. I shape my aluminum wire like letter "U" and hang my part at the end of wire (in one of the holes in my part). Does it cause the problem from my anodizing process?
- Salatiga, Indonesia
July 25, 2020
A. Hi Faisal. "Gravity" hooks are often a bad idea for anodizing, because the hooks (except for a tiny sliver where the part is resting) will become anodized and non-conductive. Then a small amount of jostling from handling or agitation will move the part a tiny bit on the hook, to a spot which is anodized and non-conductive.
If you used the same hook for the first and second part, the hook is completely anodized and non-conductive, and that's the problem.
Luck & Regards,
Ted Mooney, P.E. RET
Striving to live Aloha
tedmundmooney@gmail.com - Pine Beach, New Jersey
Need quick confidential answers? $25
Need project assistance? $100/hr.
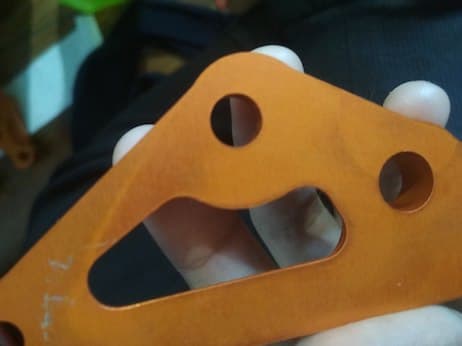
Q. Now I am using that wire to hang just one part of my aluminum. So I am anodizing my part in 12 V 3 A/square dm current density for 45 minutes, the result is the absorbed the dye perfectly but it seems like the part is getting burning in some spots. Is the problem the agitation system (cause I am not using agitation yet), too much current density, or too much time of anodizing?
- Salatiga, Indonesia
July 27, 2020
by Larry Durney
on Amazon or eBay
or AbeBooks
(affil link)
A. Hi Faisal.
The answers are: Yes, yes, and yes :-)
There is nothing wrong with experimenting and trying to learn. Enjoy it! And a scattergun can be a useful tool when experimenting.
But when your situation changes from experimentation to asking people to help you troubleshoot, you can't say: "I'm supposed to do these three things for proper anodizing -- which one of them can I do and ignore the other two, and still get proper anodizing? And by the way, I doubled my current density" :-)
As Larry Durney reminds us in "Trouble in Your Tank", there is no point even trying to troubleshoot until you decide to "Obey the letter of the law". You need agitation, you don't anodize at 3A/dm^2, and 45 to 52 minutes sounds like quite a long time to me -- what anodizing thickness are you looking for? :-)
1.5 A/dm2 was working and was in the right ballpark -- what was your reason for simply doubling it?
Luck & Regards,
Ted Mooney, P.E. RET
Striving to live Aloha
tedmundmooney@gmail.com - Pine Beach, New Jersey
Need quick confidential answers? $25
Need project assistance? $100/hr.
Q. Sorry for causing so much trouble for you sir, I am running my anodizing process at home so I don't have so much tool to optimize my process. Cause I am using my wire to hang 2 part seems don't work well I am deciding to just hang 1 part in wire (so the wire attach in 2 hole of part). The result is perfect (in this process I use 30 minutes) but I need more deep color so I increase my time to 45 minutes and that problem occurred. Based on your statement, the problem is the agitation system so I will try to add my agitation system to my setup.
Thanks for your help sir
- Salatiga, Indonesia
July 28, 2020
A. Hi Faisal. Your questions are no problem, and you are correct that for dark, saturated, colors you do need thicker anodizing than for light pastel colors because the greater the anodizing thickness, the more dye that can be absorbed.
Luck & Regards,
Ted Mooney, P.E. RET
Striving to live Aloha
tedmundmooney@gmail.com - Pine Beach, New Jersey
Need quick confidential answers? $25
Need project assistance? $100/hr.
Q. Can using an aerator fix that problem?
I am still searching for a pump that doesn't have metal parts, apply in water and acid resistant.
Thanks for your advice.
- Salatiga, Indonesia
July 29, 2020
A. Hi Faisal,
Yes, a strong enough aerator that gives good agitation all around the tank is in fact a common way to keep the tanks mixed. A CPVC pipe structure drilled with lots of holes and secured to the tank edge is common.
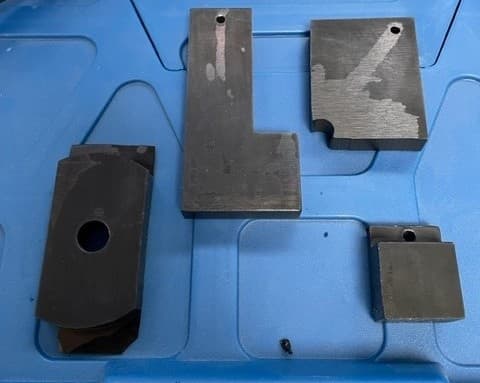
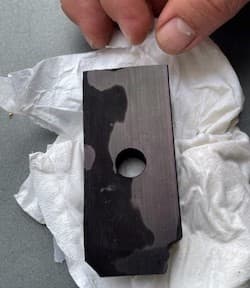
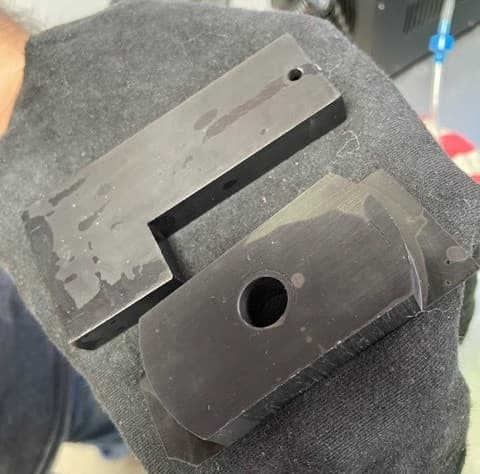
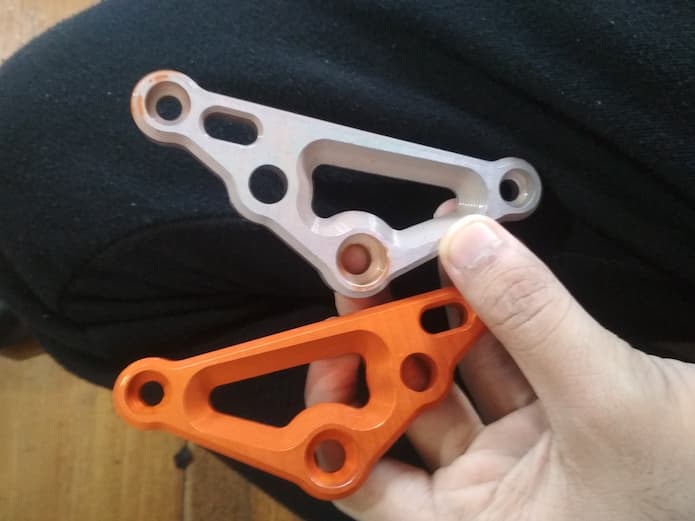
And that brings me to my next advice, relating back to your first picture. I looked at it and thought, "lost contact!" And then I saw your racking.
The advice of these gentlemen is excellent as always and I'll add that once you have good mixing in your tank, a strong, secure rack is even more important to hold the part with good electrical connection all the way from the part back to the rectifier! The bubbles will put pressure on it, and anything less than a rigid rack, clamped securely in position relative to the cathodes and sides of the tank, will allow flopping around, lost contact, uneven current, ... etc.
I would try racking that part using a stiff yet springy v-shaped bent piece of narrow aluminum or titanium plate with the ends bent outwards and cut to a point that will fit in the holes, to contact the bore of the hole where 'rack marks' have the least aesthetic impact on the finished part since I assume a bolt goes through there when installed. This type of pressure racking component is called a "clip", and mounted to a current-carrying frame or "spine" that is in turn secured to something rigid (there are multiple approaches to this) so there is no possibility of movement.
You can look at some of the rack manufacturers' catalogues to get an idea of what I mean. Google "anodizing racks" and you'll find all sorts of images of approaches to racking securely to minimize both movement and rack marks, while maximizing good electrical contact, with examples of various racks for different part configurations.
Don't forget that you have to strip your racks in between uses! The anodic layer is an insulator. You can etch it off in hot caustic soda ⇦liquid caustic soda in bulk on
Amazon [affil link]
and then de-smut it. And check the resistance all the way from the end of the rack assembly to the part surface before starting to anodize. Sometimes the bolts get degraded or don't strip right and you end up with a dead rack ... just take it apart and use fresh bolts and grind the contact surfaces to bare substrate.
Best of luck!

Rachel Mackintosh
Lab Rat / WWTF - Greenfield MA
Q. Thanks for your advice, right now I am applying agitation system and had a good result. But I have another problem, I am anodizing 2 different parts (1 part for 1 process so I am running 2 anodizing processes) and the results have different color. After dyeing I am checking that parts have the same color but after sealing the parts have different colors. Can sealing cause bleed out? (I am using cool sealant).
Thanks for answering my problem.
- Salatiga, Indonesia
August 3, 2020
Q. I am now perfectly anodizing aluminum with same color with each load (1 part each load/process). After that I tried to increase my load to 2 parts each load/process but the result is 1 part anodized perfectly and 1 part not anodized at all (I ensure the connection point from wire to each part is tight enough). Why can this happen? For anodizing many parts in one load, what are the factors that affect the process of anodizing?
Faisal Aprialdi [returning]- Salatiga, Indonesia
August 8, 2020
A. Hi, Faisal. I think the basic problem here is that you have no good method or equipment to determine if the article is being anodized correctly and was anodized correctly. Therefore you look at your dye tank, your sealing tank, etc. instead of focusing on the fact that the anodizing is not proceeding properly.
Although the distance from anode to cathode does matter somewhat, it is nowhere near as important as in electroplating because as the surface becomes anodized it becomes electrically insulating, thereby promoting the current flow to other areas of the part or other parts.
If the part that "did not anodize at all" did not have a previously anodized surface preventing further anodizing, then the contact remains the problem.
Luck & Regards,
Ted Mooney, P.E. RET
Striving to live Aloha
tedmundmooney@gmail.com - Pine Beach, New Jersey
Need quick confidential answers? $25
Need project assistance? $100/hr.
A. Hi Faisal!
In response to, "can sealing cause bleed out?"
I'm going to guess that though you matched your colors, one part took much longer to strike... And that same part showed more fading. You want to aim for a uniform and repeatable coating thickness to get repeatable behaviour in the dye and seal tanks.
If you have the resources to invest in an eddy current meter to measure build, that is a useful tool. But back to the importance of racking, a rack that has been prepared and tested for resistance to check tgat it can deliver predictable current over the entire run of the load, is the place to start. If your rack-part interface has resistance from incompletely stripped ano layer or smut, it will overheat during the process, and one of the possibilities for what happens next is that the part loses contact from a failure somewhere between the plating solution and the rectifier:)
Rachel Mackintosh
Lab Rat / WWTF - Greenfield MA
Sorry! Finishing.com is temporarily Read-Only.
Please maintain your bookmarks! Although Ted Mooney is retiring, finishing.com is not!
It will have a new owner/curator very shortly!