-----
Aluminum Anodizing Color Match Problems
Q. Hello,
I have been getting a finish problem with on the anodised pieces that I've been putting out.
I have arranged many interesting pics to show the issue.
You can see in the photos with the semi circle rings, the finish was very good, and I was happy with it.
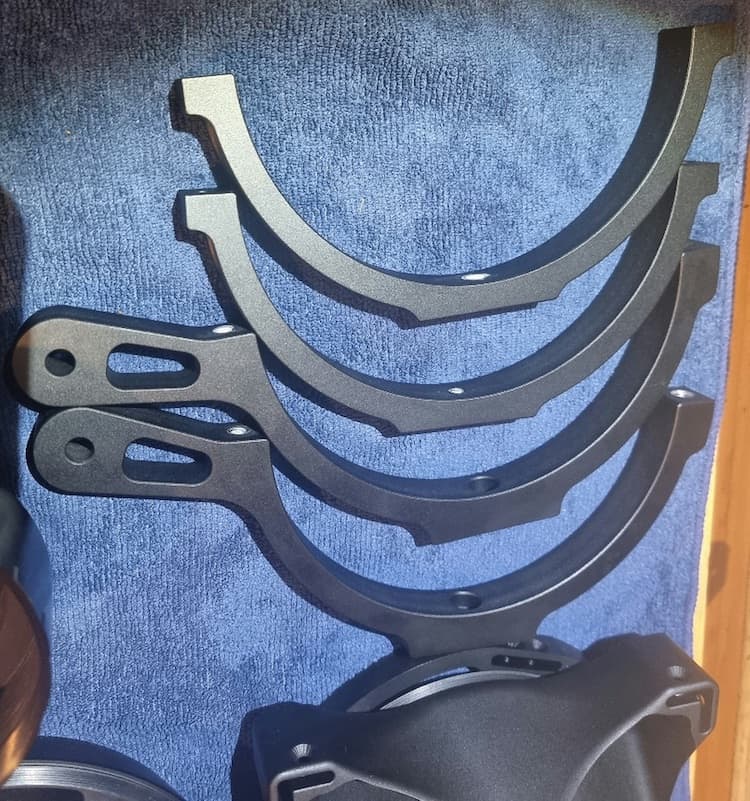
But recently, without knowingly changing anything, the finish has gone south. There are several issues I'm having. Firstly, as shown in most of the photos, there is a distinct banding of the black anodising, a clear boundary where one side is darker than the adjacent side.
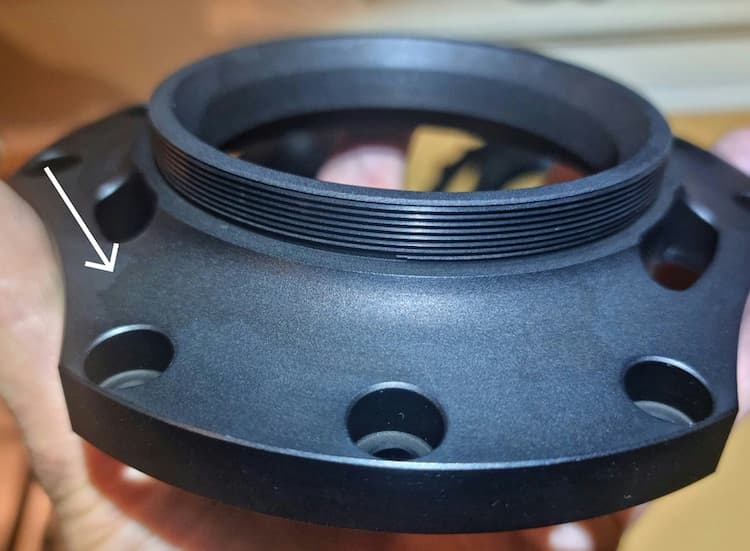

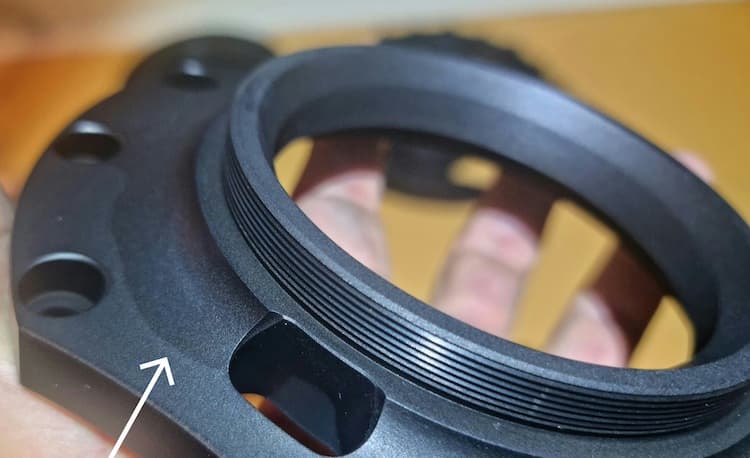
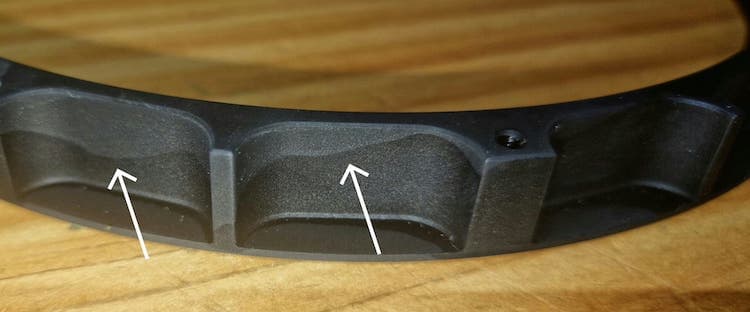
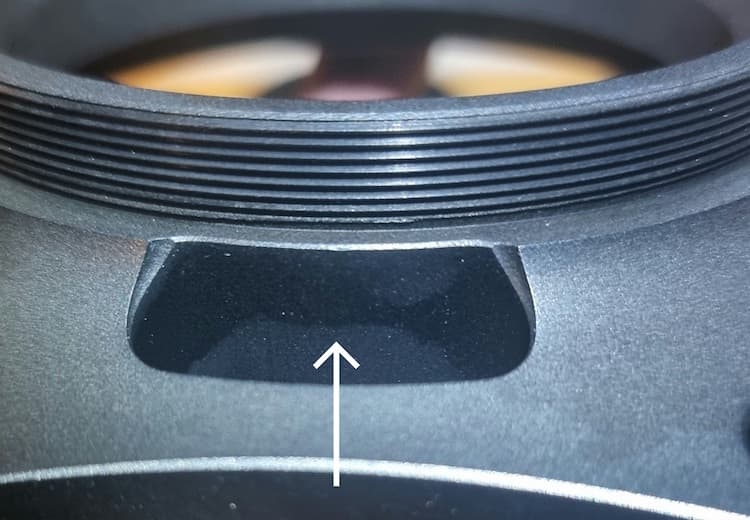
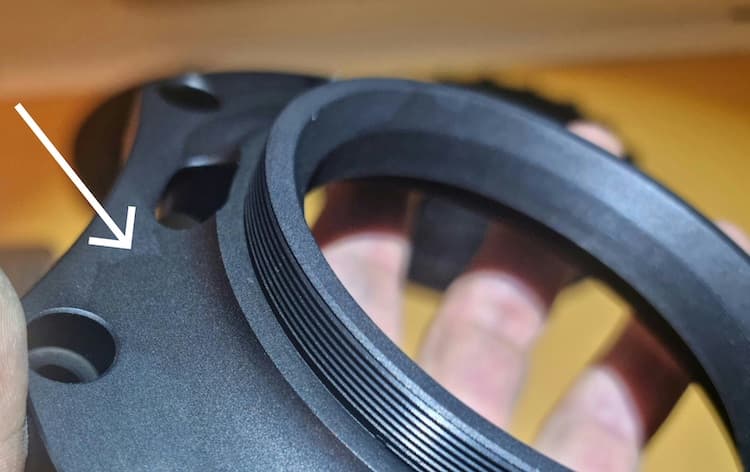
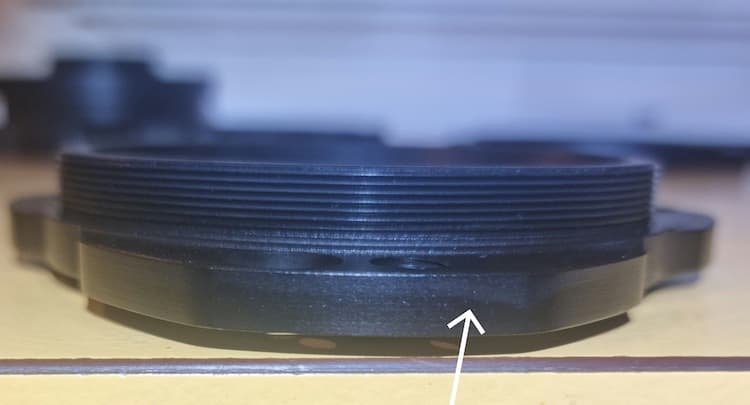
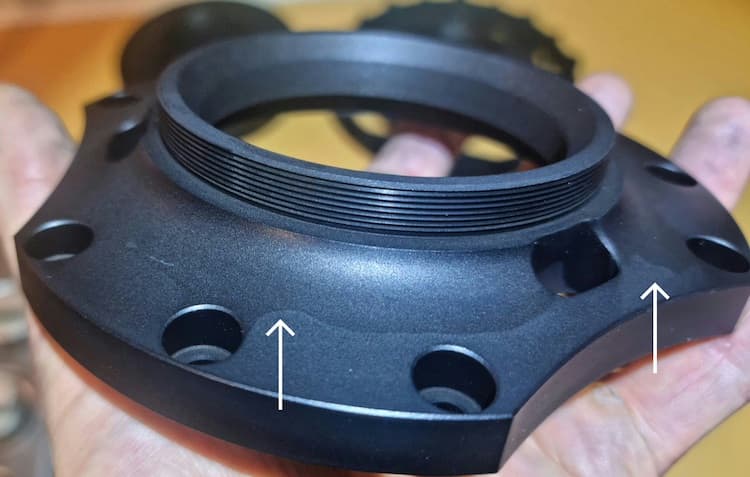
In recent previous parts, this only seemed to occur on edges and corners, but now as you can see, it's also on flat faces. What could be causing this?
The second issue, as seen in one of the photos, is a black chalky appearance as it comes out of the sealing tank.
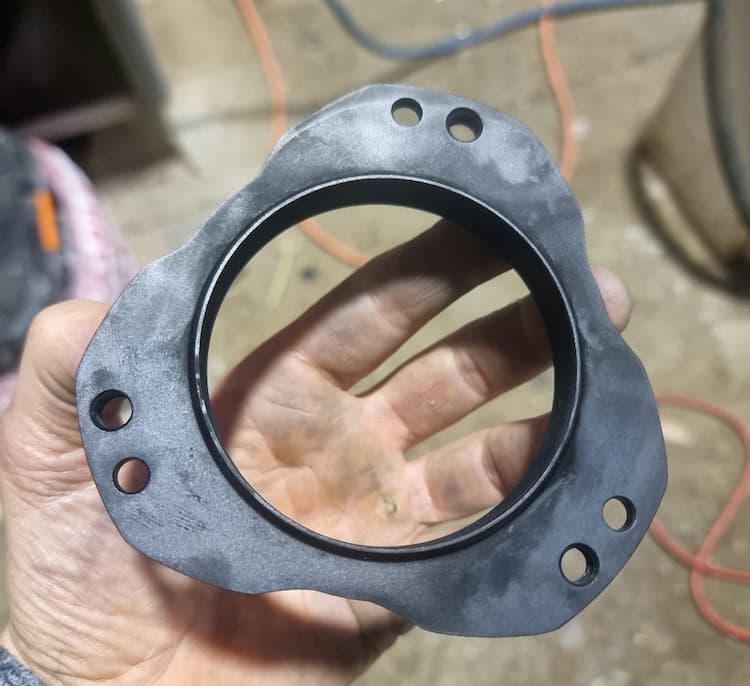
This mostly wipes off with detergent and a scrub, it has a slight blue hue to the chalky appearance as well. My thoughts are the anodising tank is too hot, it was at 22 °C [72 °F].
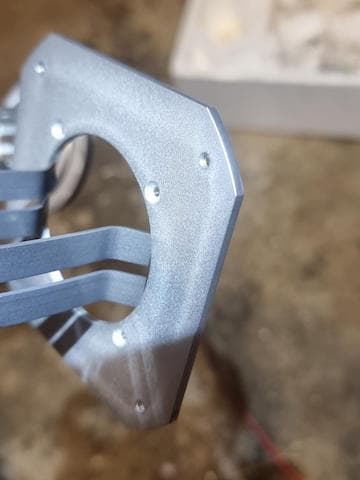
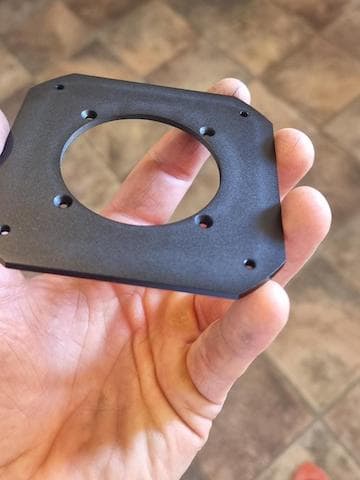
The last issue I am seeing is in the un-anodised pieces straight after they have been in the caustic etch bath. Do you see on the square flat piece, there is a band about 1cm in from the outer edge and the inner circle. Does anyone know what causes this? Strangely enough, this piece did not exhibit the banding we see in the other photos and which I mentioned in point one above.
Now, a little bit about my process.
Everything is cnc machined from 6061 T6 or T651 Aluminium and with food coolant. From there, I beadblast them at 40 psi with glass bead (I am thinking about skipping this step as it may be part of the problem). After this, the parts are degreased/cleaned at 60 deg C for 10 min with air agitation.
They then go into an E6 long life etch bath for cosmetic caustic etching at 80 °C for 10 min., very high levels of dissolved aluminium, I also use a commercial Alphisatin additive for the pickling process. This removes about 60 micron of aluminium from the surface.
From there it's back to the degrease bath for a short clean before going to be desmutted for 8 Min at room temperature with air agitation.
From there, they are anodised for 1 hr at 12 A/ft2 with a constant current power supply and sulfuric acid concentration of 200 gm/l (confirmed with titration) and air agitation. All electrical connections are new, and large enough to Cary the required current. I use lead plate in the anodising tank.
My concern is the temp is to hot, I have no active cooling in the tank, my runs are not usually big though, maximum of 16 Amps with 15 Volts. I am going to start putting ice bottles in the tank.
After anodising is a bicarb dip rinse, followed by a clean water rinse dip followed by a spray rinse. On the note of water and rinsing, all the water used in the setup is RO water and parts are at least double if not triple rinsed between chemical tanks.
I then Dye the parts for 25 min. at 55 to 60 deg C with air agitation. I use good quality Sanodal Deep Black MLW dye.
After rinsing, it goes for a Nickel Acetate seal at 85+ °C for 15 min. I have not been agitating this, but there is convection from the boiling seal liquid. I gave it agitation today by hand, it did not make a difference. I do not boil the parts after the seal tank, but I do rinse them.
Looking at the parts as the come out of the anodising tank, I can't see any banding, they look very uniform.
Would anyone have any ideas about these issues? Any help is appreciated.
- Western Australia
December 28, 2023
A. Hi Josh. You say you are thinking about trying the process without the bead blasting, and I think trying that should probably be your top priority. I think it's entirely possible that most or all of these inconsistency problems are caused by inconsistencies in blasting. Yes, your anodizing temperature is high by about 2 °C, but I doubt that that is what is causing these inconsistencies.
Luck & Regards,

Ted Mooney, P.E. RET
Striving to live Aloha
finishing.com - Pine Beach, New Jersey
Ted is available for instant help
or longer-term assistance.
⇩ Related postings, oldest first ⇩
for Shops, Specifiers & Engineers
avail from eBay, AbeBooks, or Amazon
avail from eBay, AbeBooks, or Amazon
avail from eBay, AbeBooks, or Amazon
avail from eBay, AbeBooks, or Amazon
avail from eBay or Amazon
(as an Amazon Associate & eBay Partner, we earn from qualifying purchases)
Q. I need to know if 5052 aluminum will anodize the same shade of black as 6262 and 6061? I found out the hard way that 2024 will not.
Ed Miklavcic Jr.- carol stream, Illinois
2000
A. Well let's do a little check on the material compositions first:
Composition: 5052-H32
Al 97.3
Cr 0.15 - 0.35
Cu Max 0.1
Fe Max 0.4
Mg 2.2 - 2.8
Mn Max 0.1
Si Max 0.25
Zn Max 0.1
Composition: 6061-T651
Al 98
Cr 0.04 - 0.35
Cu 0.15 - 0.4
Fe Max 0.7
Mg 0.8 - 1.2
Mn Max 0.15
Si 0.4 - 0.8
Ti Max 0.15
Zn Max 0.25
You have some definite differences in the makeup of the 2 materials, noticing that 5052 has more Mg I'd expect more of a grayish shade out of the material than I would from a 6061, other than that there isn't anything overly striking to me that would tell me that they would color any differently. My best suggestion to you would be to take a 1 sq. ft panel of each and have them processed. As much as we the people might be able to predict this and/or predict that, results don't lie (well most of the time at least :p)
I know I've processed both of these materials, but unfortunately not at the same time, so my data would essentially be worthless to you. I've done 5052/6061 in clear anodize, but not at the same time, so well how can I compare when I don't have 1:1.
Matthew Stiltnerplating company - Toledo, Ohio
A. They do not etch the same or anodize the same. Metal from different lots or tempers will not look exactly the same. Boils down to how close does it have to be. Start point is certainly the test recommended by Matthew.
James Watts- Navarre, Florida
A. We are an architectural anodizer and one of our primary concerns at all times is color uniformity. I agree with James Watts when he says that "metal from different lots ... will not look exactly the same." We have found that buying aluminum for anodizing is like buying bolts of cloth from a tailor for making clothes. If you want color uniformity you must start with a single lot of aluminum, or consecutive lots of aluminum. By "lot", I mean the coil or coils made from a single ingot that was originally rolled into sheet, or the billet that pushed into an extrusion.
Notice also in Matthew Stiltner's post that there is variance in the alloying constituents. (Max means the content could fall all the way to zero.) Even for a given alloy/temper, you will still have some variance lot-to-lot in not only mechanical properties, but also chemical composition as well.
I hope that helps.
Penn
Penn McClatcheySouthern Aluminum Finishing Co - Atlanta, Georgia
A. Hello everyone,
I'm going to chime back in here on this topic. These two guys provided a lot of helpful information and when necessary corrected some of my mental errors. I wanted to basically remark on Penn's comments about the quality of aluminum and its makeup from lot to lot. This is so true, and I have spoke with a gentleman in great detail about this issue. He basically stated that most material available to a majority of us is for the most part lacking in quality from lot to lot. That the mixtures even noticeable from the same coil can be different and vary throughout that coil itself. He said that the mixtures are (I may have these backwards now, I've got a cold and my brain isn't working at its full 100%) homogeneous not heterogeneous, meaning of course that they are improperly mixed throughout the material, where you might have .04% copper at one end of the coil and at the other end have .035% copper, now this is a small minute difference in my opinion, but generally this will probably not be the only difference in the makeup/mixture.
Also, now this may be an opinionated response, but this person I spoke with also stated that material from Germany/Europe regions and also from Japan was of extremely high quality and highly praised for this reason.
Best of Luck to Everyone, and keep on putting in your 2 cents, its well appreciated here I know and I like to see what others have to say about so many issues.
Matthew Stiltnerplating company - Toledo, Ohio
A. If you think about it, the aluminum in an anodized part is the finisher's most important raw material. Yet the anodizer has little information and no control over its alloy composition, heat history, hot/cold working, grain structure, intermetallics, surface finish, uniformity, inclusions and contamination. All of these things affect the conversion process and can result in non-uniform anodic coatings; within a single part, part to part, and run to run. Matt stated that a copper difference of .035% to .04% within a coil was minute. I would suggest that that depends how you look at it. In absolute terms, he is correct, i.e., .040-.035 = .005% difference. In relative terms .... (.040-.035)/.035 = 15% difference. Anyone trying to manufacture a consistent product would have to look at raw material variations of 15% as significant.
Chris Jurey, Past-President IHAALuke Engineering & Mfg. Co. Inc.
Wadsworth, Ohio

Multiple threads merged: please forgive chronology errors and repetition 🙂
Anodizing: coloring problem
Q. Aluminium anodizing for decorative purpose --
1. Why is it so difficult to get the color right from anodizing? The limit range for color is so large that when the two parts are assembled together we can see a big difference - aesthetically no good.
2. Why is it silver color is easier to match then other colors, e.g., blue, red?
Wong Weng Fei- Penang, Malaysia
2001
A. Whole skyscrapers are built of anodized aluminum, so color matching is not an insurmountable problem. But etching, anodizing, dyeing, and sealing can all affect the color. The dyes will appear darker and more saturated if the anodizing is thicker, which is why you may have less consistency problems with the natural silvery color.

Ted Mooney, P.E.
Striving to live Aloha
finishing.com - Pine Beach, New Jersey
Ted is available for instant help
or longer-term assistance.
A. In silver anodizing you control the surface texture obtained by mechanical or chemical treatment (satin or bright) and anodizing conditions (composition, temperature, current density and time). In dyeing anodized film, besides the variables above you have to control colouring solution composition, temperature and time as well. More parameters to control more difficult to get the same appearance.
Timur Ulucakaluminum extrusions & finishing - Istanbul, Turkey
Fixing anodized aluminum color problems
Q. I had some parts anodized. They were supposed to be a satin or matte black. However they came back to me a deep purple color that is almost black but when placed near something gray or black the purple really shows. This is not acceptable to my customers.
At this point I need to have this problem fixed. The company that performed the anodizing is recommending a black epoxy paint to fix it. I am a bit wary of this as other parts (steel & aluminum) will be clamped to the epoxy painted parts and I am worried that they will crack or flake. I am also worried about changes in dimension, conversion of the finish from satin to gloss, etc. The parts do not have to be black but could be anything from 80% grey to black.
What are my options at this point?
Eric Brooks- Oneonta, New York
2002
|
A. The problem could be fixed by stripping the parts & redoing them properly. David A. Kraft- Long Island City, New York A. They should not be a purple black. Something in the anodizer's system is out of "balance". If his suggestion is paint rather than rework, I would ask for my money back and ship them to an another anodizer for strip and re-anodize (that will promise a black black). You will have some loss of material and the surface will be somewhat rougher. Stripping will be an extra cost, but so is painting or remanufacturing. James Watts- Navarre, Florida A. Most black anodizing dye isn't exactly black--they are either very very dark red or very very dark blue. A purplish color usually indicates that the anodizing wasn't thick enough to absorb enough dye to give a full deep black color. I've seen 'basket anodizing' with black dyeing, and you clearly see the parts which anodized right are black, whereas the ones with poor contact and thus thinner anodizing come out purple. So for future parts the best approach may be to require thicker anodizing. 0.0005 inches or more is not at all excessive for black parts, even 0.001 inches is not unheard of. What to do for THESE parts though is a tough one. It's very hard for someone at a distance to tell you whether epoxy paint is a good fix or a shoddy one for the particular instance. A lacquer of a translucent gray tint might be the best compromise between how it looks as delivered and how it will look if chipped.  Ted Mooney, P.E. Striving to live Aloha finishing.com - Pine Beach, New Jersey Ted is available for instant help or longer-term assistance. |
A. The anodic coating was not thick enough to absorb all of the blended ingredients of the particular black dye. In the case of thin coatings the blue ingredients of the blend are preferentially absorbed showing purple.
You have three choices: (1) Anodize to a thicker coating like 0.8 mil, (2) Use a dye that will strike at 0.4 mil, I cannot list commercial products on this program. (3) Change anodizing job shops.

Robert H Probert
Robert H Probert Technical Services
Garner, North Carolina

Acceptable Color Variation on Anodized Aluminum Products
Q. I am an owner's representative on a condominium project in Brooklyn, NY. We have received a delivery of anodized aluminum panels (1/8" thick) approx. 3' x 3' that has what we believe to be severe color variation. Are there any standards that we can refer to that can show us what are acceptable color variation for these panels?
Sam Proviserowner's representative - Brooklyn, New York
April 12, 2010
A. Hi Sam,
I don't think that there any such standards in the UK and I suspect that the same is true of the US.
It is a really fraught subject. Phrases such as "to be agreed between customer and supplier" and "agreed samples" tend to be used in specifications. Perceived color is so dependent on type of surface finish as well as amount of colorant absorbed. I remember being involved is a dispute over anodised and dyed roofing panels. Adjacent panels could look very different even though the anodiser claimed that they were well matched when produced. On this occasion the problem was that the panels had been had been fitted without regard to the direction of rolling (it never occurred to the installer that this was relevant). The effect was like that of a grass lawn mowed in different directions!
Of course, your problem may be simply that it is bad anodising/dyeing.
Harry

Harry Parkes
- Birmingham, UK
A. Color variation on "architectural anodize" should be controllable and less dramatic than with conventional anodizing. There are specific anodizing firms that specialize in just that type of anodizing - they do entire skyscrapers that use large sheets, millions of square feet, of color anodize with little variation. Typically those sheets are quite large - 20-foot to 30-foot long in many cases. Your 3-foot square sheets I'm guessing were done by a conventional anodizing job shop who have less expertise. You might want to contact someone like Keymark in Fonda, NY, who is one anodizing firm that specializes in "architectural" applications. You may have gotten your small sheets done cheap, but your results reflect just that!

Milt Stevenson, Jr.
Plating shop technical manager - Syracuse, New York
Q. Dear Sir,
I use chemical coloring in automatic line to color into gold anodized aluminum parts (chemically polished). The process is carried out correctly, but the parts from the lower rack are darker than those from the top. The rack length = 1 meter, and the coloring time = 45 seconds. The lower part enters and leaves the bath in additional time of 5 +5 seconds. What can be the problem?
Is the coloring bath too strong, or too fast?
I would really appreciate your help.
- Bydgoszcz, Poland
August 12, 2013
Variations in Anodising color
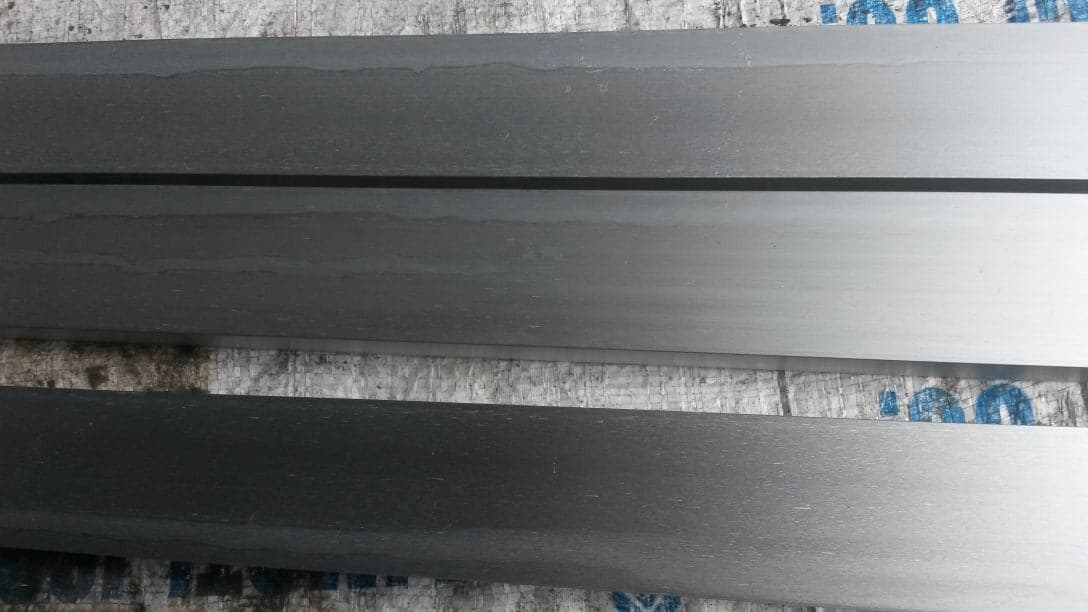
Q. When anodising is done on certain sections, the color is not uniform. There are different longitudinal shades as in the picture enclosed. Why does this happen? How to correct his problem?
- Belgaum, Karnataka, India
July 9, 2014
A. My first thought is it appears to be an inadequate rinsing issue, this especially appears to be the case on the bottom part in the picture. Are the parts racked horizontally, or vertically? If horizontally, is the discoloration always on the top, or the bottom? If vertically, is the discoloration on the inside, or the outside?
Every part in every load have the same problem, in the same area?
Coating thickness on the light areas match the coating thickness in the dark areas?
Water quality of the rinsing you are using?
Dye tank evenly agitated, and filtered?
Could use a bit more info on your process.

Marc Green
anodizer - Boise, Idaho
A. I agree with Mr. Green who commented first. If your rinsing is inadequate, you will see this appearance. My advice, you must wipe it with clean fabric and clean water. If wasn't useful, you must empty your rinsing baths (after anodizing and sealing rinsing) and refill with fresh water. You won't see same appearance. But you must consider rinsing as cleaning, especially after anodizing and sealing.
Alaattin tuna- sakarya,turkey
Q. Can someone help me with my problem, it's about dye activation. Please give me some inputs with the dye activation. Sometimes I cannot gat the color I want and sometimes it's cloudy. Is it advisable to have an air bubbler on the bath to keep the dye activated? It came out with cloudy like appearance.
Jerico payoManufacturing - Manila philippines
December 3, 2018
A. Impossible to say without more information.
What type of dye is it? What are the manufacturer requirements for maintaining it, and are you following them? What are your process steps leading up to the dye? What are your anodizing conditions and are you confident that you have good contact and consistent build across the whole part, with no 'burns'? How clean is your rinse water before dye? Do you use a preconditioning bath (weak nitric acid) prior to dyeing? What is your seal, and what are the conditions in your seal bath?
We can't help figure out what you're doing wrong if we don't know what you are doing to begin with! ;)

Rachel Mackintosh
Lab Rat / WWTF - Greenfield MA
Color matching Aluminium 6061-T6
Q. Hello,
We are experiencing problems color matching what is supposedly Aluminium 6061-T6 (made by 3 different manufacturers).
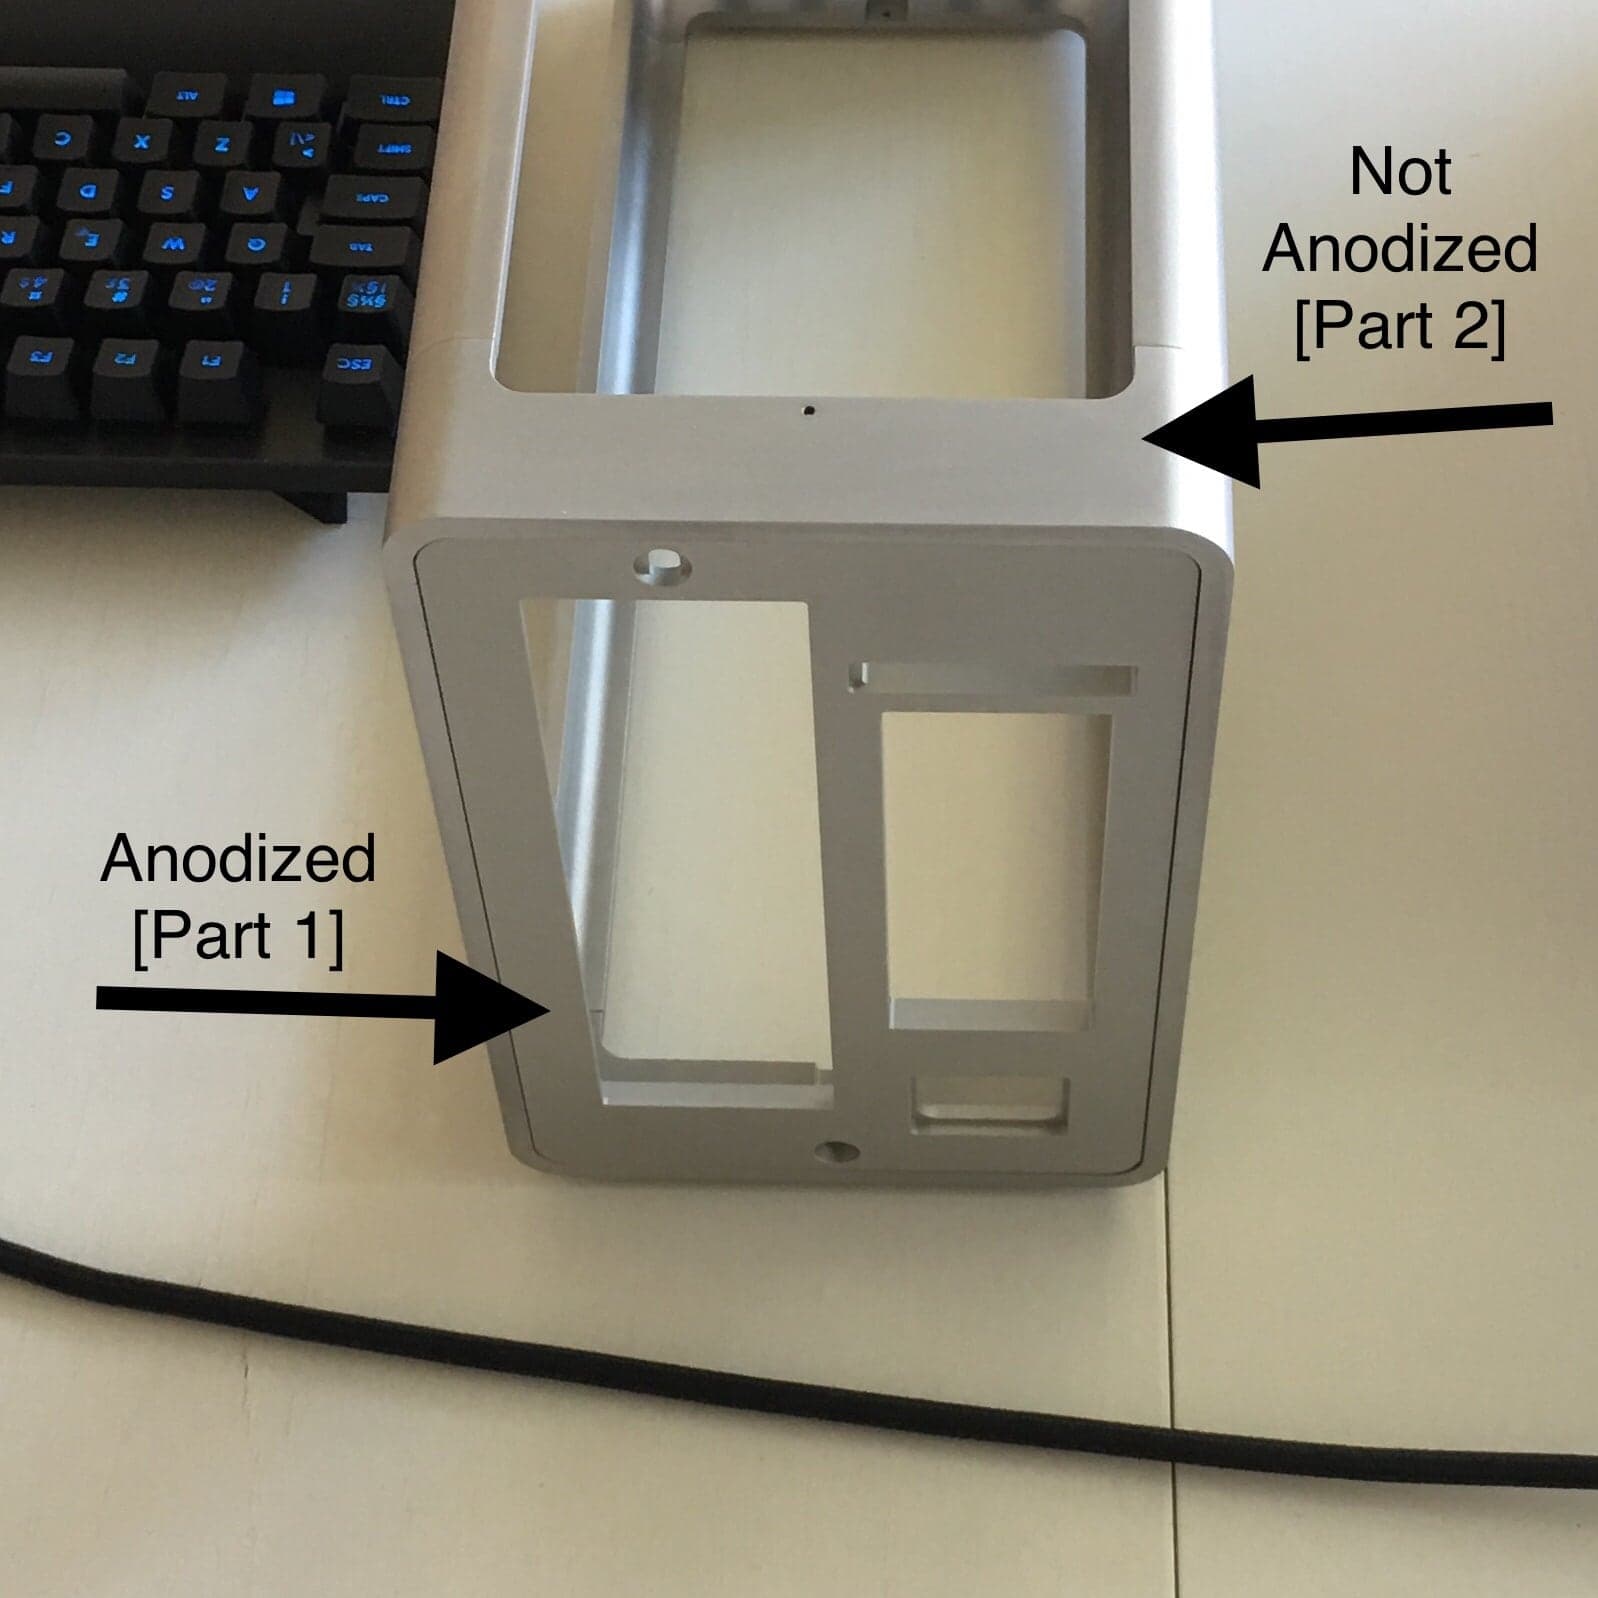
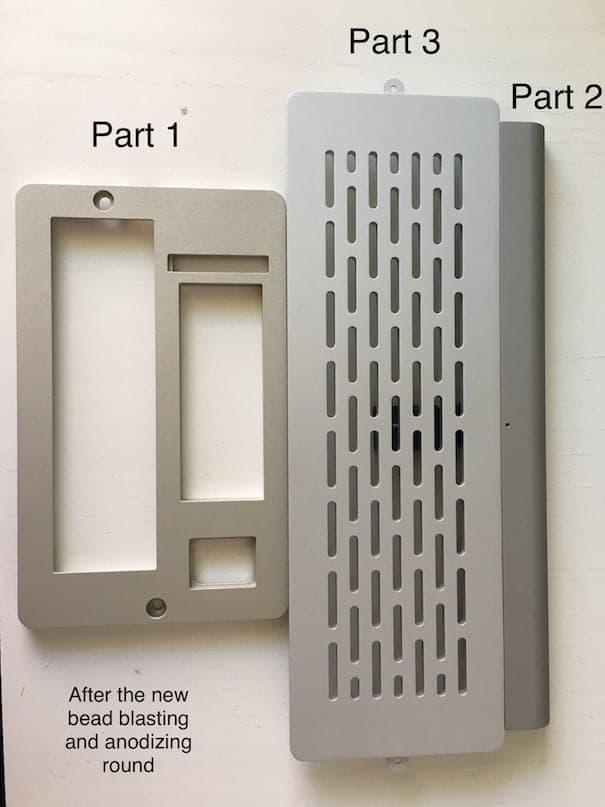
Part 1 - Bead blasting #80 (150-200 µm) & Clear anodized
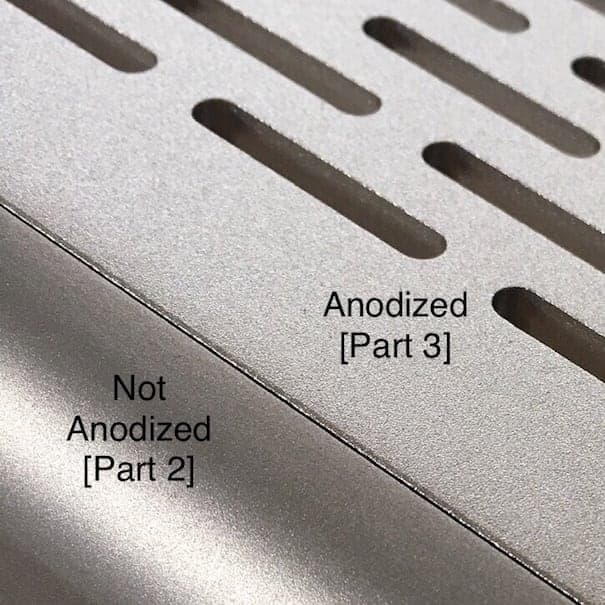
Part 2 - Bead blasting #120 (100-150 µm) & Not anodized
Part 3 - Bead blasting #100 (150-200 µm) & Clear anodized
As can be seen in this image, parts 1 and 2 are very similar (differing mostly in their shine):
Part 2 and 3 differ significantly in terms of shine (very hard to say anything about tone):
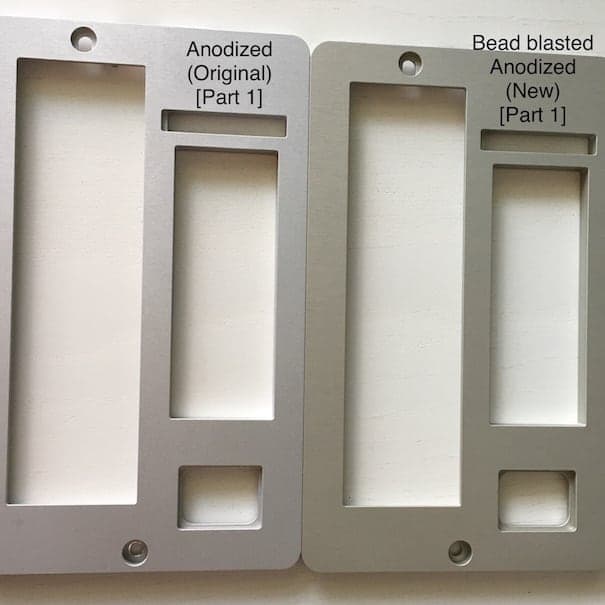
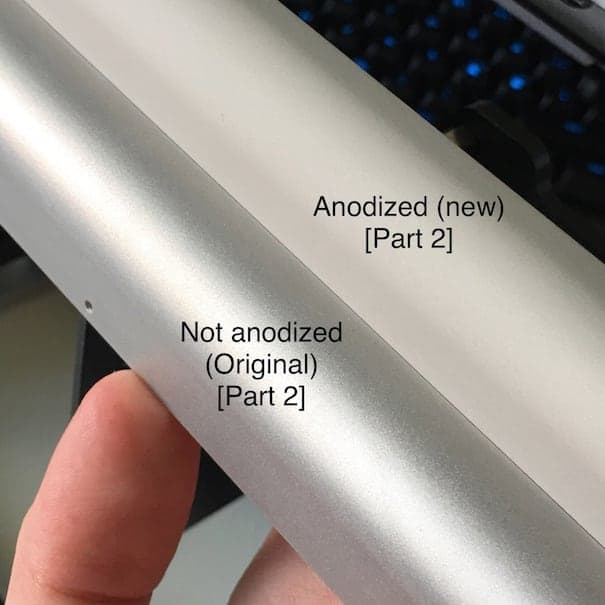
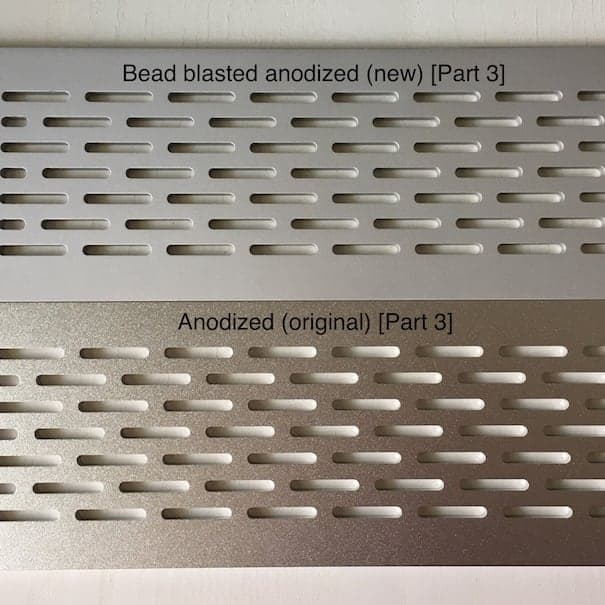
We contacted a Swedish company to bead blast all parts with the same bead size - #120 (100-150 µm) - and anodize them together. Parts 1 and 3 had their previous anodizing layer stripped prior to being re-anodized.
It's safe to say that we didn't achieve color matching:
Part 1 got more yellow:
Part 2 became substantially duller:
Part 3 also became substantially duller, but much lighter than part 2:
My question is:
1. Is it even possible that these parts are the same alloy?
2. What would you recommend we do to achieve a better match? (perhaps color anodize everything in black so it becomes hard to notice differences? Aesthetics are the priority.)
Our goal is a bright-matte finish like Part 2 (but with anodizing of course).
Founder - Sweden
May 29, 2019
A. Hi Alexander. You say part 2 is non-anodized but the dialog and the picture of part 2 anodized is confusing me a bit. Over the years I've read lots of stuff to the effect that with anodized parts 'exact match is impractical', 'close is good enough', 'variations must be expected' ... and then Apple makes a few million iPhones from 6xxx aluminum and every one is identical, and then they repeat the demonstration with the next generation made from more difficult 7xxx.
But getting anodized parts to exactly match non-anodized parts is a whole 'nother issue because the materials and the surface morphologies are very different, which can make things that look identical in one light look different in another. If part 2 must remain non-anodized, perhaps parts 1 and 3 could be black anodized, or another color, so you're not trying for a match.
My only ideas for improving the color match is to etch and de-smut the non-anodized parts the same way the anodized parts are etched and de-smutted because those steps affect the chemical composition of the surface. And anodize only once or always strip and re-anodize.
Regards,

Ted Mooney, P.E. RET
Striving to live Aloha
finishing.com - Pine Beach, New Jersey
Ted is available for instant help
or longer-term assistance.
! Ted,
Except they don't all perfectly match, I have seen the standards books for Apple and they have an acceptable range similar to colour mastering in the auto industry which uses boundary samples of 6 - 9 plaques representing light dark and colour shift.
Operation Manager - Northampton, U.K.
August 19, 2021
![]() Thanks Kevin. I didn't know that, and it's good to learn :-)
Thanks Kevin. I didn't know that, and it's good to learn :-)
Sample boards were ubiquitous all across the metal finishing industry several decades ago, then became quite rare and pooh-poohed for a decade or two. Interesting that Apple uses them or at least digital specs for samples :-)
Luck & Regards,

Ted Mooney, P.E. RET
Striving to live Aloha
finishing.com - Pine Beach, New Jersey
Ted is available for instant help
or longer-term assistance.
A. Since the finish appearance varies with: free acid, dissolved aluminum, temp, current density, impurities, racking to deliver the current: then the closest match must all come out of the same anodizing solution, at the same time.with all the above parameters equal - as Ted says, almost impossible.

Robert H Probert
Robert H Probert Technical Services
Garner, North Carolina

? It is a bit unclear how the already anodized parts were reworked, was it just stripping and reanodizing? or stripping, blasting, and anodizing?
A. Also I guess glass beads were used for blasting? Blasting with glass will leave embedded dust in the aluminum, it will come out during etching/desmut, but it will produce a very dull matte finish at the end after anodizing, not the lustrous look you see after blasting
IMO best way to salvage these parts would be to strip all of them, wet sand them smooth (this is important, you can also use something like WD-40
⇦ on
eBay
or
Amazon [affil link]
instead of water) and blast them again and anodize, that is a lot of work, but will get the best result, if possible, use new clean media and as little air pressure as possible to minimize embedded glass dust, reduce etching time to minimum
The best results I've had with this finish were done using stainless steel ball media, there was still some dust embedded, but it was aluminum dust that etched off nearly instantly (the embedded glass takes longer to get out, longer etch time = duller matte surface texture), the resulting finish after anodizing was much shinier than the one where glass beads were used, it felt smooth to the touch as opposed to sand paper sort of feel when parts were glass bead blasted.
I also remember one time (I think I posted pictures in some other thread on this site) I had to match some glass bead blasted parts to already finished parts that had a lustrous matte finish, and to avoid prolonged etching (to remove surface contamination from blasting) I instead just degreased and anodized them for a short period, like 10-15 min, stripped (being careful not to overetch while stripping) and re-anodized them to 15-20 micron, and got a near perfect match, the reason for the first short anodizing time was to consume the "dirty" layer, and it worked, the first short anodizing turned quite gray quickly (due to all the Si in the surface), and the 2nd anodizing was. This is very tedious, I don't recommend it at all, just saying it worked for me once or twice.
I assume much better results could be had with using brightening bath after etch/desmut, but I don't have that bath, so can't say for certain that it would be the right thing.
- Riga, Latvia
|
A. Firstly, I do not understand why you compare "ANODIZED PROFILE" and "NON-ANODIZED PROFILE" with each other. This issue is completely different...also its against nature of anodizing. This logic will be mislead you. So I agree with Ted. - TURKEY,sakarya A. We've been doing blasted then anodized aluminum work and found that glass bead gave the worst consistency of color (this is even more apparent when dye is involved), which makes sense due to the high silicon content of glass, which can embed in the aluminum. Try Aluminum Oxide blast media and then follow Ted's suggestion for processing.  Rachel Mackintosh Lab Rat / WWTF - Greenfield MA |
A. We have historically supplied very high specification parts to automotive OEMs such as Rolls-Royce, McLaren etc. We have found the only way of achieving perfect match is to machine all parts from the same billet of material and take the additional waste and cost.
Kevin Challenger [returning]Operations Manager - Northampton, U.K.
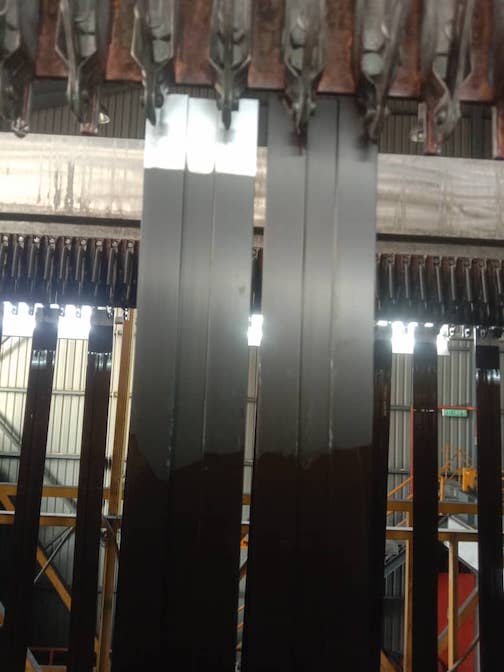
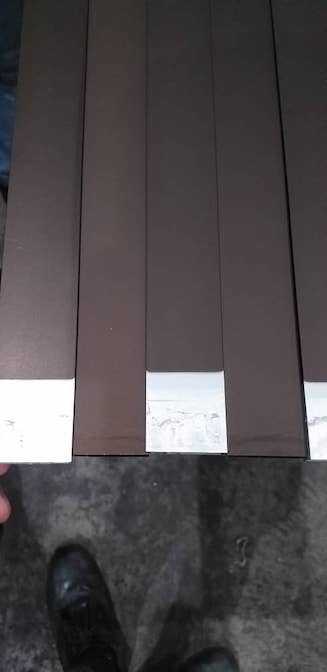
Q. Hi guys, wondering if all of you have severe color matching problem from time to time. My issue is, we have top and bottom color variation (our process is vertical anodizing, then nickel electroplating).
The problem is severe for sandblasted aluminum, where the bottom part will have lesser color than bottom.
Zul Zulfadhli
process engineer - kuala lumpur, malaysia
December 8, 2022
A. The end of the circuit at the bottom is the high current density area. Leave it in longer time, that insulates the bottom and the current moves up towards to top, also shorten the cathodes.

Robert H Probert
Robert H Probert Technical Services
Garner, North Carolina

A. Bob is again right! We always recommend that the cathodes should never extend past the length of the part. That could be a problem in a job shop environment due to various lengths but your setup just magnifies the problem

Drew Nosti, CEF
Anodize USA
Ladson, South Carolina

Q. Hi Mr. Robert. Thank you for the reply.
By leaving it a longer time, do you mean dipping time without current flow? May I ask how long you suggest? Currently, we allow article to dip for 30 seconds before rectifier starts.
- kuala lumpur, malaysia
December 21, 2022
|
|
A. Leave the anodizing going for a longer time so that after the high current density area is insulated, the current will move up to the top and more evenly cover.  Robert H Probert Robert H Probert Technical Services Garner, North Carolina  Q. Hi Mr. Drew, Thank you for your reply. - kuala lumpur, malaysia |
A. Hi Zul. Do I understand that your parts are gripped only from the top -- that there is no anodizing rack to hold them? In that case, a question must be: "What are the dimensions of the part?".
From that we can calculate the current density the parts themselves must carry. If they are very thin and contact is made only at the top, inconsistency could be built in because the parts cannot conduct the necessary current reliably. Hopefully that will not be the case.
Luck & Regards,

Ted Mooney, P.E. RET
Striving to live Aloha
finishing.com - Pine Beach, New Jersey
Ted is available for instant help
or longer-term assistance.
|
|
A. I think that you have variant thicknesses. If you don't have an eddy current meter purchase on one check the thickness in different areas of the part. I'll bet my standard Cup of Coffee and donut there is a wide range.  Drew Nosti, CEF Anodize USA Ladson, South Carolina  A. Leave the anodizing going for a longer time so that after the high current density area is insulated, the current will move up to the top and more evenly cover.  Robert H Probert Robert H Probert Technical Services Garner, North Carolina  Q. I see, Robert. I have actually done that, and it did work. When anodized longer, the color at the bottom will be lighter than the top, as if the bottom side is insulated more. - kuala lumpur, malaysia December 23, 2022 Q. Hi Mr. Ted, - kuala lumpur, malaysia December 23, 2022 |

Aluminum How-To
"Chromating - Anodizing - Hardcoating"
by Robert Probert
Also available in Spanish
You'll love this book. Finishing.com has sold almost a thousand copies without a single return request :-)
A. Hi again Zul.
Sorry, but I don't understand what you are doing. Are you saying that you subsequently nickel plate the sulfuric acid anodized surface? Or are you saying that part of the profile is anodized and part is dyed. I can't understand what "the color setting" as opposed to "the anodizing setting" has to do with anything.
Please take a moment to explain what these parts are, are used for, and overall processing sequence. Thanks.
Luck & Regards,

Ted Mooney, P.E. RET
Striving to live Aloha
finishing.com - Pine Beach, New Jersey
Ted is available for instant help
or longer-term assistance.
Q. Hi Ted, Sorry its been a long time.
Yes, we anodized first with sulfuric acid, then electroplate with nickel bath.
- kuala lumpur, malaysia
June 16, 2023
A. Hi Zul, lots going on here, i can only speculate as I'm trying to follow your process...
Color has a light/dark gradient...
Are your tank cathodes set up properly; do you have good agitation.
How do you agitate the dye tank? Yes, they can be quite prone to settling [azo dye experience, your mileage may vary ].
Have you taken thickness measurements to see if it's a variation in build along the spines? Eddy current readings?
You are processing further after dyeing? What are you doing for seal, in between,
And do you know how robust it is? Are you really seriously nickel plating after anodize? Getting beyond my experience with that, but there are some things to consider.
If you plan to clean off certain bits and then run through a totally unrelated process... you're going to have to look at how the second process affects the first; depending upon the application, this may mean destructive testing of a finished sample.
I know less than nothing about nickel plating, but once the seal on a dyed anodized part is compromised, you've lost control of the final product.

Rachel Mackintosh
Lab Rat / WWTF - Greenfield MA
June 25, 2023
Q, A, or Comment on THIS thread -or- Start a NEW Thread

