
| Search our quarter-million Q&As |
Home of the finishing HOTLINE since 1989
-----Grain structure visible through anodising
Q. I am currently having a problem with black anodising grade 6061 aluminium. The parts are cylindrical with and OD varying between 1 and 3cm. When the parts are black anodised the coating replicates the grain structure underneath and appears mottled, this is not passing quality inspection as the coating does not appear uniform (even though it most probably is). Can anything be done while anodising to prevent this or is there something that can be done to treat the aluminium to reduce the large sized grains evident on the surface? Or, would a different aluminium grade be better?
The parts also require turning, so that an easily machinable aluminium is required prior to the anodising.
Is the "mottled" effect due to the extrusion of the aluminium and the severe grain growth experience on the exterior of the rod because of this?
Any suggestions would be most welcome.
Katrina Parlevliet- Ringwood, Victoria, Australia
2002
|
A. Is your alkaline etch loaded with zinc from previously running 7075? Is the alkaline etch too high in dissolved aluminum. What are you deoxidizing in, how long, concentration, contamination level. Is the anodizing solution over 12 gm/L of dissolved aluminum? Can you see the mottled look after anodizing and before dying, if so try dipping in 5% Nitric Acid before dying. Is there high calcium in the dye? Is the dye tank stainless steel, then reverse the galvanic cell any which way you can. Try dying a piece in a beaker [beakers on eBay or Amazon [affil link] in the lab in a new make-up to see if the dye tank is contaminated.  Robert H Probert Robert H Probert Technical Services Garner, North Carolina  2002 A. Your anodizer is over aggressive in his etching, probably using a hot caustic or strong nitric / hydrofluoric acid etch. Suggest using NO caustic etch and only chromic/sulfuric deox prior to anodize. If indeed the grain is from the extrusion process, might try one of many acid "matte" etch products which tend to be elevated temperature fluoride baths.  Milt Stevenson, Jr. Plating shop technical manager - Syracuse, New York 2002 |
A. Katrina,
I think that your evaluation is correct. I do not believe that it is anything to do with the anodising.
6061 is a 'hard' alloy and can be difficult to extrude AND achieve required mechanical properties.
I do not think that you can be confident to ALWAYS have a grain free appearance - the effect is merely cosmetic.
Try keeping the etch time to the absolute minimum.
Also, 6061 is one of the best free machining 6000 series alloys, especially in T6 condition.
If you do not need high mechanical properties, you are probably aware that you could use 6063 or 6060 - this will be far less likely to have the grain effect, BUT, machinability would be compromised.
Best regards,
Martin Webb- New Zealand
A. Are you sure your material is 6061? 7075 has a strong tendency to show grain structure when etched and anodized.
Guy Lester- Ontario, California, USA
2002
Sandy feel and grainy look along edges on thin aluminium anodised plates
May 6, 2015Q. We have just moved premises and have had a small natural anodising job. The sulfuric acid solution is 10% (analysed), solution temperature is 24 °C and the voltage is measured at 4.5 V.
we are getting a very sandy rough finish to the surface with extreme roughness along the thin edges. We are using titanium jigs.
We are using lead anodes and there is a large deposit of white fine crystals on the anodes and in the bottom of the the tank. The tank is polypropylene.
Part looks fine after cleaning and activation
Can you suggest what the problem might be?
Much obliged
Steve
plating shop owner - Cape Town, South Africa
Hi Steve. When you say you "just moved premises", you seem to be implying that you were anodizing successfully until the move ... or am I misreading you? If that is what you are implying, were you able to retain the employees who were delivering good parts before the move?
Three more quick notes: first, it's usually hard to make much progress here until you tell us the alloy, since aluminum alloys behave so differently when anodizing. Second, you say the part looks fine "after cleaning and activation"; what do you mean by activation? Third, satisfactory anodizing at 4.5 V sounds very unlikely to me.
I think we may be able to help you work through this, but we'll have to clearly understand exactly what you are doing before we can tell you what it is that is perhaps being done wrong. Thanks!
Regards,

Ted Mooney, P.E. RET
Striving to live Aloha
finishing.com - Pine Beach, New Jersey
Need quick confidential answers? $25
Need project assistance? $100/hr.
May 2015
A. Couple of observations, but I agree with Ted, we should be able to figure this one out with more info.
1. 24 °C is a little high but not terrible. 21 °C would be preferable.
2. As Ted mentioned 4.5 volts is not enough. For Type 2 anodizing, you'll want a rectifier capable of 21 volts.
3. It almost sounds as if your tank is wired wrong, especially since you mention "lead anodes". You do realize that your lead (ideally you would use aluminum, not lead) acts as the cathode, and should be hooked up to the "-" (negative) output of your rectifier, right? It almost sounds like you wired backwards, and are plating onto your part, instead of anodizing.

Marc Green
anodizer - Boise, Idaho
May 7, 2015
Grain Marks on Etched 6082 Aluminum Surface
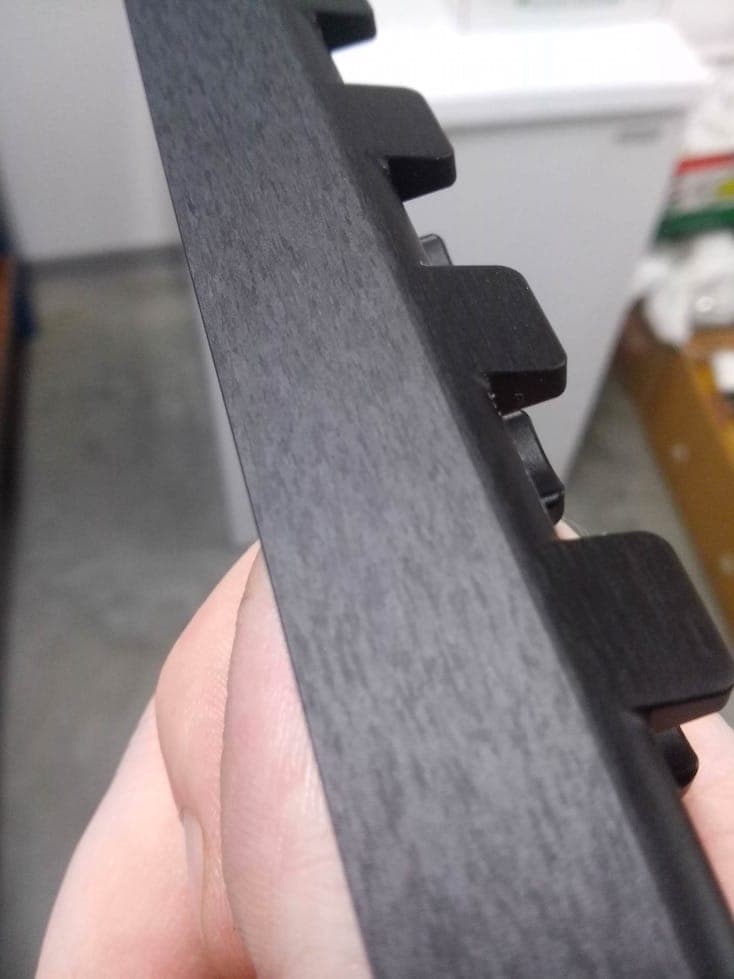
November 2, 2015Q. I have a problem with grain marks on the Aluminium.
We use Aluminium 6082T651 which is CNC Machined. No grain marks visible after machining. Thereafter we Etch and Natural Anodise. Well, just after the part gets anodised^etched we start to see the lines/grains of the material. This is not very pleasing and we require a more satin matte finish (the Apple aluminium finish)

No brushing or polishing is done to the part.
Material is Alu 6082 T651 (Nedal Aluminium Germany)
caustic soda ⇦liquid caustic soda in bulk on
Amazon [affil link]
Etch = 60 g/l
Alu = 100 g/l
Additive (Al 5000) = 30 g/l (Metachem Germany)
Temperature = 65 °C
User - Centurion, Pretoria, South Africa
|
A. Use a less aggressive etch. Addition of something like gluconic acid or sodium glutamate might help. James Watts- Navarre, Florida November 3, 2015 A. Two comments:  Jeffrey Holmes, CEF Spartanburg, South Carolina November 4, 2015 A. Juan - Colorado Springs, Colorado November 5, 2015 |
|
November 6, 2015 Q. Thanks for the support guys. - Centurion, Guateng, South Africa A. Good day Juan. Aerotek Mfg. Ltd. - Whitby, Ont., Canada November 6, 2015 |
|
A. Unless your etch concentration is very low, 5 minutes sounds extremely long to me. I'm surprised your machining tolerances aren't affected by such a long etch. Why are you going so long? Marc Green anodizer - Boise, Idaho November 8, 2015 A. Juan - Colorado Springs, Colorado November 9, 2015 Q. Eric - We require a smooth matte "Apple finish" to describe it best on our parts. The internal surfaces/faces of our parts are not that important but the outer faces and surfaces are what is important. - Centurion, Guateng, South Africa November 9, 2015 |
November 9, 2015
Hi Juan,
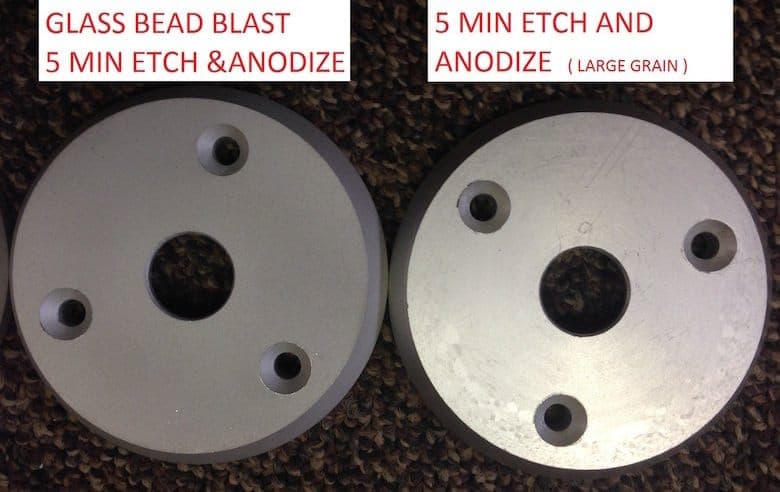
You are on the right track with the glass beading. We do that here regularly to hide the large grain structure that can pop up when you don't want it on extrusions or plate.
I am not familiar with the'wet' blasting (we just use compressed air), but you will have to do some experimenting with how long you etch the parts once they have been blasted. We are usually in the neighborhood of 3 min to 5 min in our caustic no-dump etch bath.
I have attached some pictures of parts cut off a 3" dia rod of 6061. The bad part with a 5 min etch and anodize and the glass beaded part with a 5 min etch and anodize.
Hope you have blast working on your parts.
Cheers,
Jeff Holly
- Toronto, Ontario , Canada
|
November 10, 2015 Dear Marc Green, - Centurion, Guateng, South Africa A. Good day Juan. Aerotek Mfg. Ltd. - Whitby, Ont., Canada November 10, 2015 |
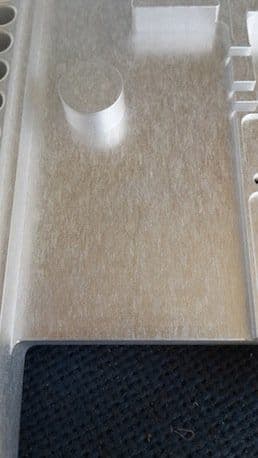
Q. Hello, we have a trouble with grain structure visible on AL-7022 machined parts. From what I've read it is caused by too long etching. We need to find a way to cover the grain structure. In many cases rubbing it with liquid paraffin into the surface makes it a little bit darker and hides some defects. In this case, however, it is not entirely enough. Does anyone have and idea what might work? Re-anodising is sadly not possible due to tolerances that must be adhered to.
Here's what it looks like:
- Prague, Czech Republic
December 8, 2017
Etch grain problem
Q. Recently I had discovered that my company's etch tank had "fallen out" and needed to be remade with none of the fallout present as this was limiting our etch's potential. Before I had made the new etch, we were removing around 0.1-0.2 mil per side of a part. I was recently informed at an anodizing conference that etches are actually supposed to remove around 0.8-2.0 mil. So I removed the fallout and made the etch better, and now we are removing around 0.6 mil (I can remove more but I am waiting for the manufacturers to catch up to the change).
The new problem I have been seeing since making this change is a grainy pattern appearing in non-sandblasted parts. Sandblasting seems to prevent this issue from occurring, and it doesn't happen to every single part we get, but I have seen it in 6061, 7068, 2011, and 6063 for sure.

At first I thought it was galvanization. Various sources have told me this can occur in etch tanks with higher than 5 oz/gal Aluminum or higher than 5 ppm zinc. However, I tested both a cut back solution (25% old etch, 75% new) as well as a brand new etch solution and still saw the problem. I also tested whether or not it could be cutting oil still left on the parts from machining. I swished a part in acetone
⇦ on
eBay
or
Amazon
[affil link] Flammable!
for 10 seconds, then soaped it for 15 minutes, then swished it in acetone
⇦ on
eBay
or
Amazon
[affil link] Flammable!
again before etching and still saw the issue.
I am running out of places to look and would appreciate any input anyone might have regarding this strange grainy appearance.
- Keene, New Hampshire, United States
November 14, 2018
A. In a side 5 gal bucket see what happens when you add 1 oz/gal sodium fluoride and a smidgen of hex chrome (from the chromate or the chrome plate). You should see a finer grain.
Robert H Probert
Robert H Probert Technical Services
Garner, North Carolina
November 14, 2018
A. I see this exact problem with some customer parts (about 5%, couple thousand parts in total); my theory is that it has to do with extrusion process of the base material.
The parts I saw this on were milled on all sides made from 1" * 3" extrusions (6082), then this extrusion is cut into length, and machined, scotchbrite wheeled for cosmetic purposes on one side and perimeter; the defect shows up only on the scotchbrite wheeled surface. Remedy was to to lightly scotchbrite affected surfaces on parts after etching (straight NaOH 30 gr/l 60 °C 45 sec) and then anodize -- sometimes the "staining" still reappears after anodizing, but very slightly, almost not noticeable, mostly it isn't noticeable at all.
And the parts are hung on the fixture in multiples of 10 -- 9 might be fine, one might have this defect, the part may be like 6th counting from top (other times it will be near top of a rack, or bottom, it is totally random), so it isn't related to part spending more/less time in etch or rinses, etc.
So, as I said, my theory is that it is related to extrusion process, like parts cut from the beginning or end of the blank will be affected, and middle parts will have no problems whatsoever, and the effect seems to be more pronounced if the final machined surface was close to outside dimension of the blank, meaning very little amount of thickness was milled off, because the other side, where more material is being removed, shows no signs of this "staining"
Spending less time in etch helps, but sometimes etching is a prerequisite to get the desired texture.
- Riga, Latvia
November 15, 2018
A. In my opinion this is a coarse grain structure from the production of the semi-finished product, e.g., coarse grain during extrusion (often only partially, for example pressing end, only one portion is affected).
Sandblasting will only hide the problem. The surface is a bit rougher and so the coarse grain is not so good visible.
With a stronger etching or a thicker anodized layer, the coarse grain is also more visible.
It is important to improve the material quality. Improve extrusion process and quality control of the material.
- Hallau, SH, Switzerland
December 4, 2018
Aluminum Frame anodizing - how to prevent white spot at the frame joining
April 22, 2019Q. I'm doing a frame by joining 2 piece of extrusion aluminum plate. The problem is when I did the black anodizing,
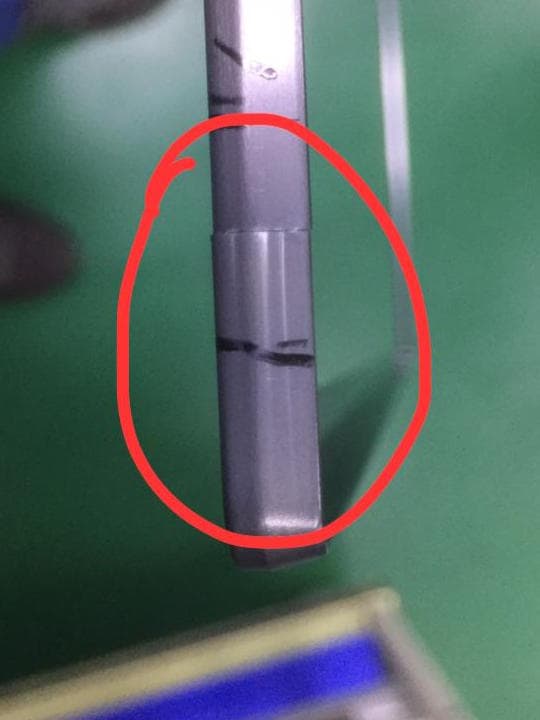
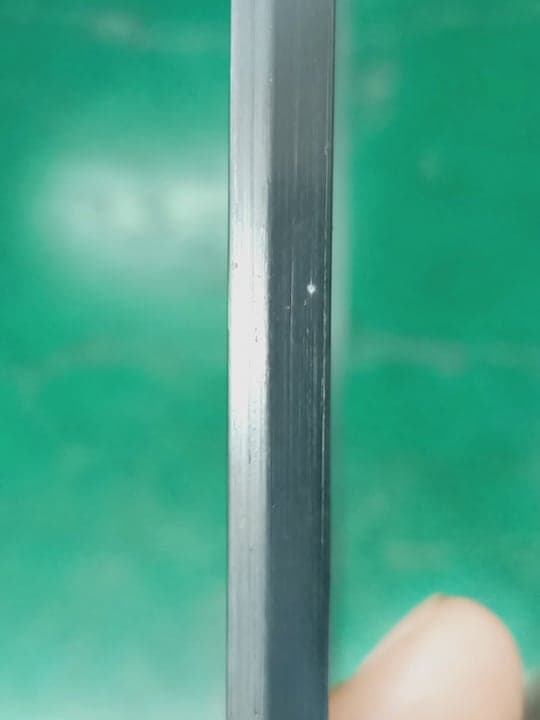
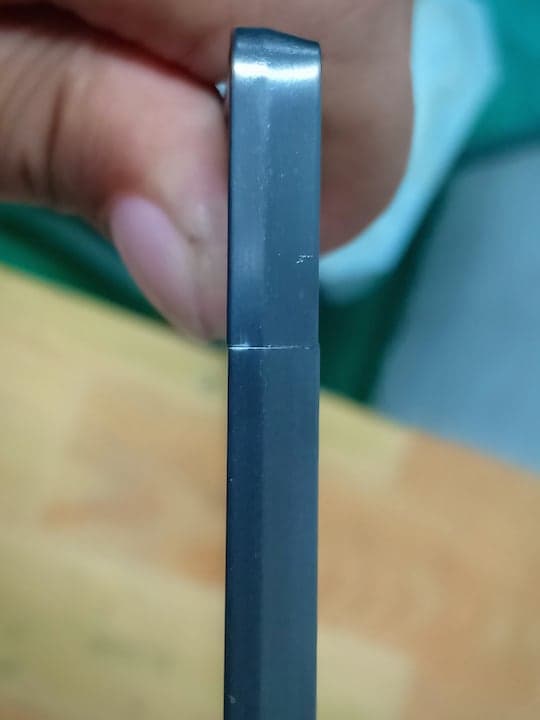
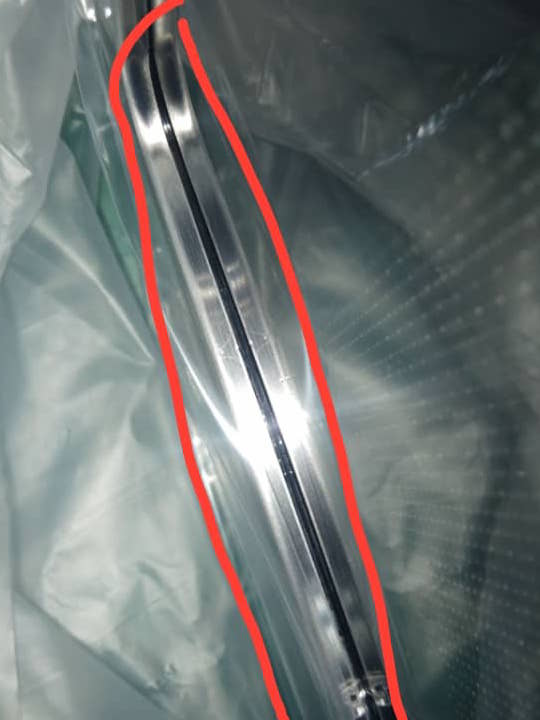
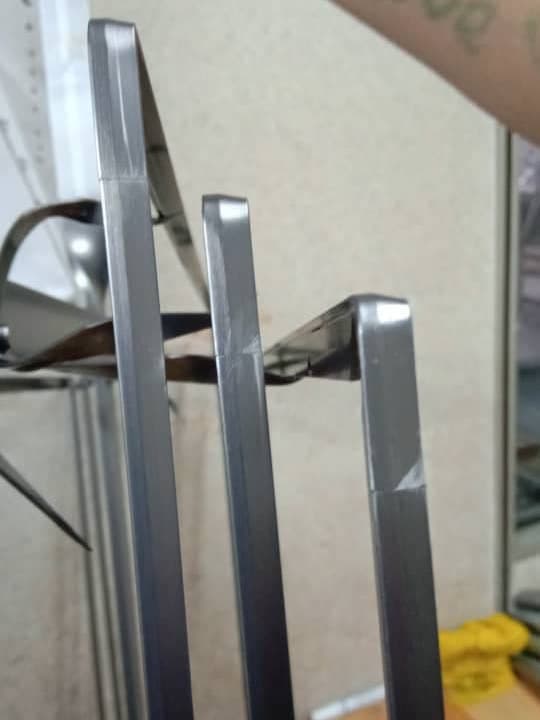
The joining will have some sort of acid flow mark. I used aluminium jigs and at one time, I can produced 5 frames. Not all will be affected though. Rejection will be about 50%. What's wrong?
Othman AliI'm a QC manager, supporting my anodizing sub con - Selangor D.E., Malaysia
April 2019
A. Hi Othman. I'm having a lit bit of trouble understanding the question because you speak of problems in black anodizing, but at least 4 of the pics seem to be showing us clear anodizing.
In pic 1 the lower piece has what might be flow marks -- it's hard to see because of the reflection in the lighting; the upper piece seems to have some whiteness right at the end, but are you sure this is not mechanical damage from assembly?
In pic 2 I see a white spot, but also some fairly deep lines which look to me more lie scratches than flow defects.
In pic 3 (I guess this is "black" anodizing), I'm not sure what those 5 or 6 little pits are in the upper piece, and I find it rather strange that the white marks at the joint line up so well from the top and bottom piece. Are you sure these pieces aren't rammed together causing the damage?
In pic 4 there is so much reflection that I can't see much.
In pic 5, those large triangular marks on two components look to me like burning from excessive heat, poor positioning, or whatever.
I think we need a more deeply detailed description of what you feel the problems are and where they start. Further, you probably need to visit the anodizing subcontractor and 'walk the line' and learn exactly where the defects occur if you haven't. But hopefully another reader can be more insightful than I. Good luck.
Regards,
Ted Mooney, P.E. RET
Striving to live Aloha
finishing.com - Pine Beach, New Jersey
Need quick confidential answers? $25
Need project assistance? $100/hr.
A. What Ted said PLUS, where two pieces are joined the gas evolution from the back side is diluting the solution at that joint, these are not "white spots" they are the anodic coating from continuous diluted anodizing solution. The fix is to completely join the two pieces with no gap and no edge sticking up to draw extra current.
Robert H Probert
Robert H Probert Technical Services
Garner, North Carolina
April 23, 2019
A. Hmm. I assumed the tubes were anodized before joining. Maybe I was oblivious.
Regards,
Ted Mooney, P.E. RET
Striving to live Aloha
finishing.com - Pine Beach, New Jersey
Need quick confidential answers? $25
Need project assistance? $100/hr.
April 2019
Sorry! Finishing.com is temporarily Read-Only.
Ted Mooney is retiring but I have several offers to take it over.
We're working hard to make sure we find it the best new home.