
| Search our quarter-million Q&As |
Home of the finishing HOTLINE since 1989
-----Tips for bottle cap tables
|
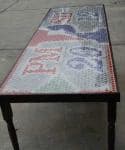
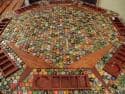
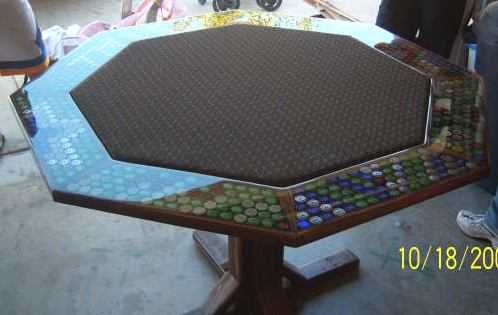
built by Jeremy Melis: |
May 19, 2021 I love that this thread is old and still semi-active ... and accessible. - Appleton Wisconsin ⇩ Similar, related, Q&As -- oldest first ⇩ Q. Recently, several friends and I have started a very unusual project. Using beer bottle caps (over 2500), we are constructing a very unique mosaic-style table top. However, we have not come up with a good method for "sealing" the gaps between the caps in order to create a smooth, level table top. One idea we are currently exploring is the use of a very thick (~1/4 inch) layer of exterior polyurethane. This presents three major concerns. 1) Will it dry if applied in a "pour and spread" fashion? 2) Is the polyurethane too volatile to use on the painted/colored bottle caps? 3) Will the polyurethane bond to the metal at all? Can you please provide me with any suggestions or insight you may have into solving this problem. Is there a better material, or will polyurethane be sufficient? For the record, the caps are secured with poly-resin to a wood surface. The caps are arranged in hexagon fashion which minimizes the amount of "gap." The table is 7x3, and has a frame surrounding it which makes the cap surface appear recessed. The plan is to have a clear coating which comes up to the level of the frame, thus making the entire table top level. Thank you for your anticipated help. William Holby- Pittsburgh, Pennsylvania 2002 A. I have seen bar tops done using a two part clear mix. You might check with an arts and crafts store for the material, or maybe a hobby shop. The 2 part mix cures by chemical reaction, so it does not need the air. I think a thick poly coat would take very long to set up and would not give the surface you desire. Good luck, Ed Kay- St. Louis, Missouri 2002 A. U.S. Composites sells Epoxy Resin which is the product most commonly used on bar tops and table tops in many bars and restaurants. You can purchase this epoxy through their website and print the directions for use. Product Description: - Centreville, Virginia 2004 Ed. note: An alternate source is Envirotex Lite according to another writer (see letter 12362). Plexiglass vs. pourable epoxyQ. I have collected a TON of bottle caps to make a table! - Chicago, Illinois February 20, 2008 A. Use two part self-leveling epoxy. just go to your local paint store and pick it up. its not cheap tho. Josh vanslovie- brick, New Jersey July 31, 2008 Q. William, - Dallas, Texas October 8, 2008 |
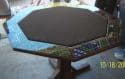

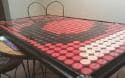
Update: We finished our poker table, and it looks great. The resin is both easy and a pain in the butt. Requires much patience. We'll be making more tables.
- Dallas, Texas
October 30, 2008
|
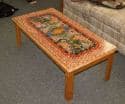
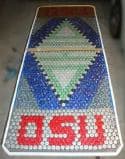
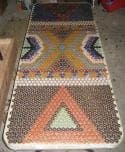
built by Nick Deihi, Wallingford, PA |
Q. Jeremy, I am thinking about doing a poker table very similar to yours, but I am thinking about doing the whole table instead of the outside. Do you have a problem with cards or chips sliding on the Kleer Kote? Scott Phillips- Edwardsville, Illinois January 25, 2009 A. Scott, I think I misunderstood originally--thought you were talking about putting cards or chips in the resin, and were asking about them sliding around while pouring it. If you were just talking about the playing surface itself, I think it would be fine. There's only about 5" around the perimeter on ours, but it's decent for moving chips and cards on. It's actually probably a little less "slidey" than the felt we have in the center, so I don't know how well a card would slide all across it, but it's probably manageable.  Jeremy Melis
- Dallas, Texas January 26, 2009 |
Does epoxy discolor photos?
Q. So will the epoxy clear coat discolor, say, photos? Would you laminate them first?
Brian Kleinfall- Dallas, Texas
February 19, 2009
Q. I am planning on doing the same thing for a beer pong table. How did you keep the beer caps down? Did you adhere them to the table before applying the resin or did you put them in between layers of the resin?
Emery Dudensing- Abilene, Texas
February 26, 2009
Glue down the bottlecaps or let them float?
Q. I'm also making a beer pong table but I had a few questions. Should I adhere the caps to the table first so they won't float in the epoxy? And if so what's the best type of adhesive to use. Also with the epoxy that has to be mixed does it create a lot of bubbles in the epoxy itself?
Mike Marks- Boston Massachusetts
March 1, 2009
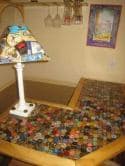
A. When we did this table, I put a "seal coat" (thin layer) of the resin down to seal off the wood. If you wanted to, you could put your caps down directly on this while it's drying. We waited until the seal coat was dry, and adhered them to the table w/ plain old Elmer's school glue (just squirt some on cardboard, press/scoot your cap around on it, and then place on the table). Floating caps aren't a big problem, but you want to stick them to the table one way or the other, or it makes it difficult to spread your first 'flood' coat out and get between them all. On our next table, we'll probably glue the caps to the raw wood, and then seal coat the table and caps at the same time to save a little time.
As far as bubbles go in the resin itself, buy some of the mixing tubs and sticks (or use a paint stir stick). Stir slow and steady, and you won't get too many bubbles. Also, I found I had more bubbles if I measured the resin and hardener separately and poured into a 3rd container...it's better to measure separately, and pour the hardener into the measured resin container.
Your big bubble problem is going to come from under the caps and from the resin as it dries. Tip: don't spend too much time trying to work the material around and get it flat...it self levels. As soon as you're pretty confident that you've got material in all the nooks and crannies, jump on a hair drier and start popping bubbles. You'll notice that some caps seem to have a million bubbles underneath them. Once you get past the first 2 coats, cap bubbles aren't a problem, and you can focus on the resin bubbles. don't shortcut that part--stay with it at least 1/2 hour popping bubbles.
As for the photo question...the resin website says that if you seal coat the photo with a thin layer of the resin prior to flood coating, you should be fine.
Jeremy Melis- Dallas, Texas
March 18, 2009
What lacquer to use, where to get it, what does it cost?
Q. Hey, another pong table question:
1. What type of lacquer/resin did you use exactly, and what was the cost.
2. Will a ping pong ball bounce on it? Thanks.
- State College, Pennsylvania
March 30, 2009
A. Response to bubbles in the resin...
If you apply heat to the resin, the bubbles will go away. I have used a torch to do this and it takes less than a minute to make the bubbles go away.
Good luck with all of your projects and hope this helped.
- Plano, Texas
April 6, 2009
April 30, 2009
Q. What would be the best way to contain the resin to only the areas over the caps? For example, if you wanted the caps going right to the end of the table/wood, would a small piece of trim attached to the end suffice for containing the resin? Would a small bead of caulk between the edge and the trim be enough to hold in the resin? Any insight from people who have used the product would be awesome!
[surname deleted for privacy by Editor]- Rhode Island
A. The way I did it was to build up "fences" around the exterior perimeter, and around the interior edge of where the caps would be. Also put in wood separators between sections since the cap shape and size didn't make for perfect octagonal sections. All of these elements were about 1/2" high overall. I wanted a completely smooth surface, so I poured the resin in layers (approx. 1/8" each) until the resin went over the top of the "fences", and ran over the sides. That's what I recommend, as it self-levels, and gives you a slightly rounded edge automatically. All you have to worry about then is smoothing the side edges while the resin is wet, and grinding down the hard drips around the outside bottom and the overflow around the inside.
As for the caulking question, if you glue down your "fences" you shouldn't have too much of an issue w/ seepage. Plus, the first coat you'll do would be a seal coat (thinner than the remaining flood coats), which when dry, would help close up any gaps prior to the flood coat.
Jeremy Melis- Dallas, Texas
May 7, 2009
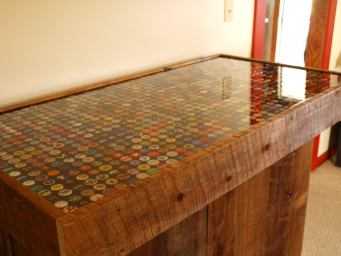
![]() It was very generous of you to share your photograph and such deep detail regarding how to do it, Jeremy. Awesome work. Thanks!
It was very generous of you to share your photograph and such deep detail regarding how to do it, Jeremy. Awesome work. Thanks!

Ted Mooney, P.E.
Striving to live Aloha
finishing.com - Pine Beach, New Jersey
Need quick confidential answers? $25
Need project assistance? $100/hr.
May 12, 2009
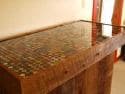
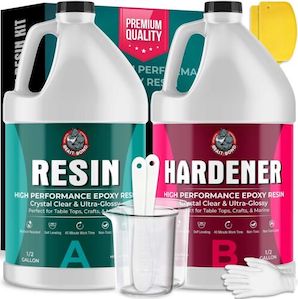
A. I had good results with the US Composites Kleer Kote table top epoxy. I built a portable bar and used the epoxy to encapsulate bottle caps for the bar top.
more pics:
http://s616.photobucket.com/albums ... cap%20bar/
- Northampton, Pennsylvania
May 26, 2009
Ed. note: Thanks, Ron. Looks great!
Update June 2013, sorry, looks like Ron isn't maintaining the photobucket site anymore.
(you are on the 1st page) Next page >
Sorry! Finishing.com is temporarily Read-Only.
Please maintain your bookmarks! Although Ted Mooney is retiring, finishing.com is not!
It will have a new owner/curator very shortly!